Introduction to OIDC
OIDC (Open ID Connect) is an identity layer built on top of OAuth 2.0, designed for authentication purposes in Single Sign-On (SSO) systems. It allows clients (such as web or mobile applications) to verify the identity of end-users based on authentication performed by an authorization server. In OIDC, identity information about the user is provided through JSON web tokens (JWTs), which contain claims such as user ID, name, email, etc. These tokens are securely exchanged between the client, the authorization server, and possibly the resource server. Overall, OIDC enhances OAuth 2.0 by adding standardized authentication functionality, making it easier for applications to verify the identity of users across different services in a Single Sign-On environment.
Create OIDC Connections with Okta
OIDC stands for Open ID Connect, which is an authentication layer built on top of the OAuth 2.0 protocol. It enables clients (such as web applications or mobile apps) to verify the identity of end-users based on the authentication performed by an authorization server, as well as to obtain basic profile information about the user.
SSO.ID endpoint for okta configuration with OIDC
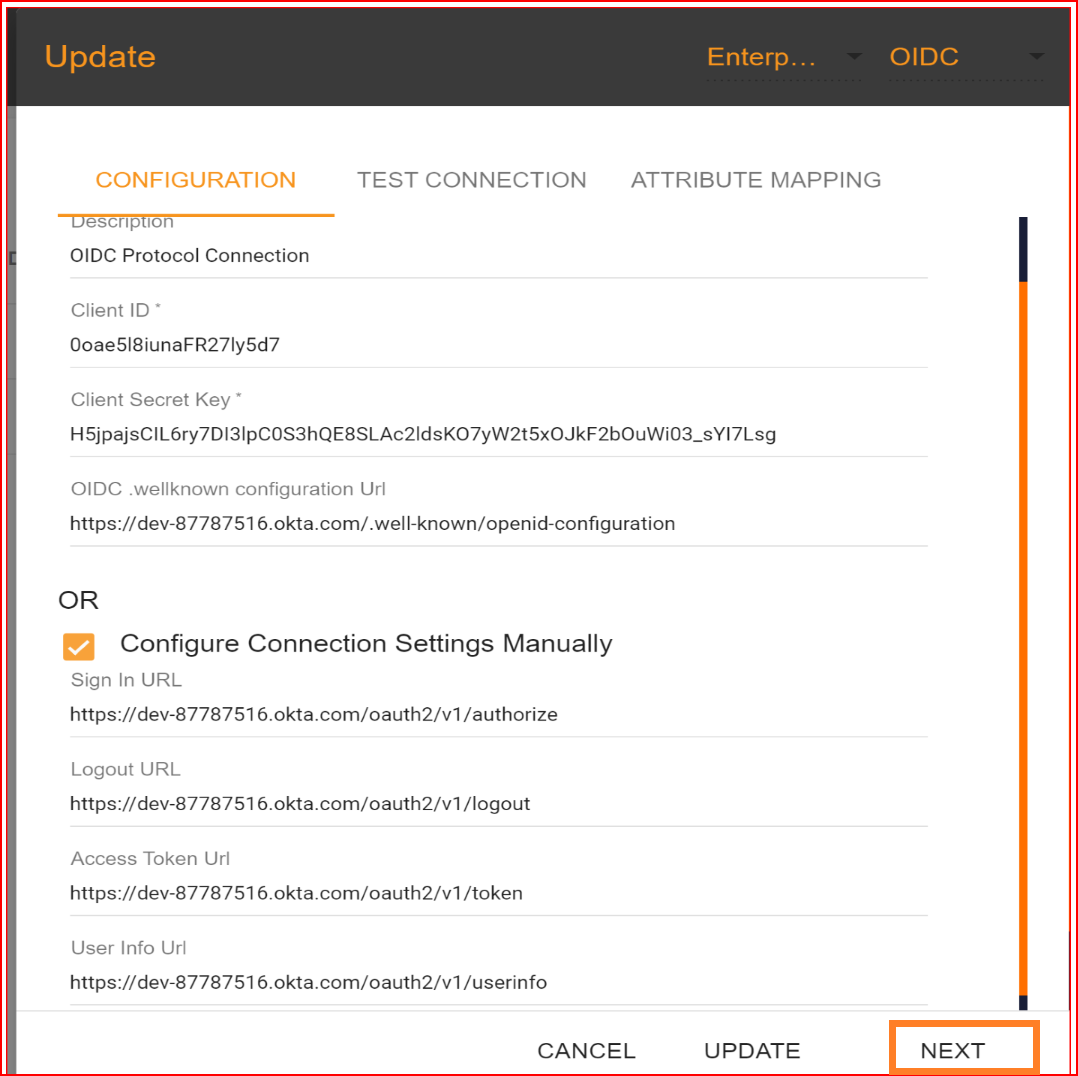
Name Enter the valid and complete name of your newly generated connection.
Description Write a short description of your connection.
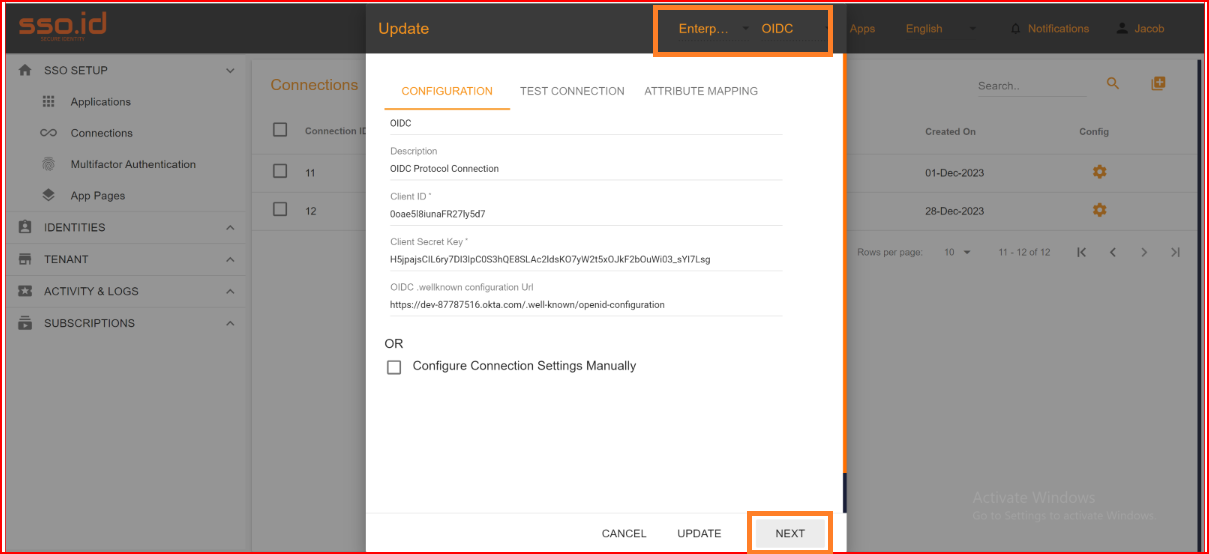
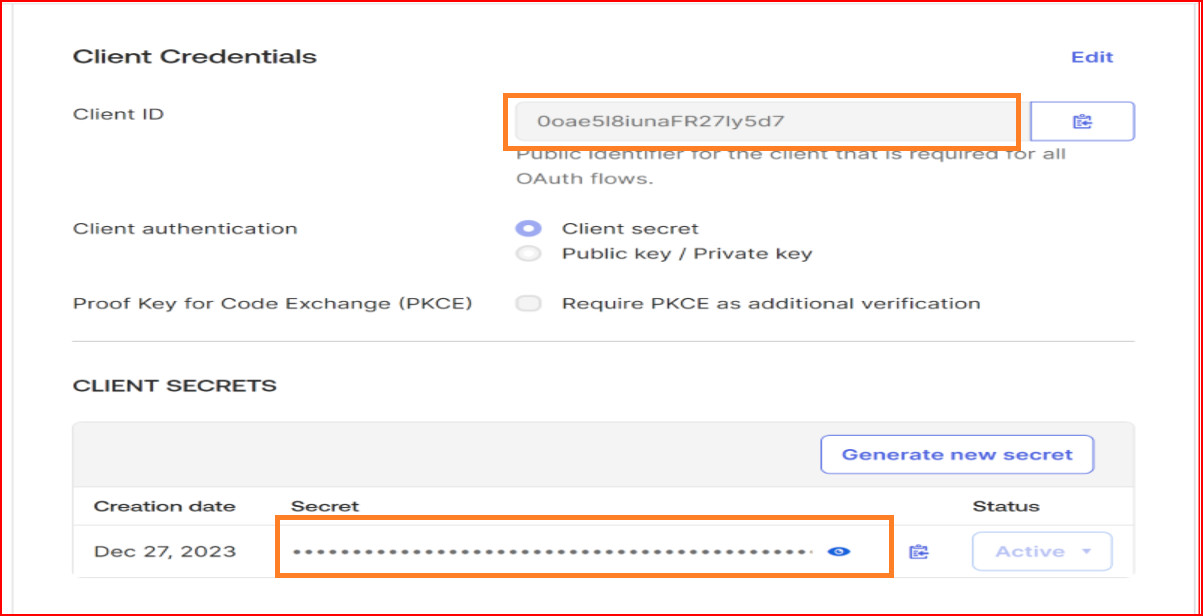
Client ID The Client ID holds significant importance during the configuration procedure. Please provide the Client ID of your Okta application.
Client Secret Key Kindly input the valid client secret key generated by your Okta application's new configuration.
OIDC Well-known configuration URL
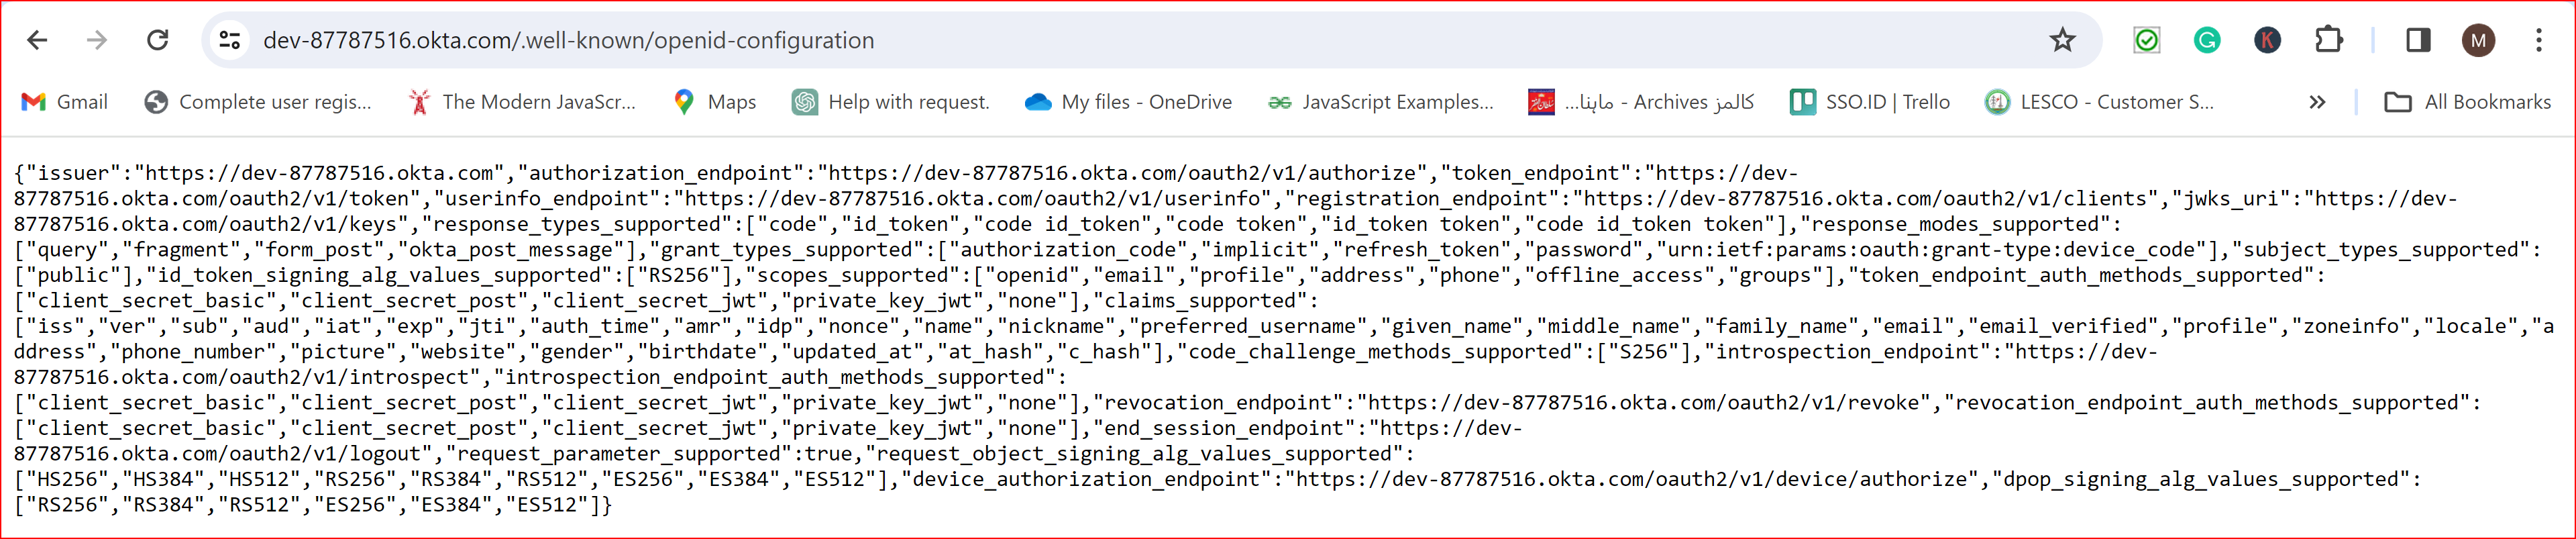
OIDC (Open ID Connect) defines a discovery mechanism that allows clients to dynamically locate information about an Open ID Connect provider (OP). This is done using the "well-known" URL, which is a URL specified by the Open ID Connect specification where clients can find metadata about the OP. The well-known configuration URL for Open ID Connect is typically constructed using the following format.

The provided URL is https://dev-87787516.okta.com/.well-known/openid-configuration refers to a resource that offers a comprehensive and valid Open ID Connect (OIDC) configuration. This configuration contains essential information about the Open ID Connect endpoints and settings that are publicly available and commonly used for authentication purposes. Please paste this URL in the OIDC. Well-known configuration URL.
If you hit this https://dev-87787516.okta.com/.well-known/openid-configuration in the google browser this will be provide essential information about the Open ID Connect endpoints.
If you enter the valid OIDC Well-known configuration URL and then click on the save button, the remaining fields will be automatically filled or can be manually set.
fields will be automatically filled or can be manually set.
Test Connection
Once you have configured the Client ID, Client Secret, and well-known configuration URL, proceed by clicking the "NEXT" button to test the connection. In the test connection section, SSO.ID offers a feature to verify whether your connection has been established successfully or not. To perform the test, click on the "TEST CONNECTION" button.
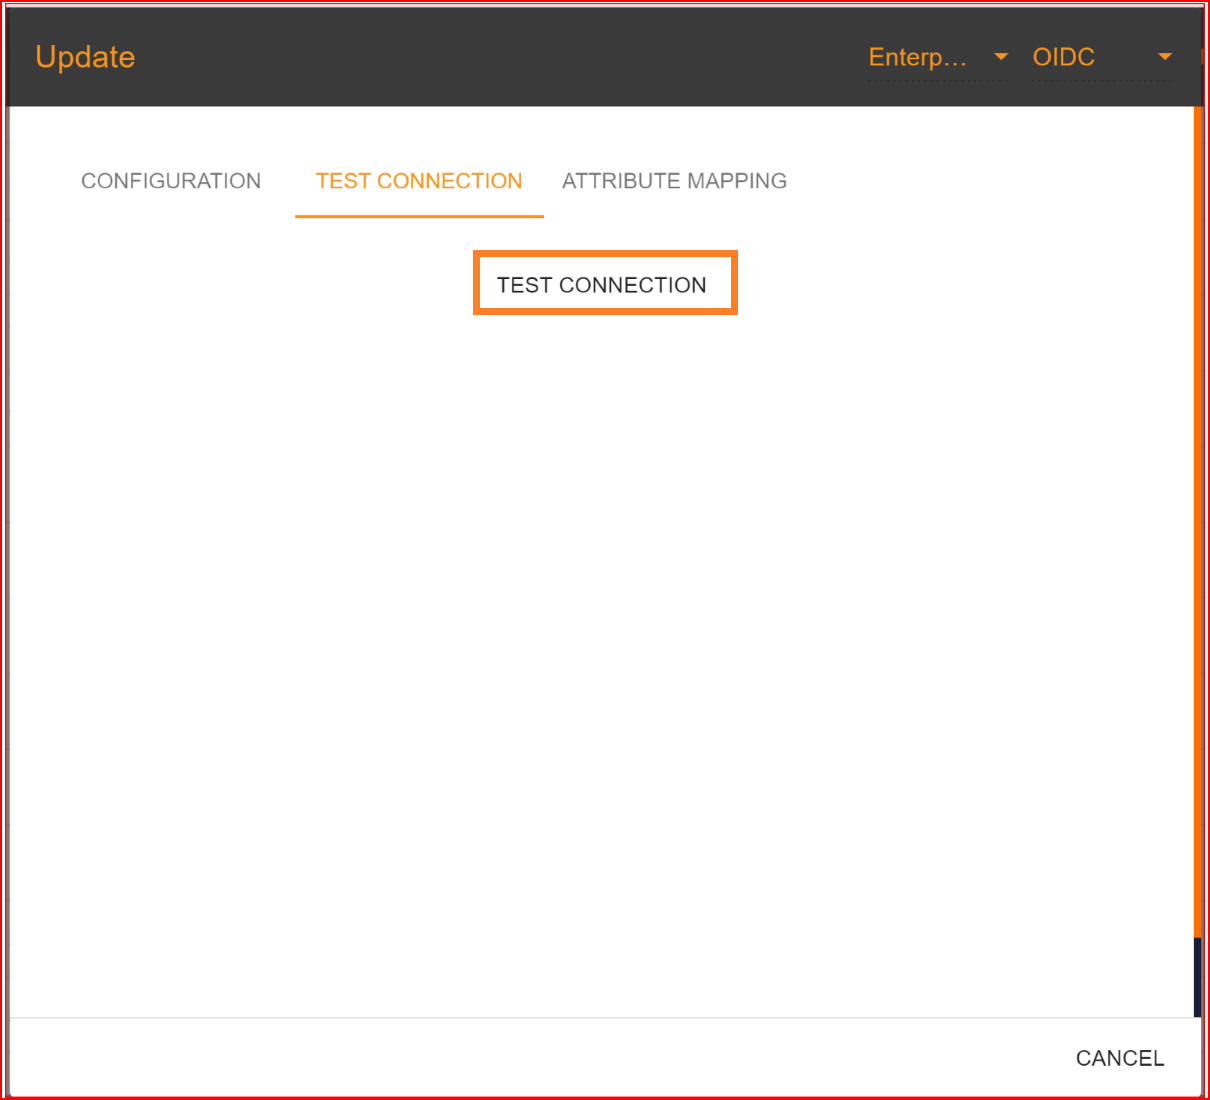
If all your configuration parameters are correct, including a valid Client ID, Client Secret, and well-known configuration URL, you will see a message stating, "Connection built successfully," along with the user info endpoint response. Then, proceed by clicking on the "NEXT" button to proceed to attribute mapping.

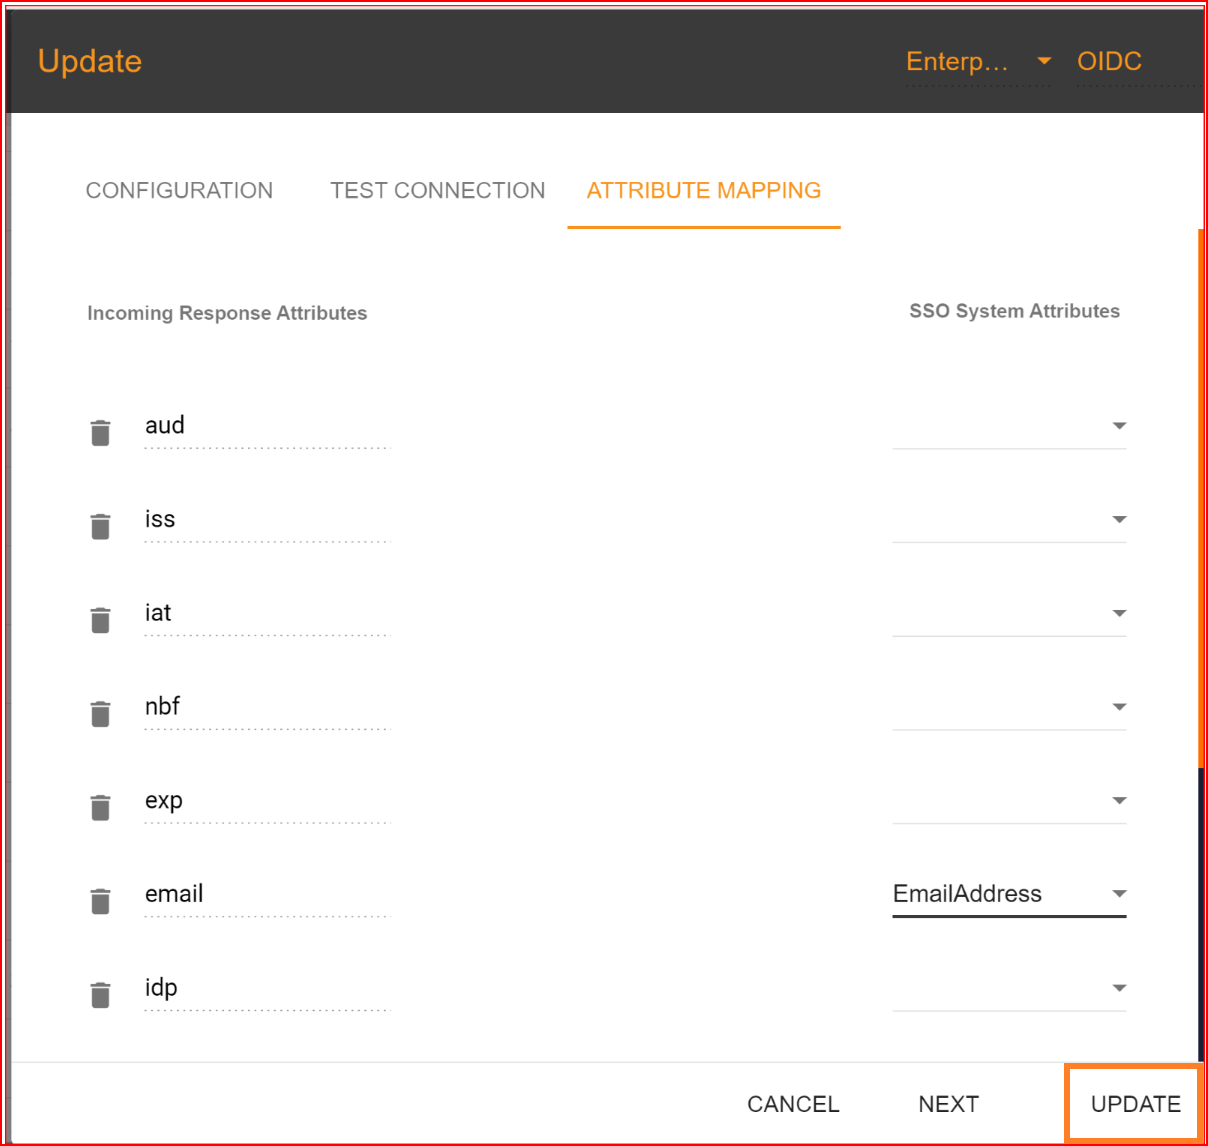
Attribute Mapping
In the attribute mapping section, the "Email Address" attribute is mandatory, while other attributes are optional. After completing the attribute mapping, click the "Update" button to finalize the connection establishment process, which is now successfully completed.
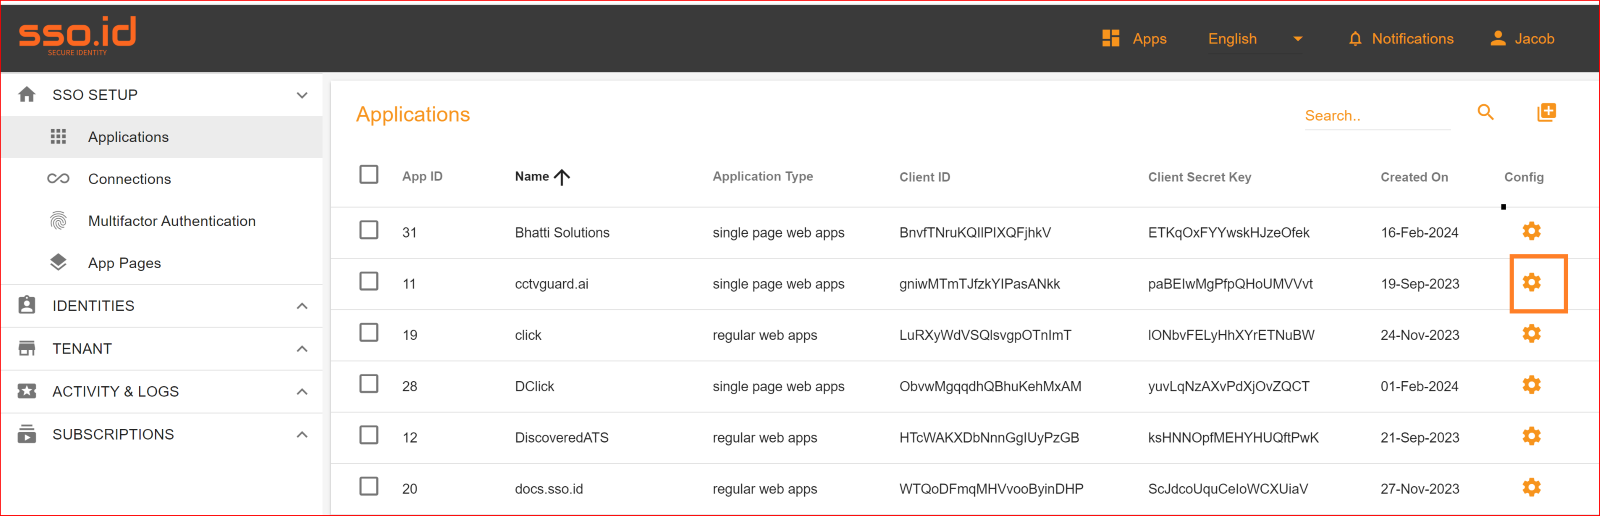
Check attribute mapping
To check the attribute mapping process in the SSO.ID, navigate your application configuration setting.
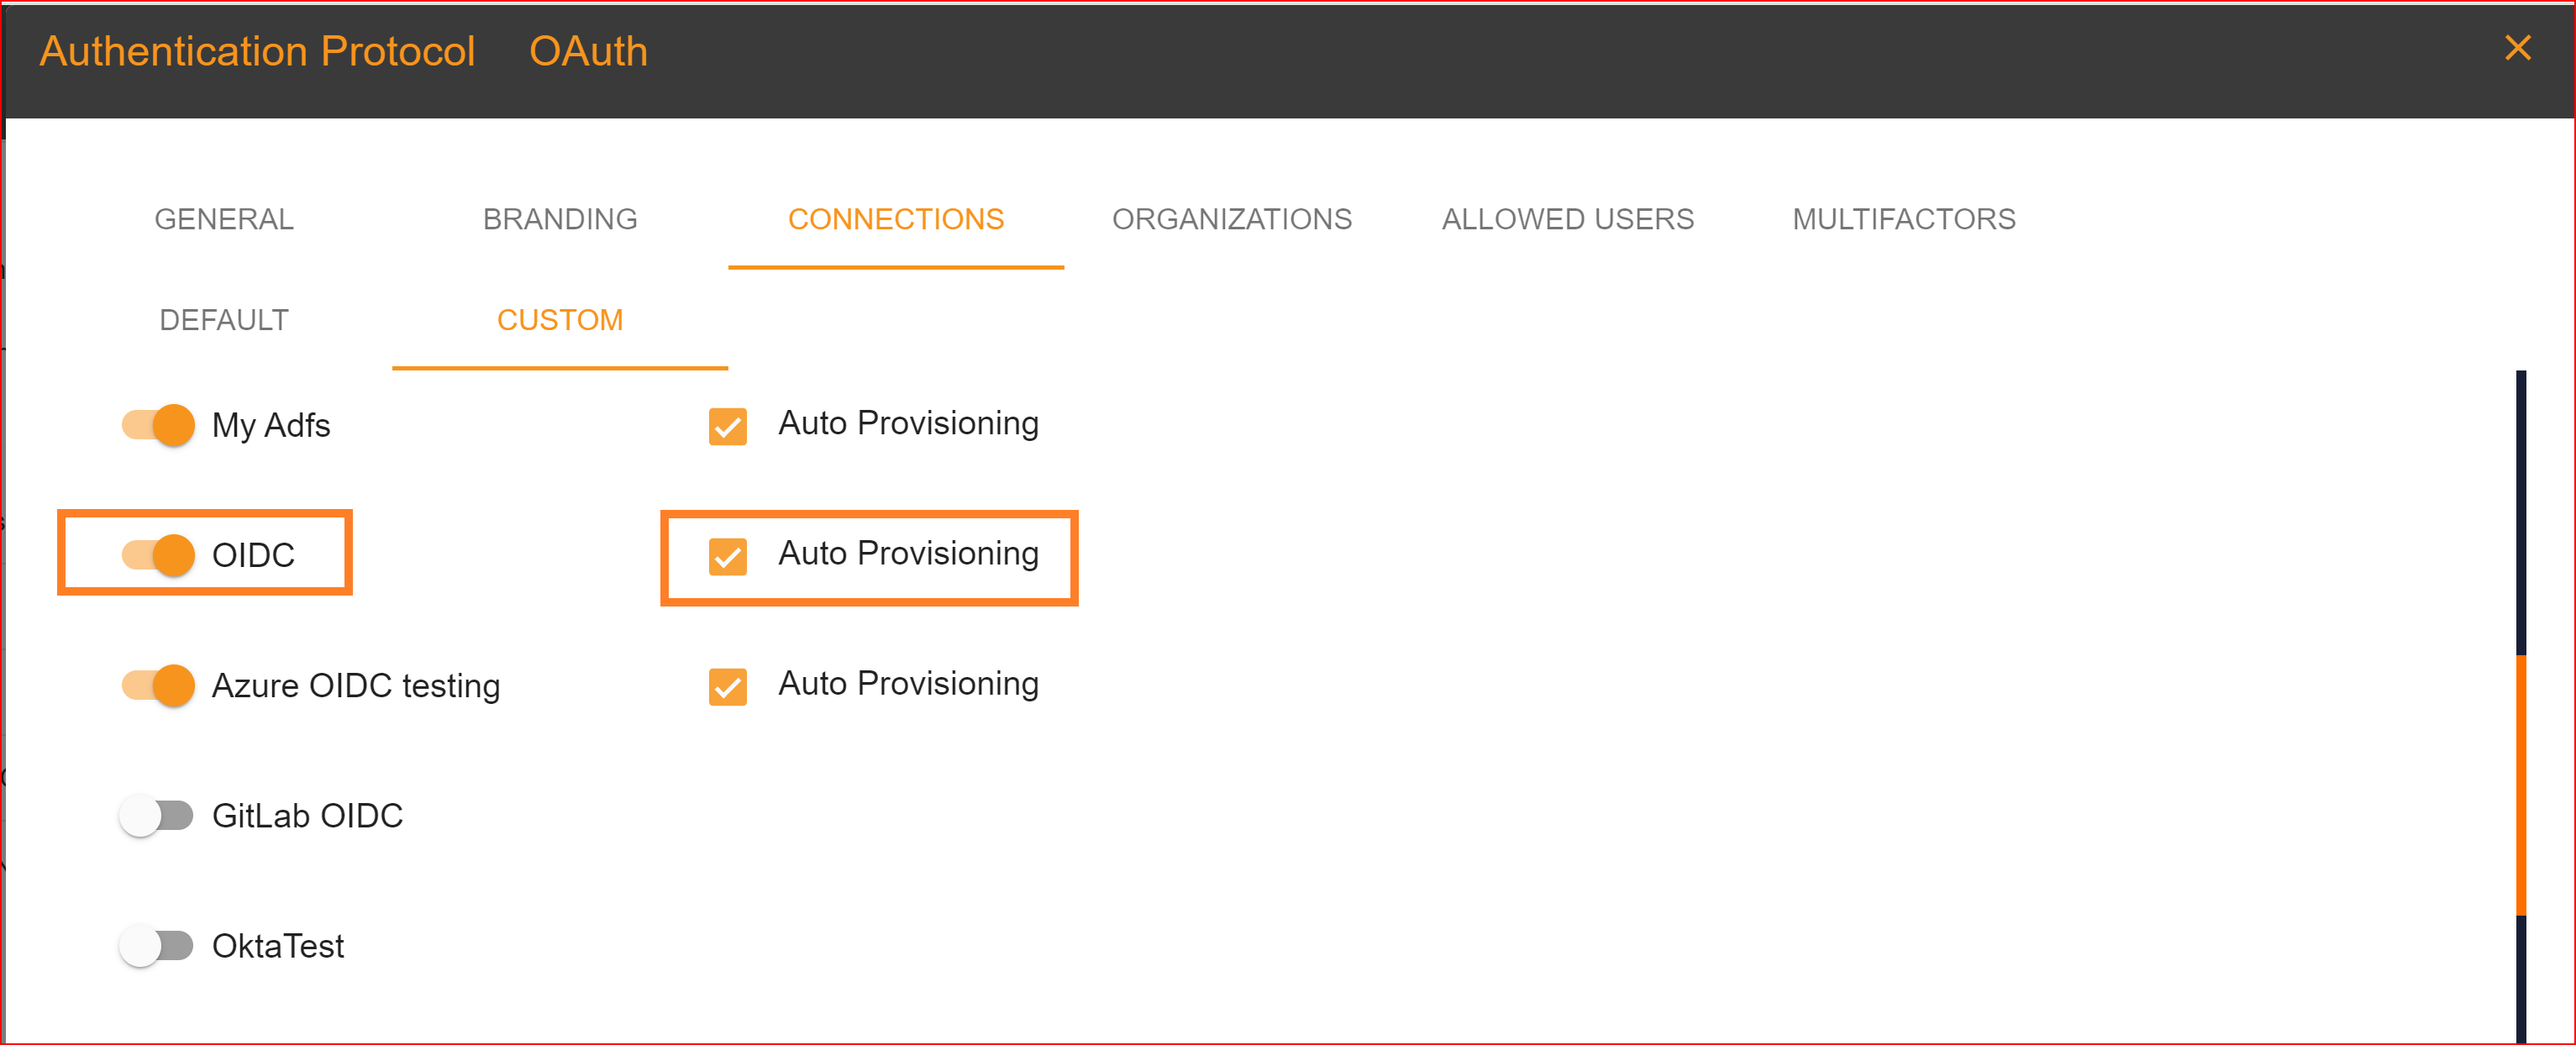
After configuration setting, go to Connection section and enable both OIDC connection and auto provisioning. What is Auto Provisioning: Auto-provisioning in Single Sign-On Identity (SSO.ID) refers to the automatic creation and management of user accounts within applications or services based on the user's authentication through the SSO system. Note: To verify the attribute mapping process, please ensure that when Auto Provisioning is enabled, the user has not already registered in the SSO system. After enabling it, you'll see the Azure OAuth connection details in the redirect Uniform Resource Identifier (URI) of your application.
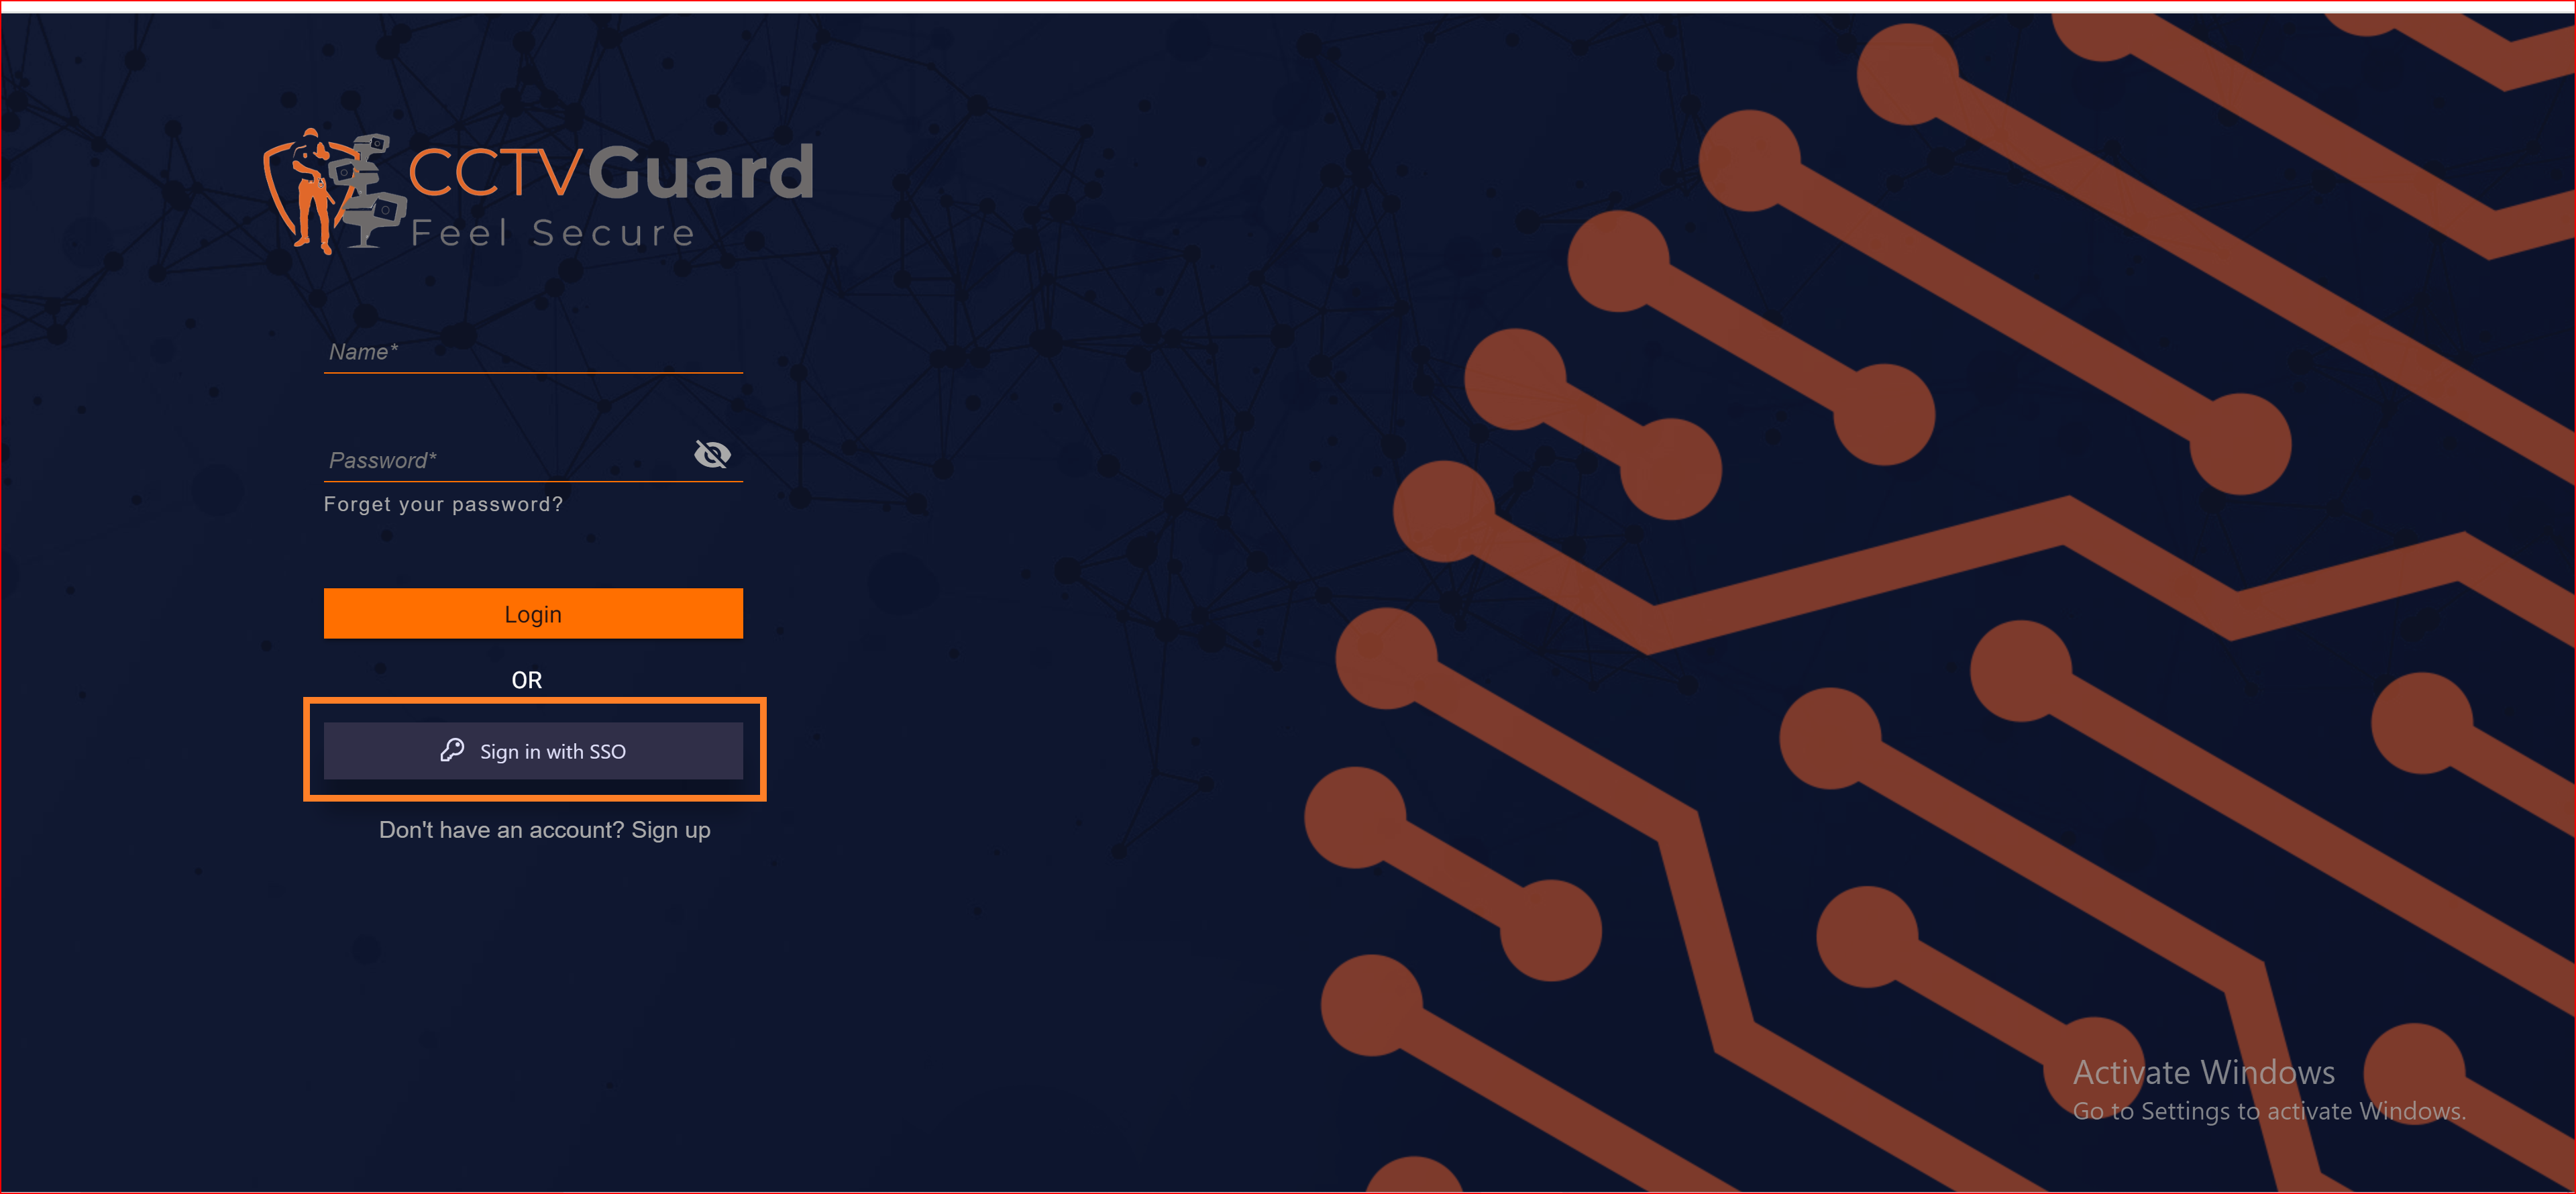
To confirm that the connection is properly set up, look for the "Sign in with SSO" button on the redirect URI of your application.
Here, you will find all the established connections that you allowed within the application. Now, you should click on the "Continue with OIDC Connection" connection, which represents our newly established connection.
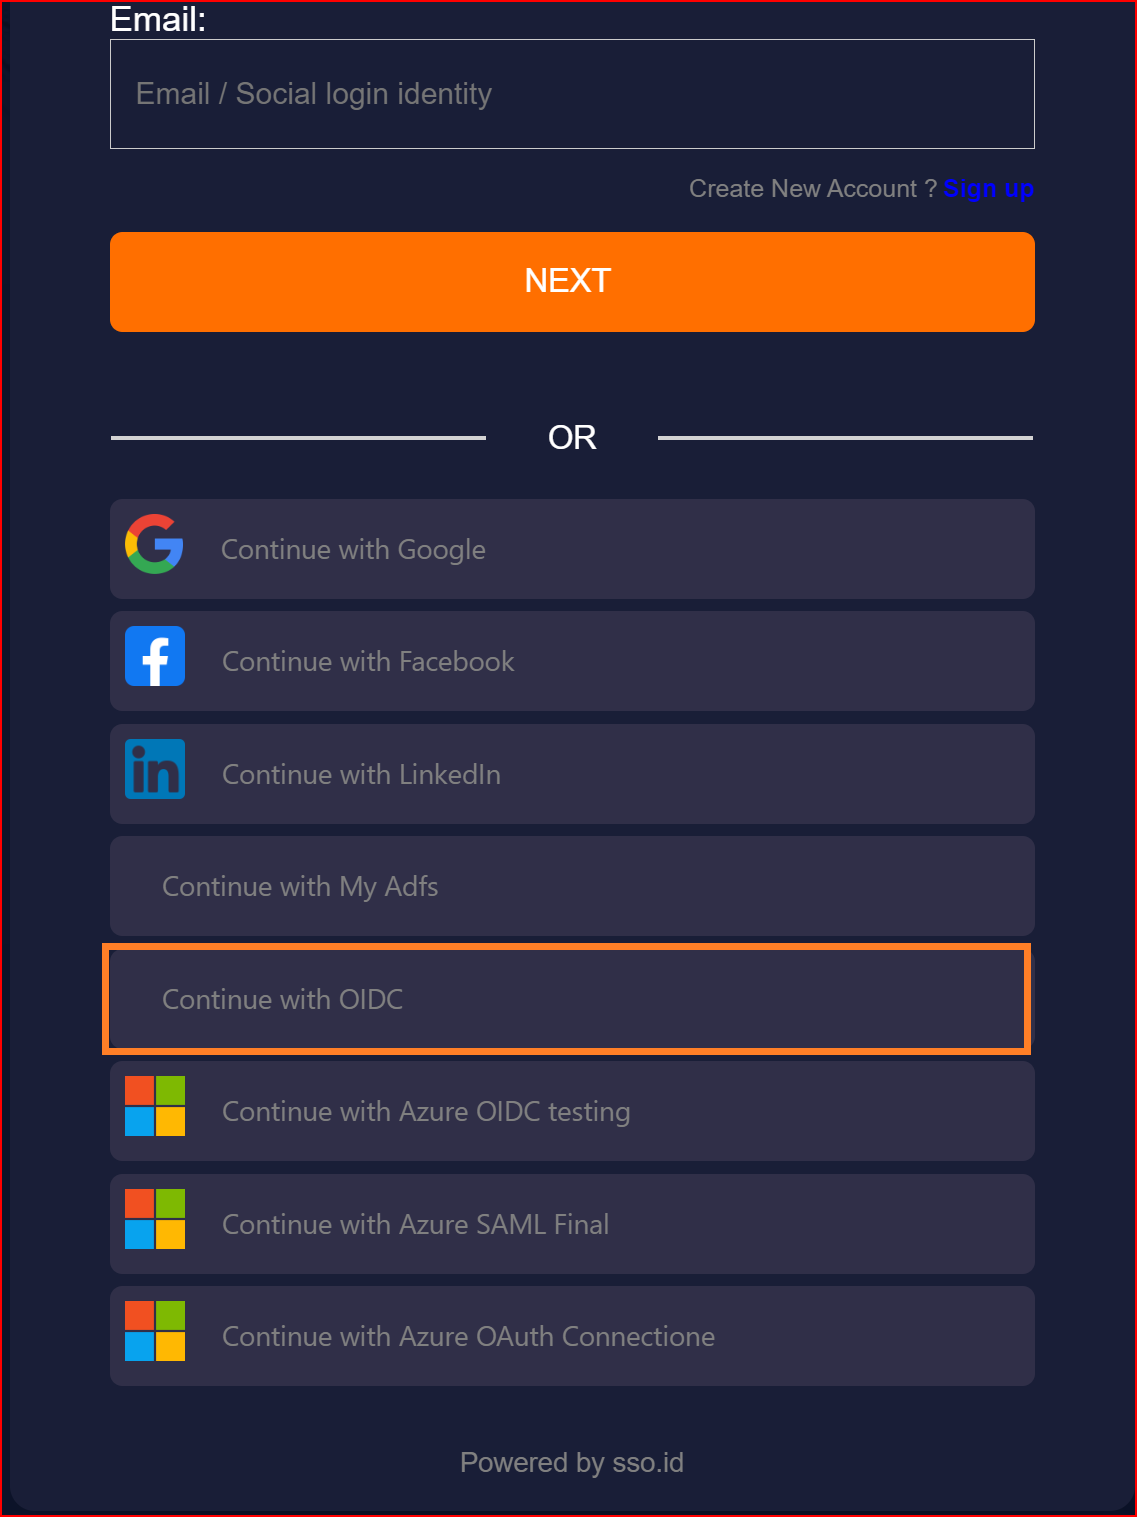
Finally, we have successfully logged into our application using the OIDC protocol with the Okta application.
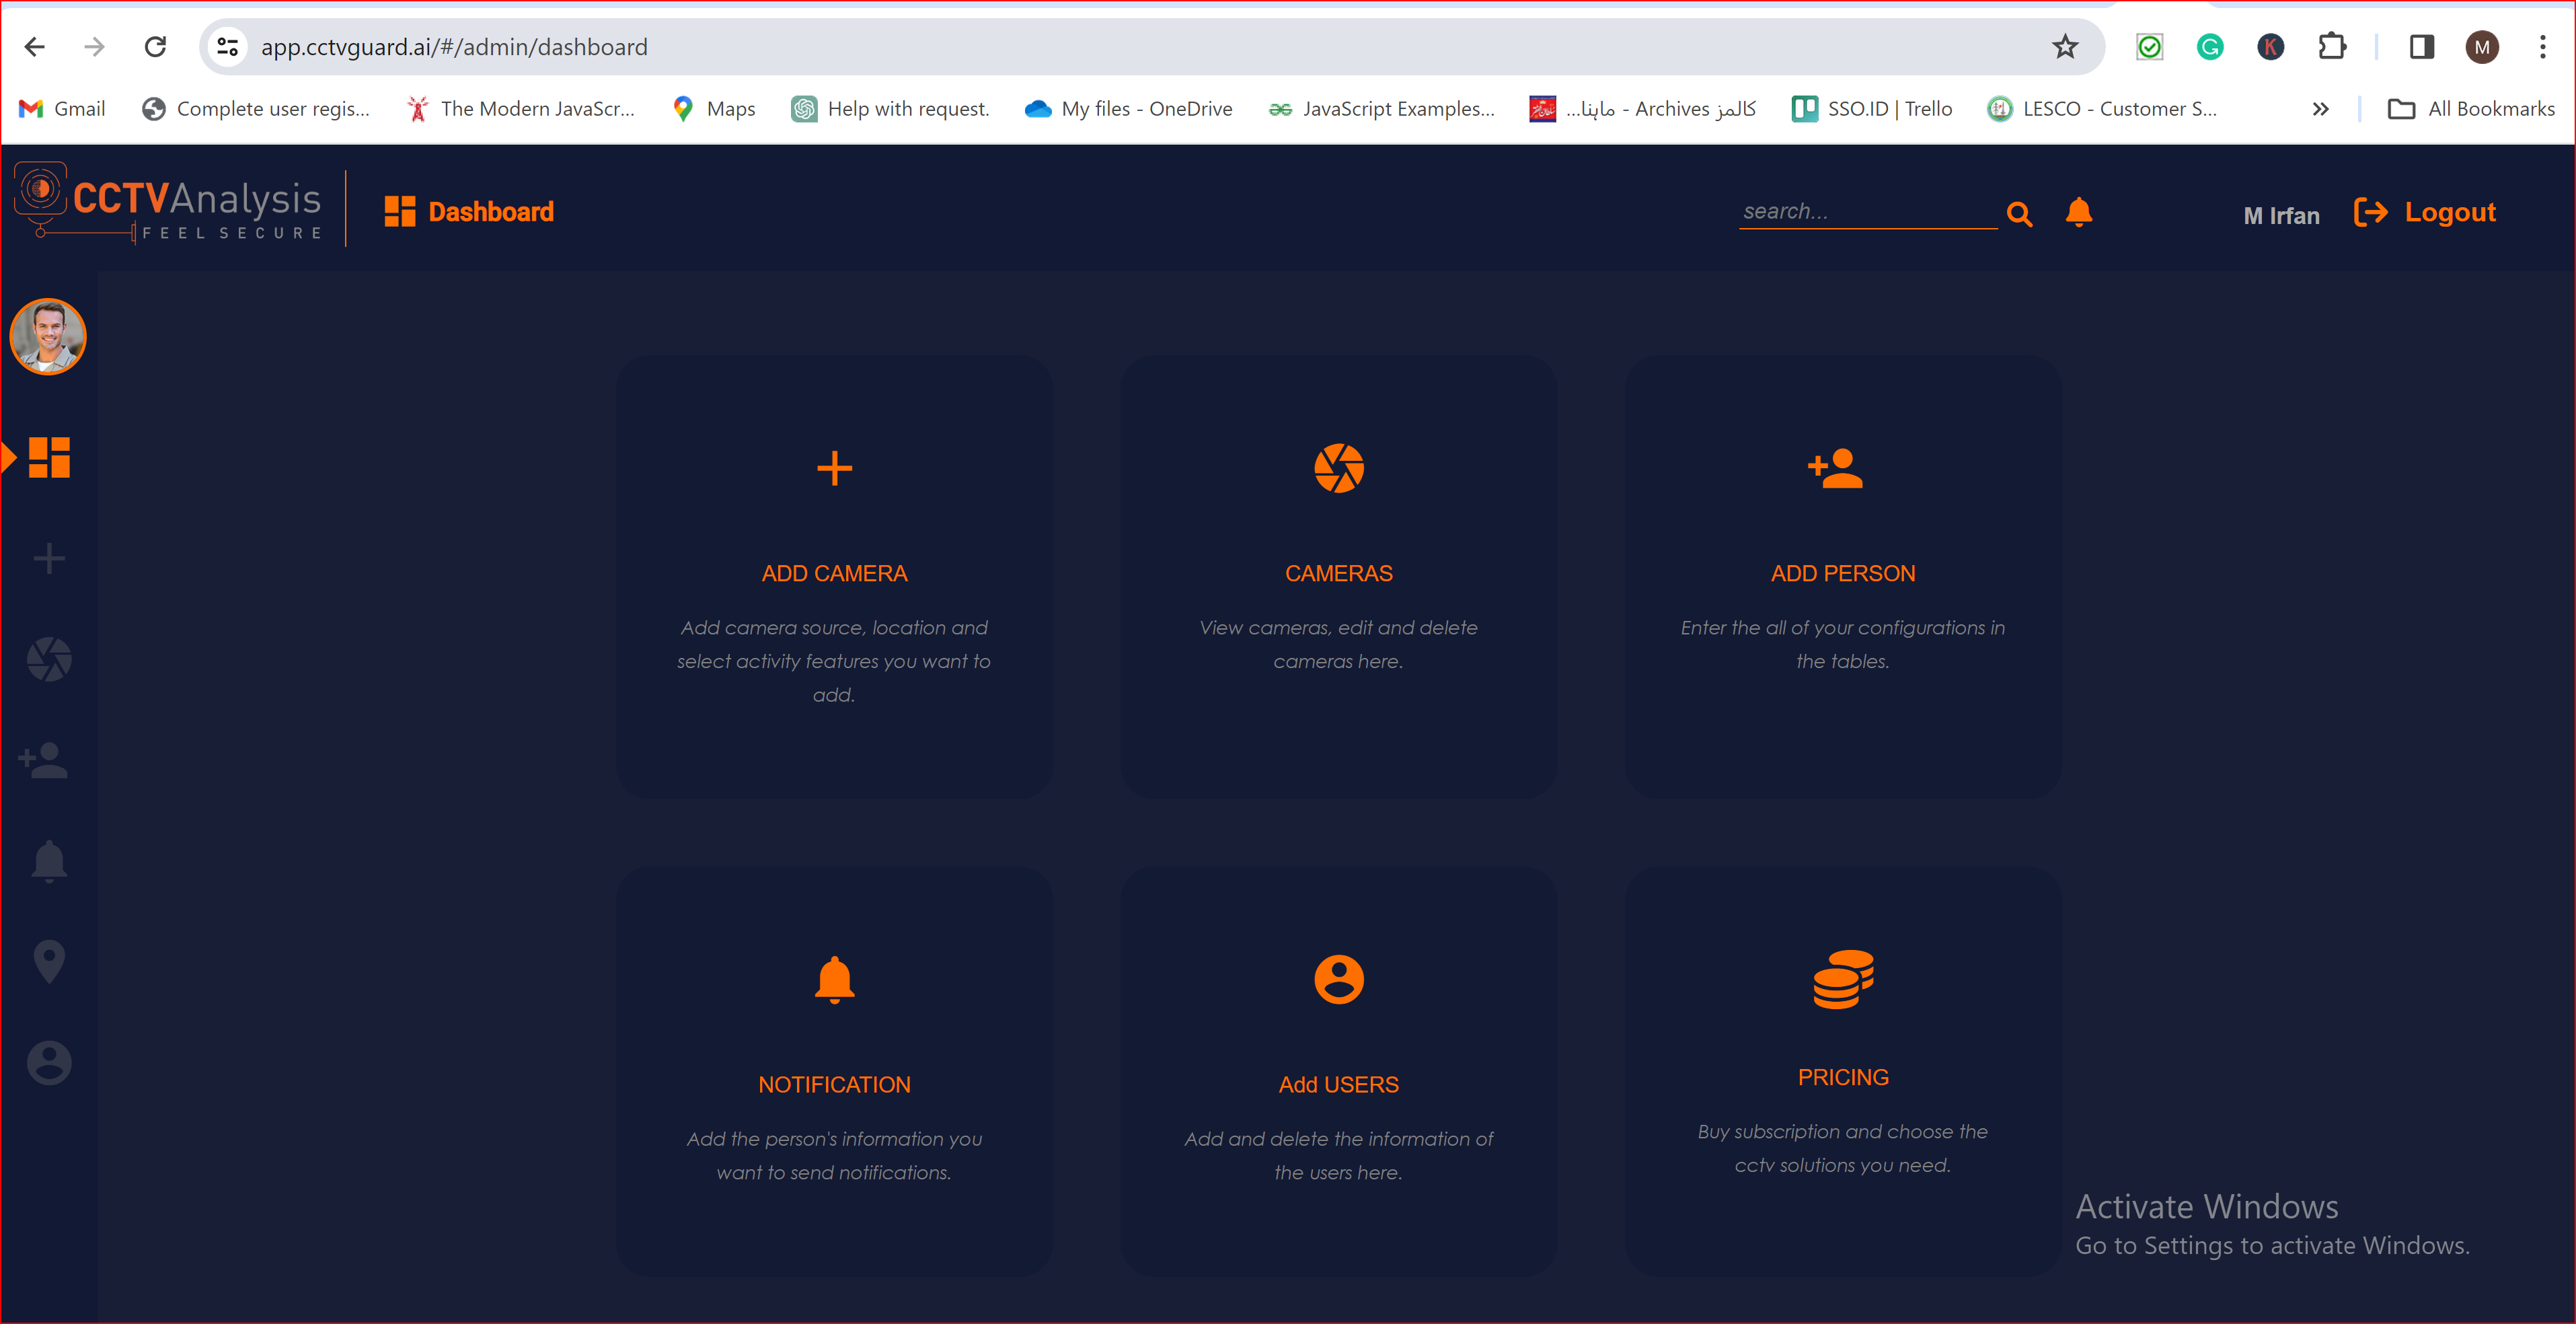
To check the auto-provisioning and attribute mapping process, you should navigate to the user management section of your SSO.ID provider's dashboard. Ensure that the user is successfully created through the OIDC connection with the attributes you have specified in the attribute mapping settings.

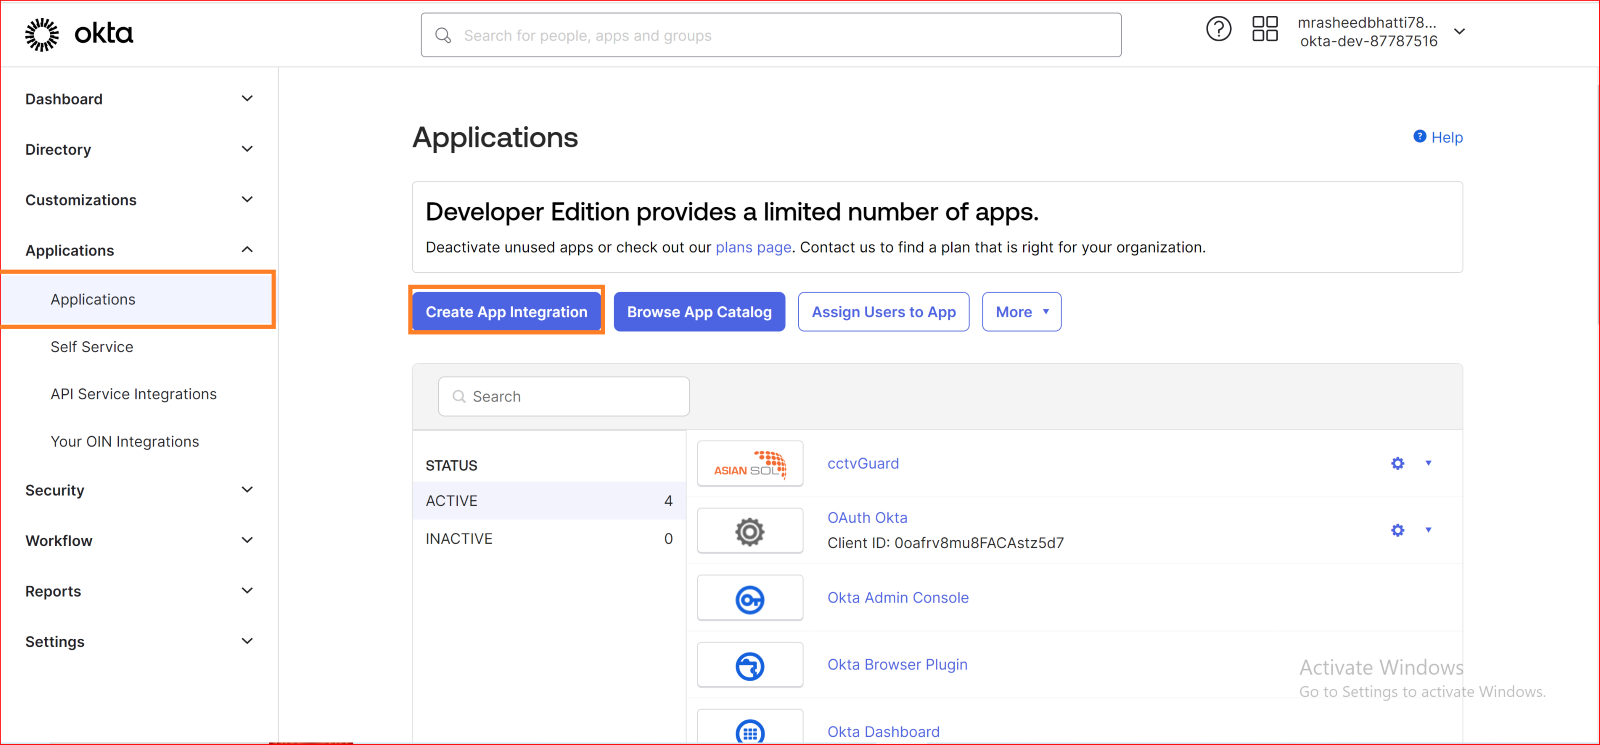
Steps to Create an Okta Application with OIDC
Access the Okta Developer Console
Log in to your Okta Developer account at https://developer.okta.com/login/

Create new OIDC Application
Once logged in, navigate to the "Applications" tab. Click on "Add Application" to start the process of creating a new application.
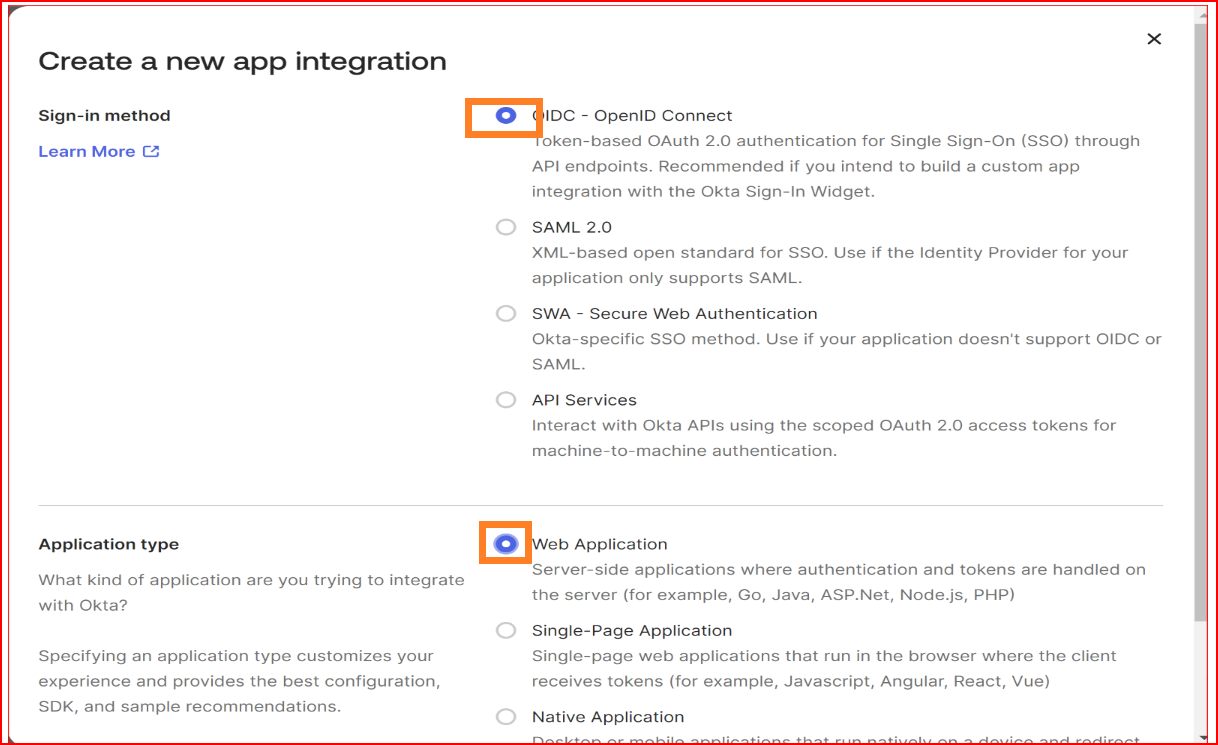
Choose Application Type
Select "Web" as the application type since you're setting up an OIDC application for web-based authentication.
Configure initial settings
In General Settings
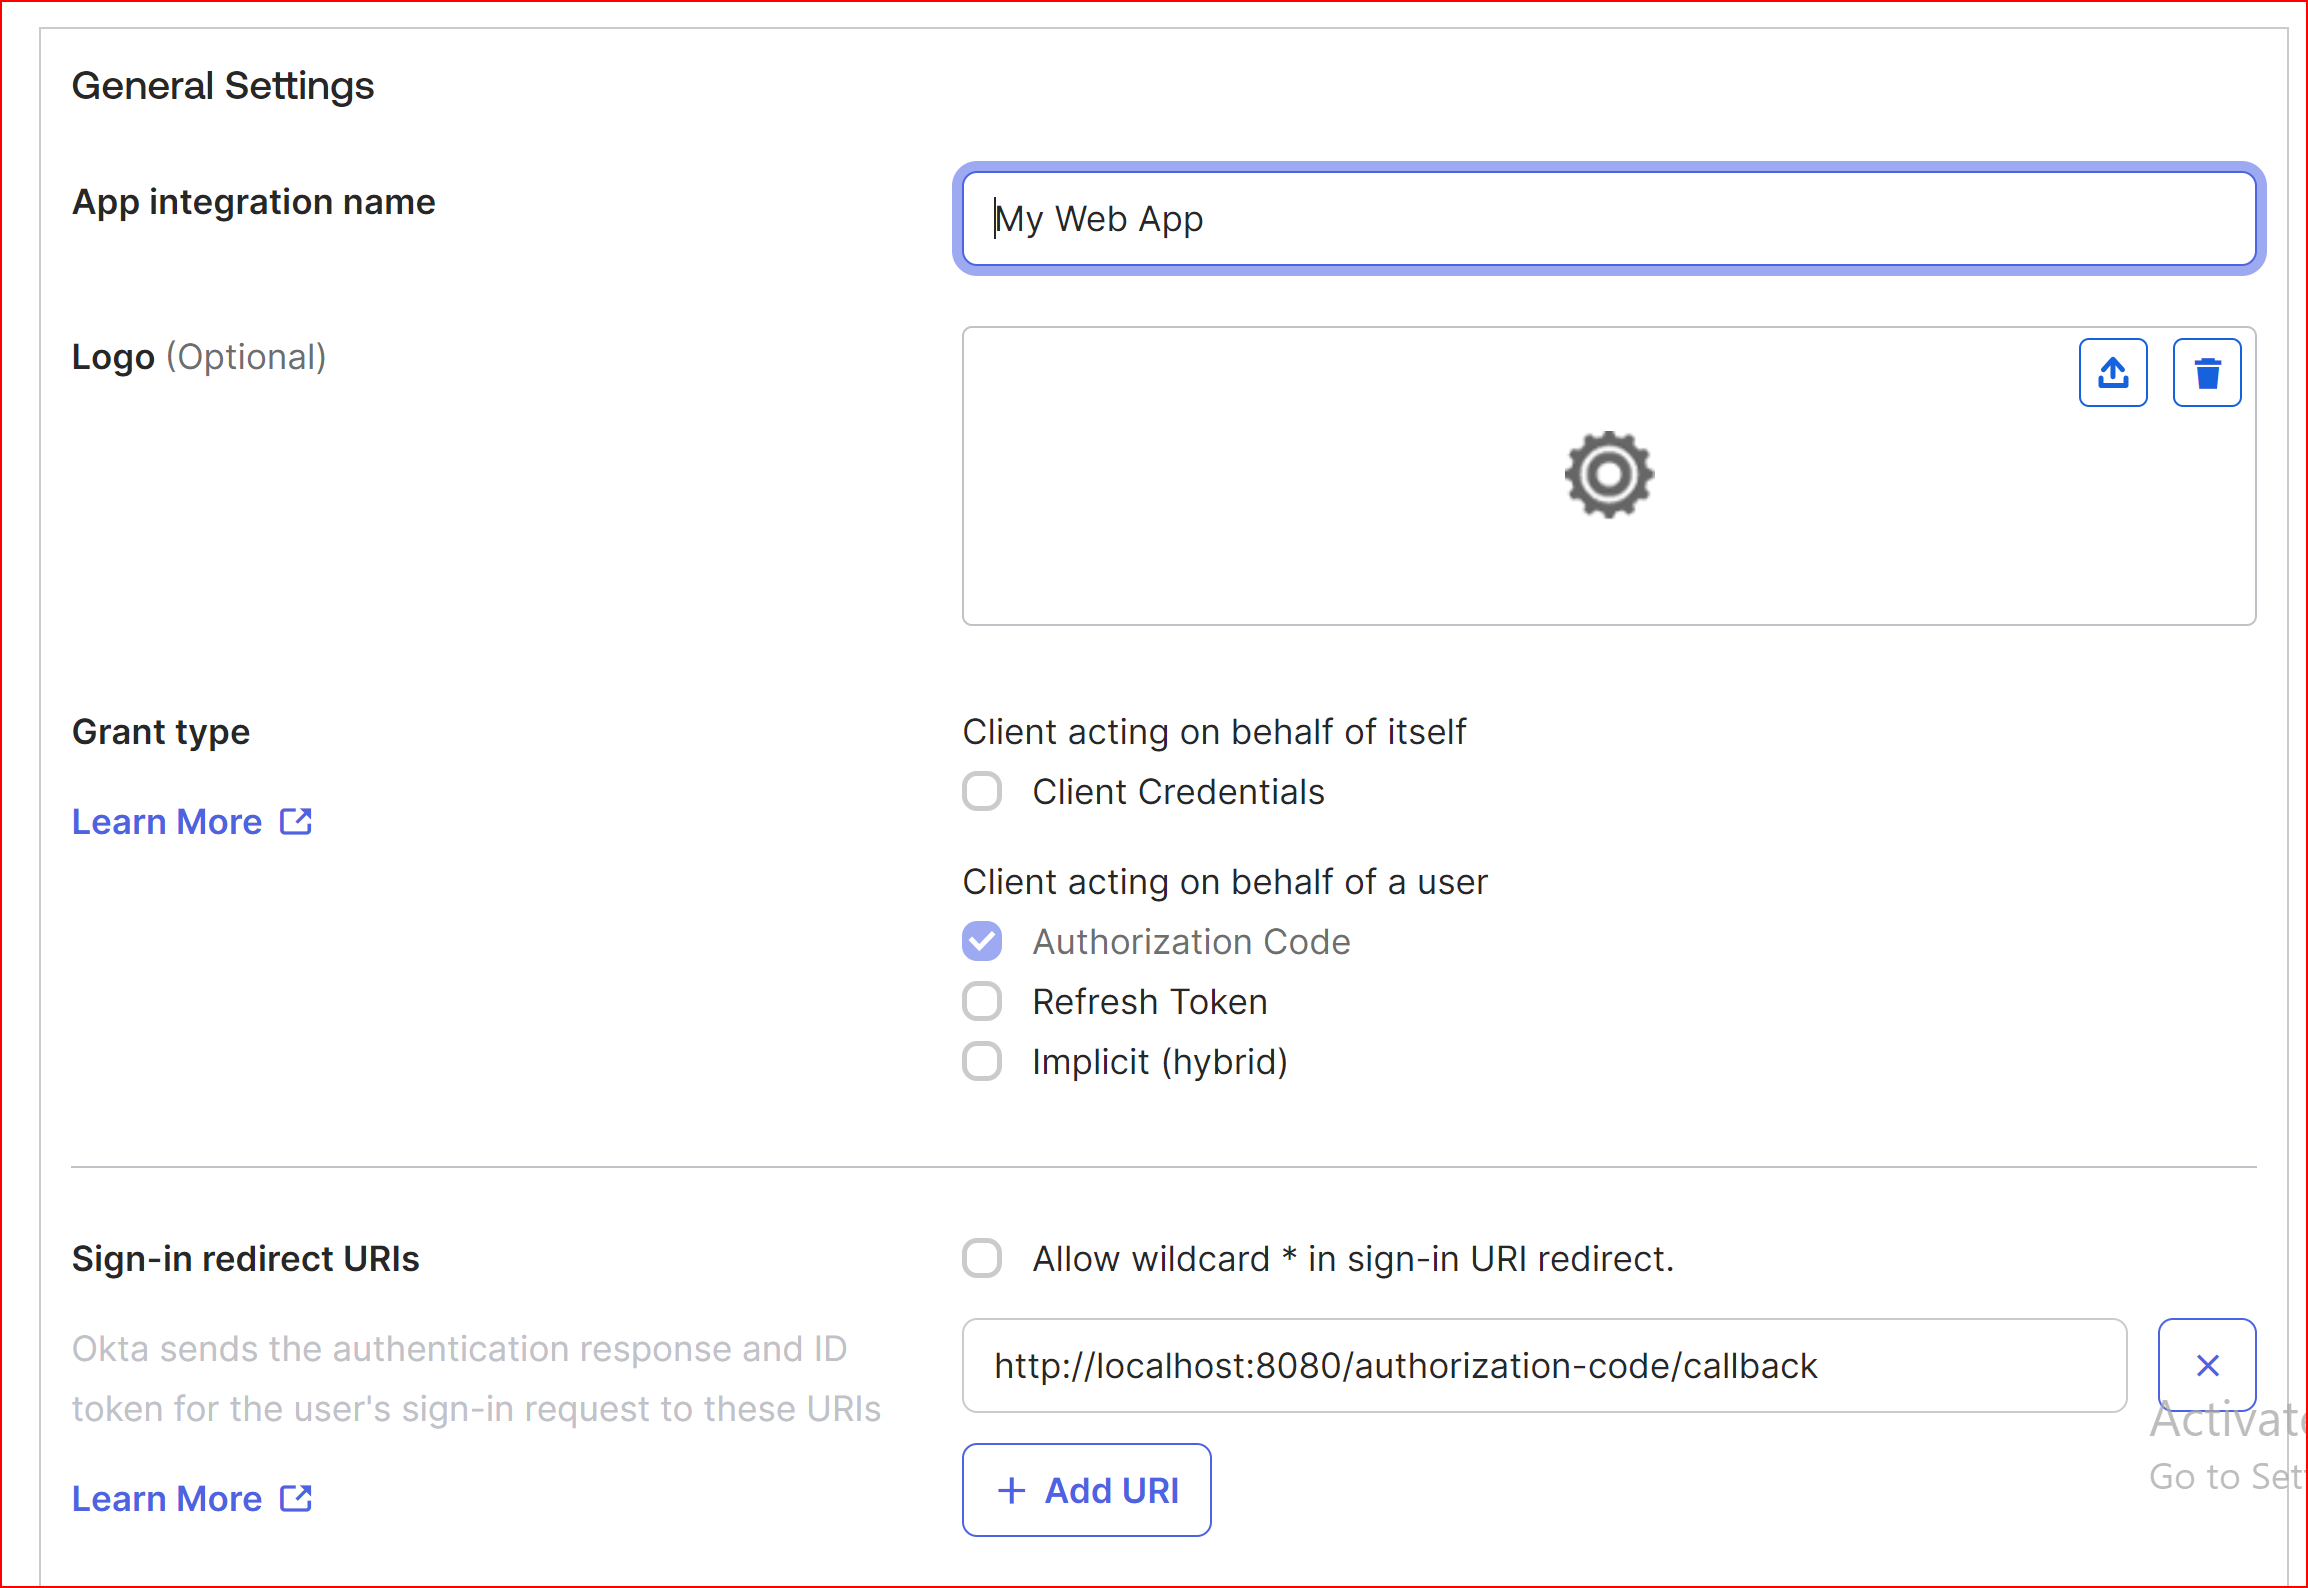
App integration name
Specify a name for your app integration.
Logo
Add a logo to accompany your app integration. The image file should be in either. Png, .jpg, or .gif format and should have a file size smaller than 1 MB. For optimal results, it is recommended to use a PNG image with a transparent background and landscape orientation. Ensure a minimum resolution of 420 x 120 pixels to prevent the need for upscaling the image.
Grant type
Select from among the different grant type options. The grant types available for your app integration depend on the platform you select.
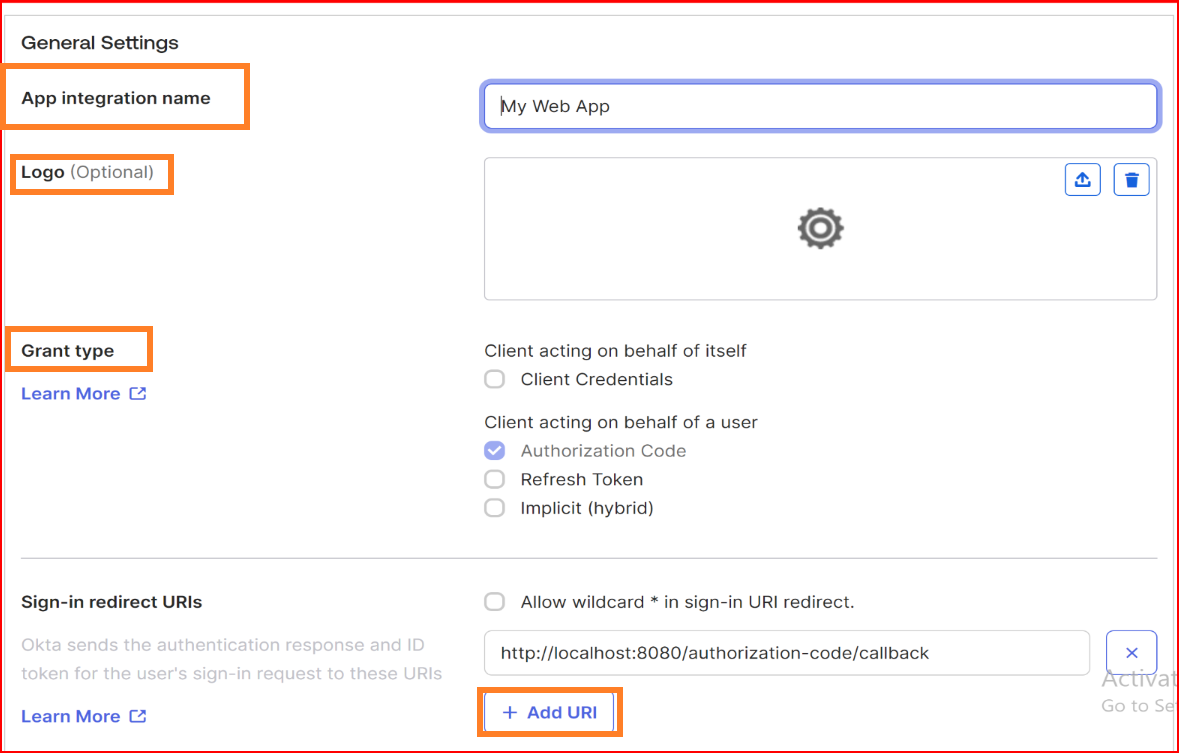
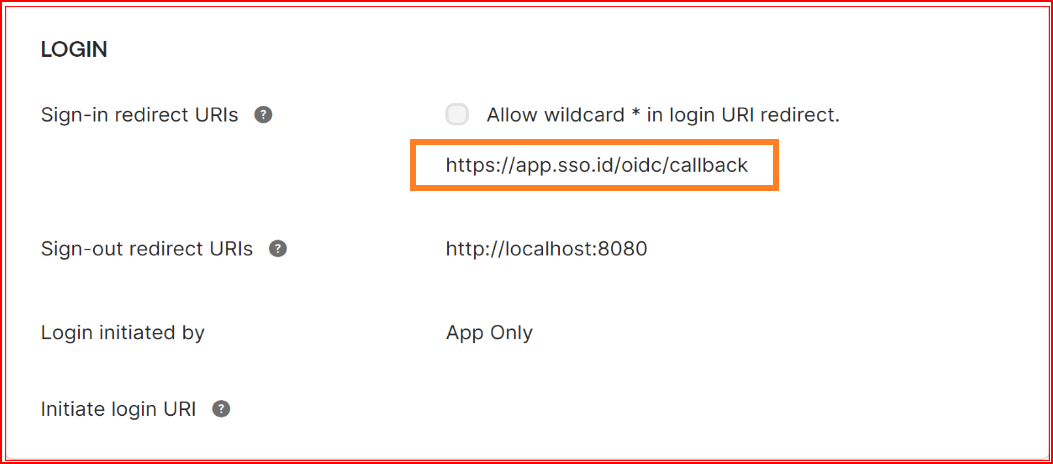
Sign-in redirect URIs
The sign-in redirect URI is the specific web address (URL) to which Okta sends the authentication response and ID token after processing the sign-in request. These URIs must be complete and precise, providing the full path or location where Okta forwards the authentication-related information. We provided SSO.ID complete Sign-in redirect URIs with OIDC protocol.
https://app.sso.id/oidc/callback
Create an OIDC Connection with Azure
Open ID Connect (OIDC) is a widely used authentication protocol that enables secure access to web applications. Azure Active Directory (Azure AD) supports OIDC, making it easy to integrate authentication into your applications. Follow these steps to set up Azure AD with OIDC.
SSO.ID endpoint for Azure configuration with OIDC
You require two additional pieces of information the Client ID and the Provider URL.
- Name Enter the valid and complete name of your newly generated connection.
- Description Write a short description of your connection.
- Client ID The Client ID holds significant importance during the configuration procedure. Please provide the Client ID of your Azure application.
- Client Secret Key Kindly input the valid client secret key generated by your Okta application's new configuration.
OIDC Well-known Configuration URL
In Azure Active Directory (Azure AD), the Open ID Connect (OIDC) well-known configuration URL provides metadata about the identity provider (Azure AD in this case) and its supported endpoints. This URL allows applications to dynamically discover important information needed for authentication. The well-known configuration URL for Azure AD OIDC is structured as follows.
If you enter the valid OIDC Well-known configuration URL and then click on the save button, the remaining fields will be automatically filled or can be manually set.

Navigate to your application's configuration settings and enable acceptance of newly created connections from the custom connection tab.
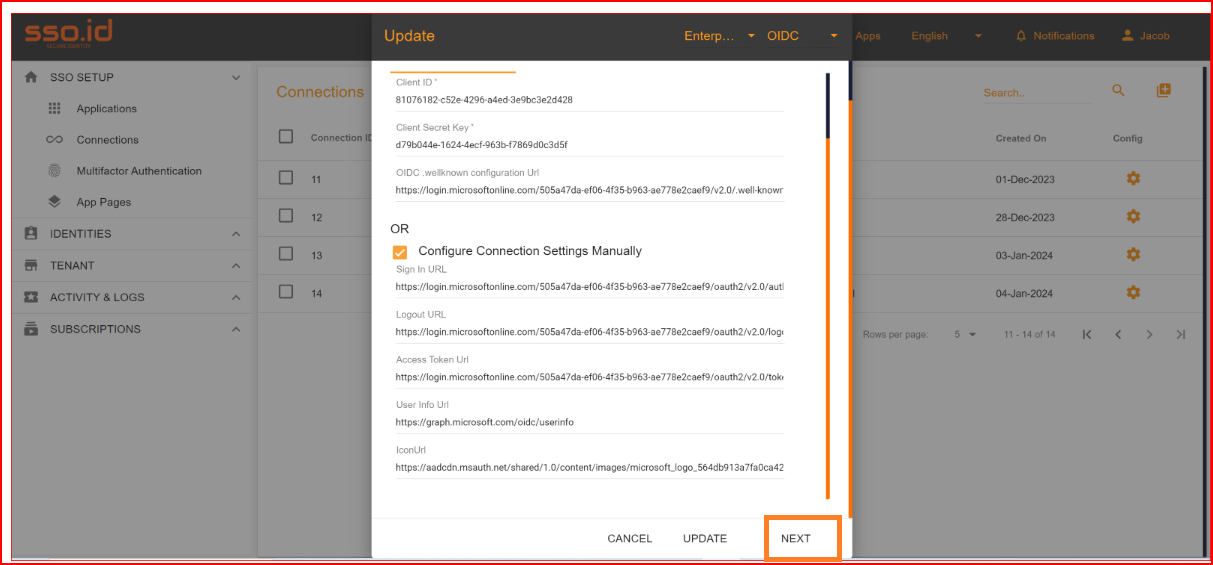
Test Connection
Once you have configured the Client ID, Client Secret, and well-known configuration URL, proceed by clicking the "NEXT" button to test the connection. In the test connection section, SSO.ID offers a feature to verify whether your connection has been established successfully or not. To perform the test, click on the "TEST CONNECTION" button.
If all your configuration parameters are correct, including a valid Client ID, Client Secret, and well-known configuration URL you will see a message stating, "Connection built successfully." With user info endpoint response Then, proceed by clicking on the "NEXT" button to proceed to attribute mapping.
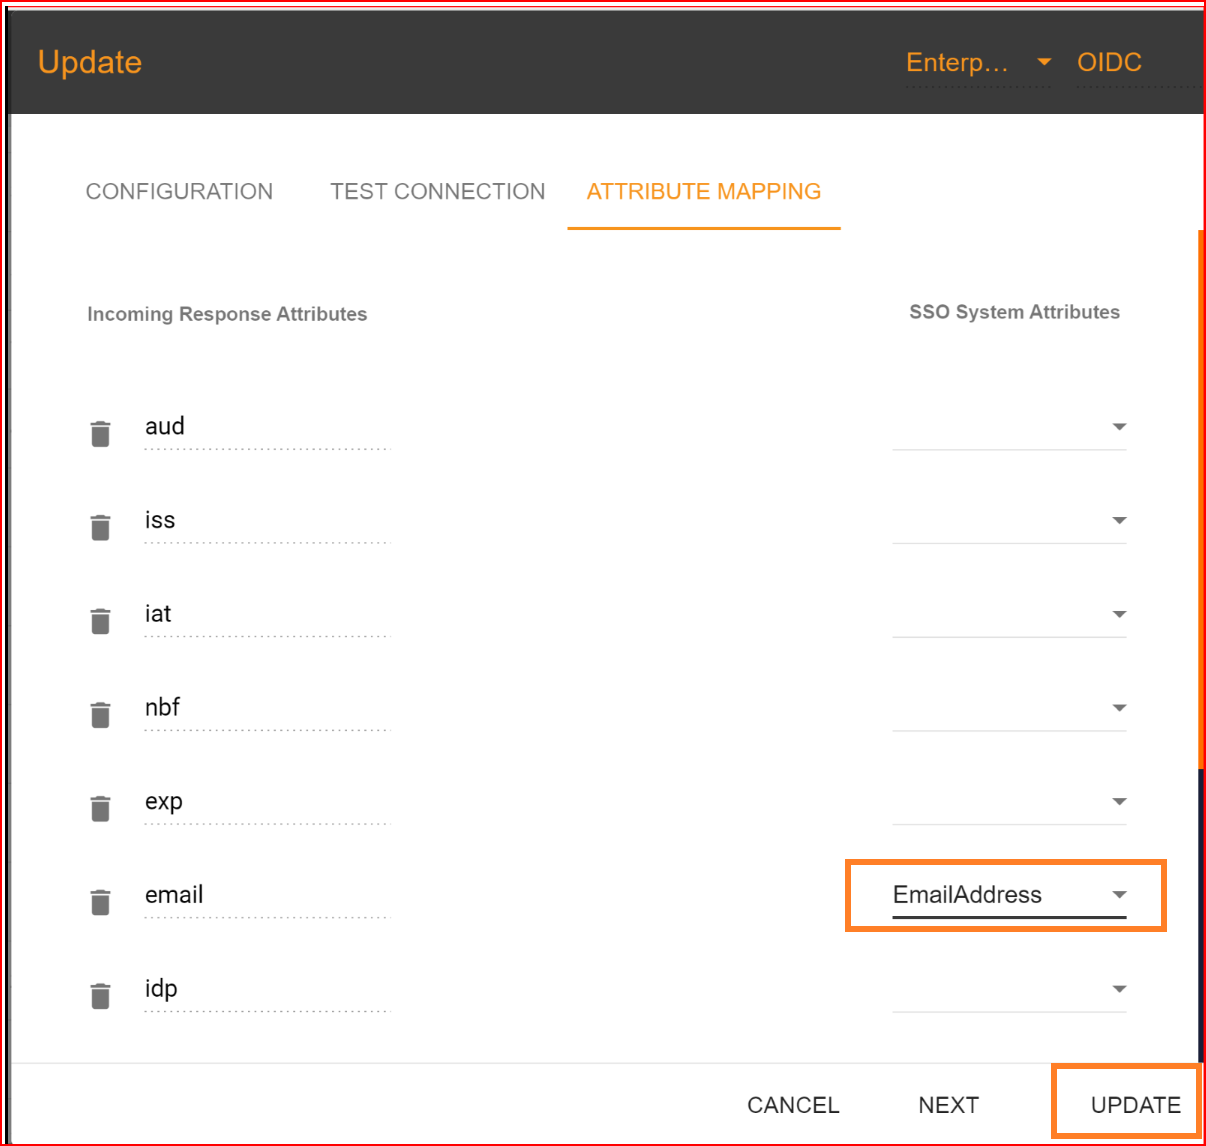
Attribute Mapping
In the attribute mapping section, the "Email Address" attribute is mandatory, while other attributes are optional. After completing the attribute mapping, click the "Update" button to finalize the connection establishment process, which is now successfully completed.
Check attribute mapping correctly
To check the attribute mapping process in the SSO.ID, navigate your application configuration setting.
After configuration setting, go to Connection section and enable both Azure OIDC testing connection and auto provisioning. What is Auto Provisioning: Auto-provisioning in Single Sign-On Identity (SSO.ID) refers to the automatic creation and management of user accounts within applications or services based on the user's authentication through the SSO system. Note: To verify the attribute mapping process, please ensure that when Auto Provisioning is enabled, the user has not already registered in the SSO system. After enabling it, you'll see the Azure OAuth connection details in the redirect Uniform Resource Identifier (URI) of your application.
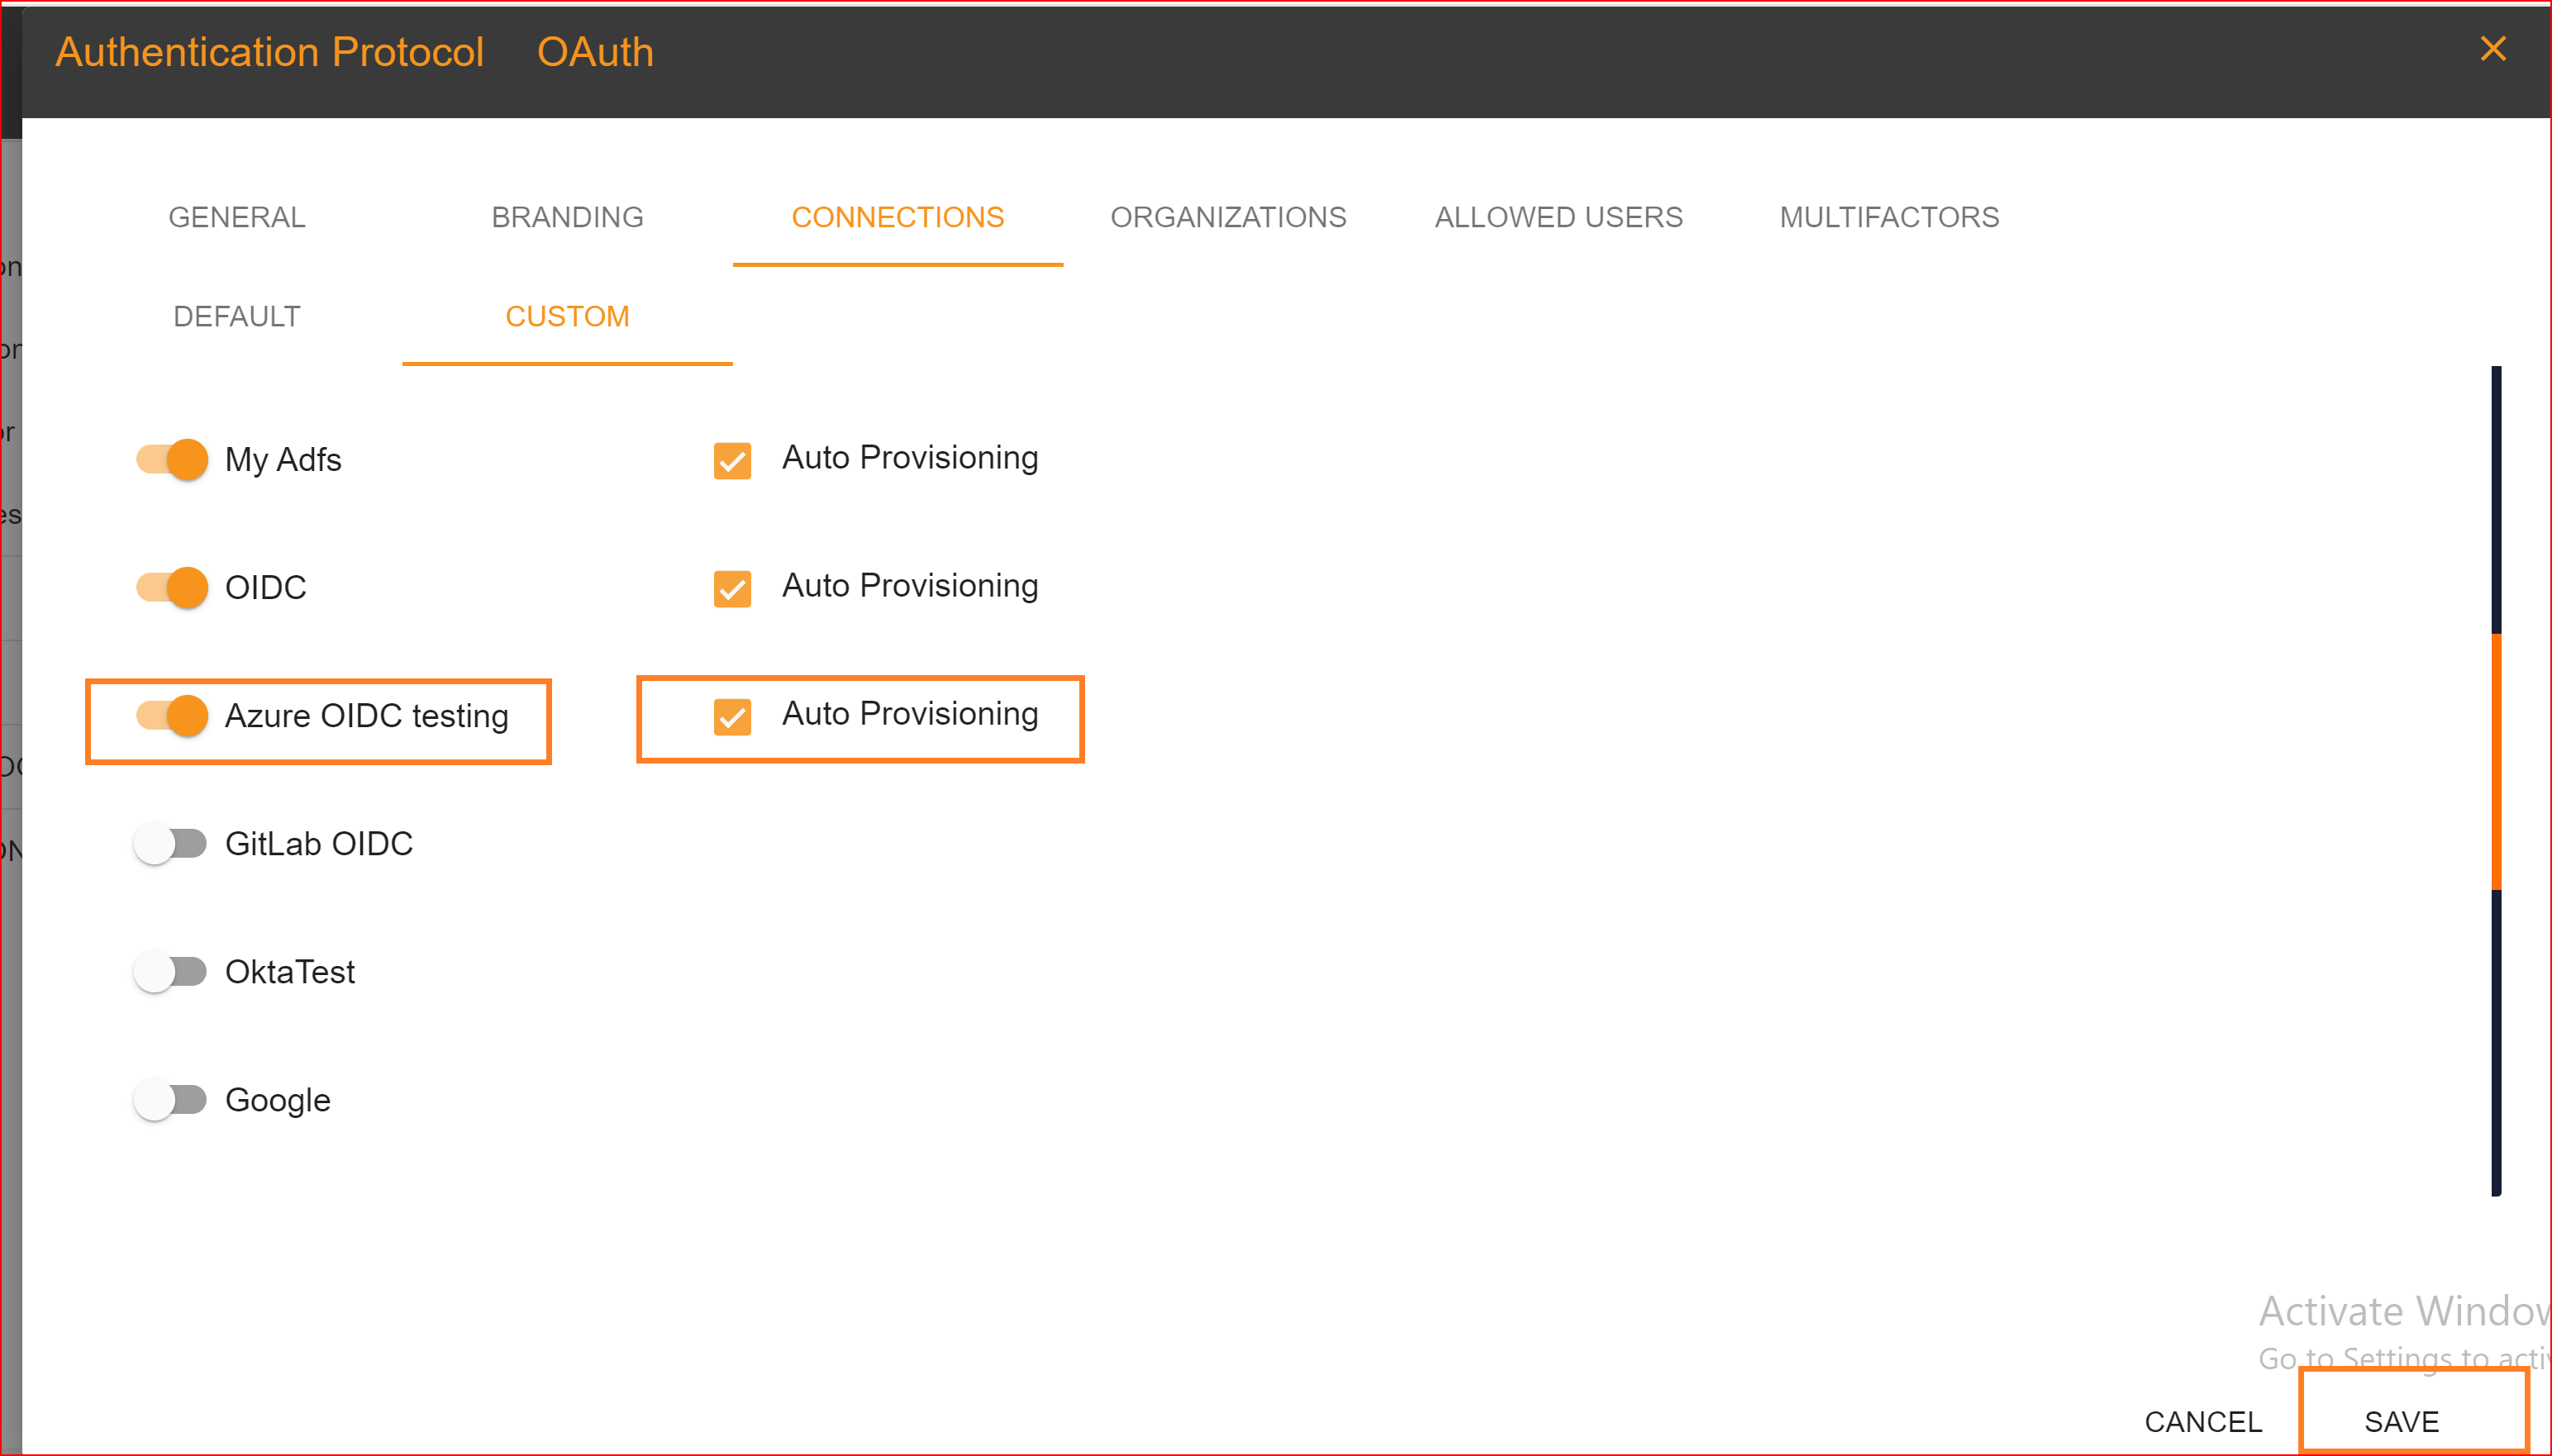
To confirm that the connection is properly set up, look for the "Sign in with SSO" button on the redirect URI of your application.
Here, you will find all the established connections that you allowed within the application. Now, you should click on the "Continue with Azure OIDC testing" connection, which represents our newly established connection.
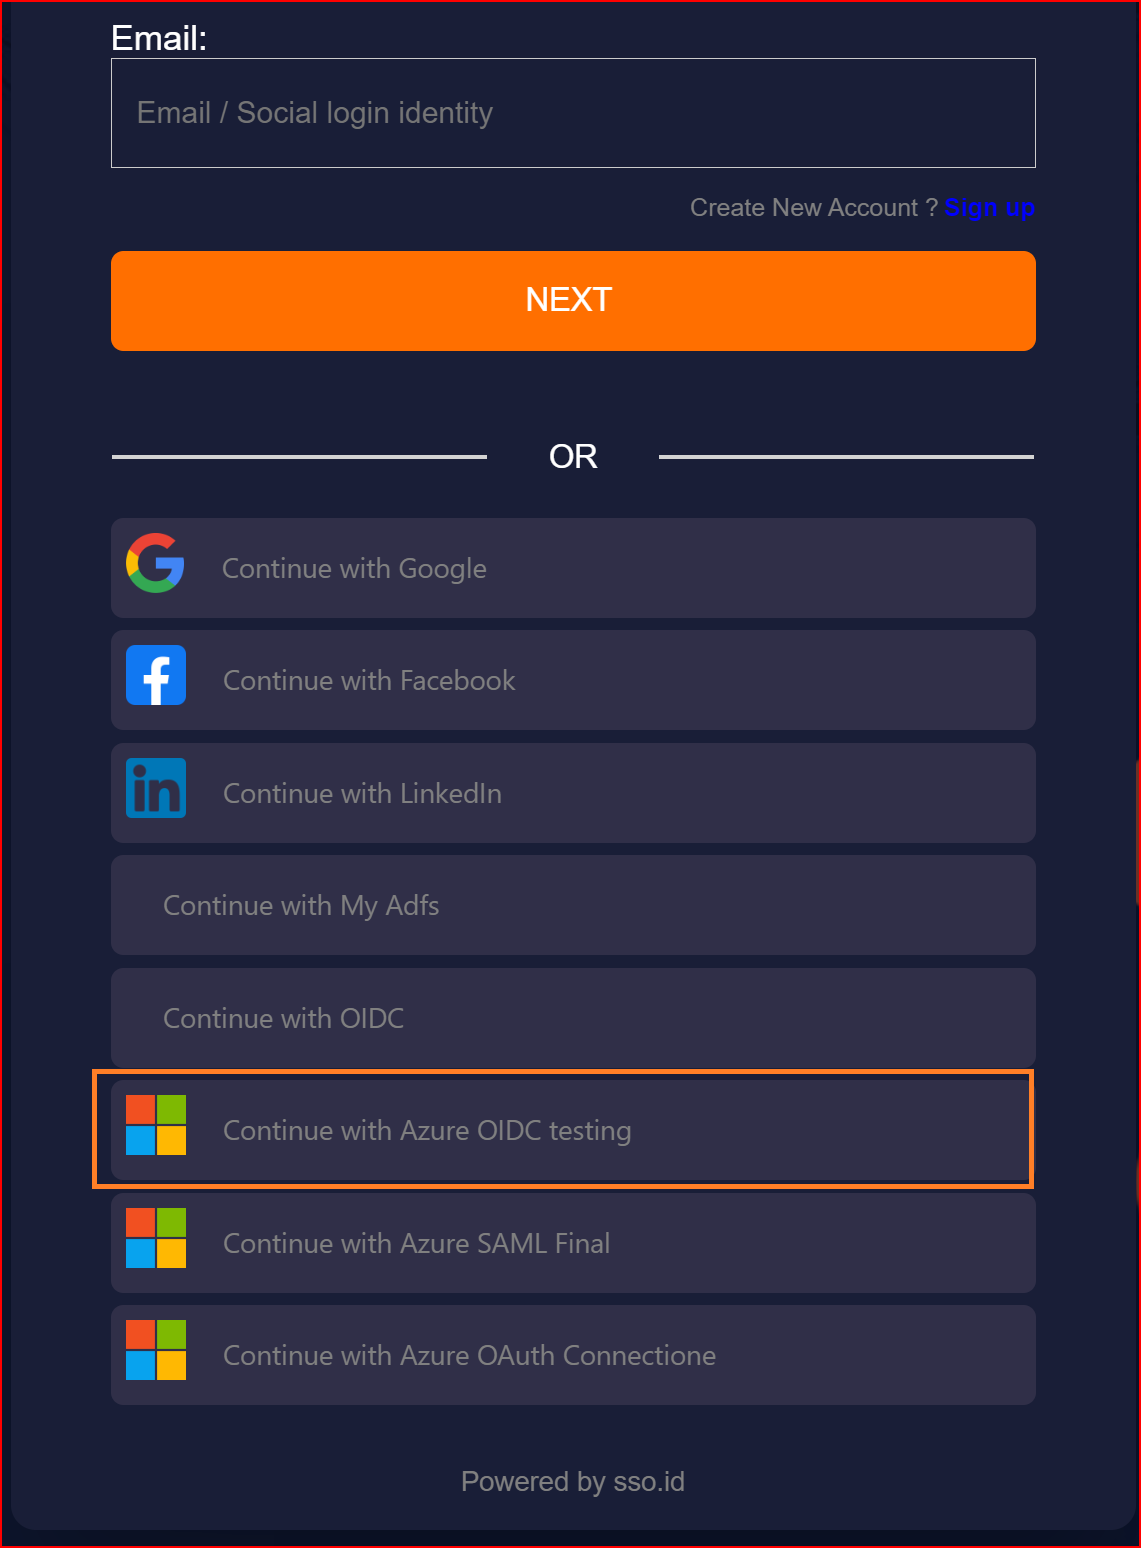
Finally, we have successfully logged into our application using the OIDC protocol with the Azure application.
To check the auto-provisioning and attribute mapping process, you should navigate to the user management section of your SSO.ID provider's dashboard. Ensure that the user is successfully created through the Azure OIDC connection with the attributes you have specified in the attribute mapping settings.

Pre-requisites
You need an SSO.ID account with admin permissions and an Azure account that has an active Azure Active Directory. Additionally, you must have the necessary permissions to create an App Registration within your Azure AD.
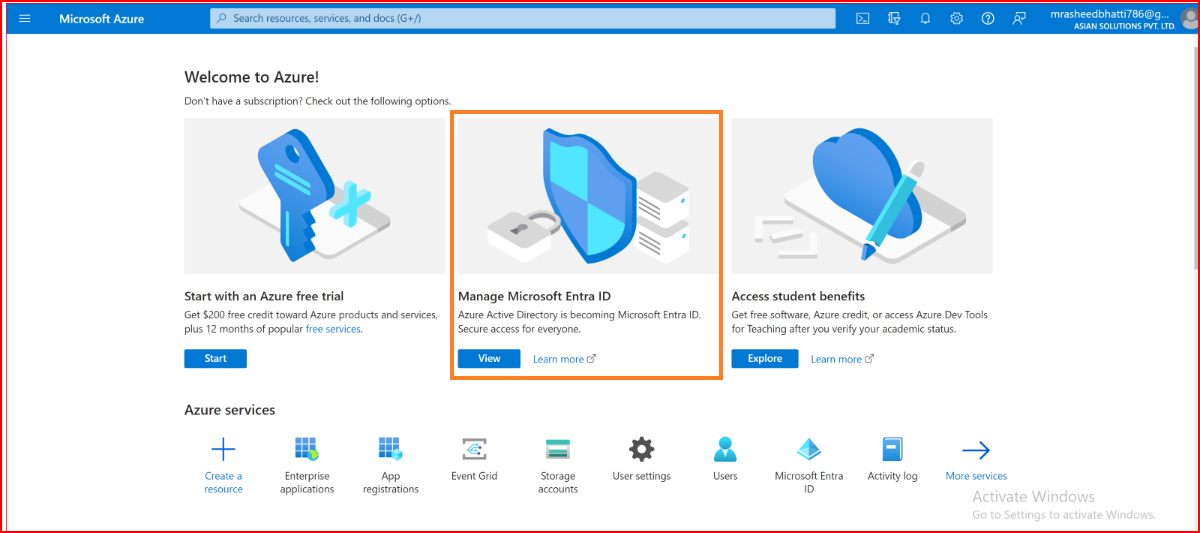
Go to Azure Portal and find Azure Active Directory
Within your Azure Account, navigate to your Azure Active Directory where you'd like to set the OIDC integration for.
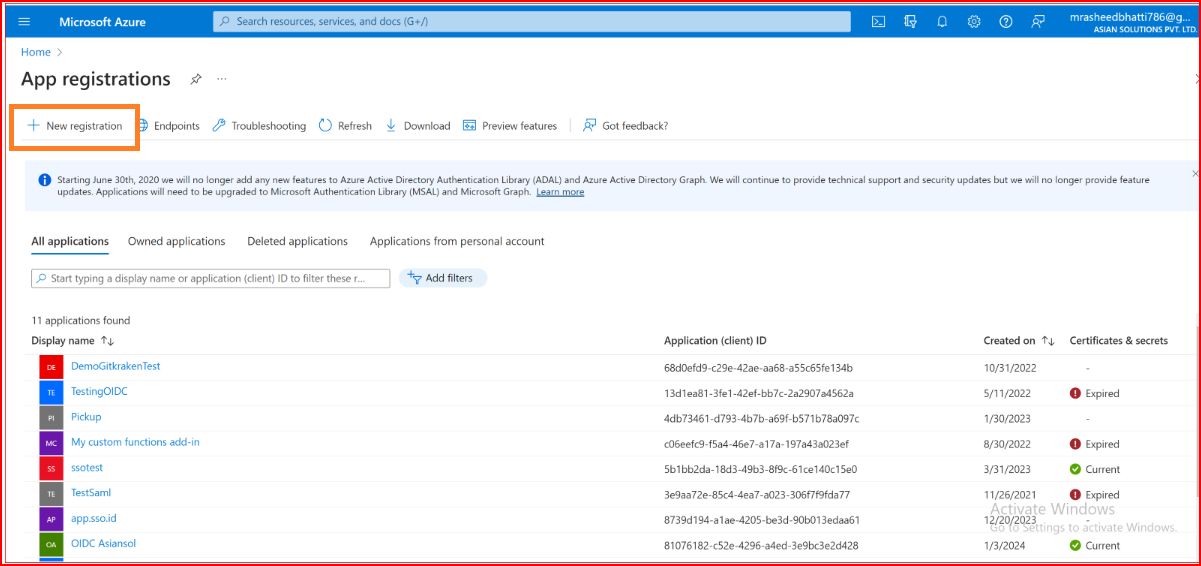
In Azure AD, make an App Registration
When you're in your Active Directory settings, go to App registrations in the navigation, and then choose new registration.
Azure AD App Registration Configuration
Give your application a name Configure your supported account types as per your login requirements. In this example, we are allowing Accounts in this organizational directory access to newly created applications. Remember the authorized redirect URL should be
https://app.sso.id/oidc/callback
. You'll want to paste that URL into the Redirect URI input as shown. Make sure you select Web for the type. Click Register.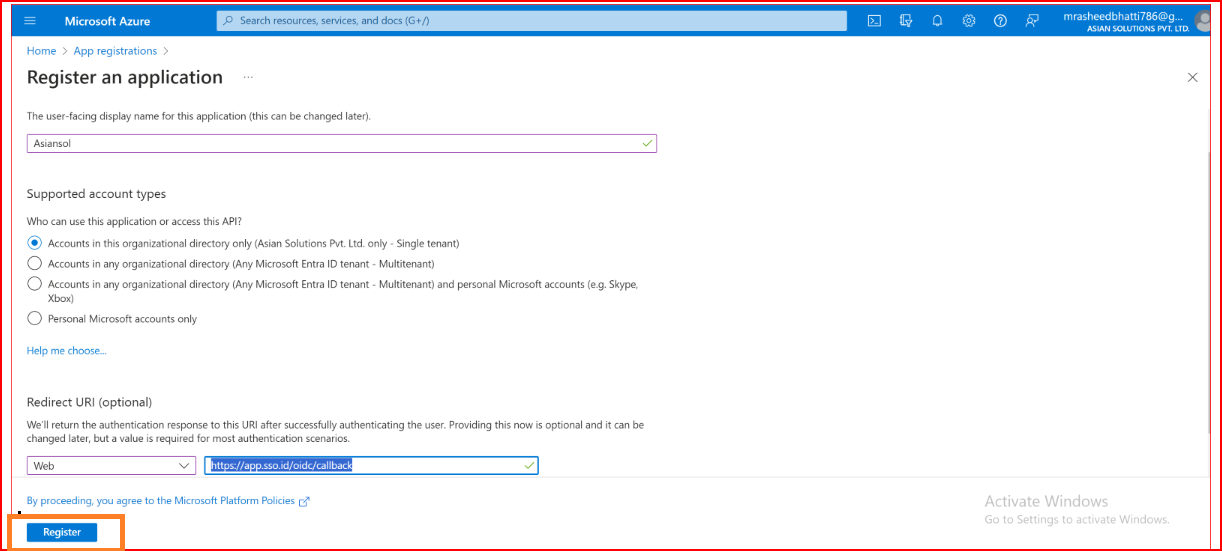
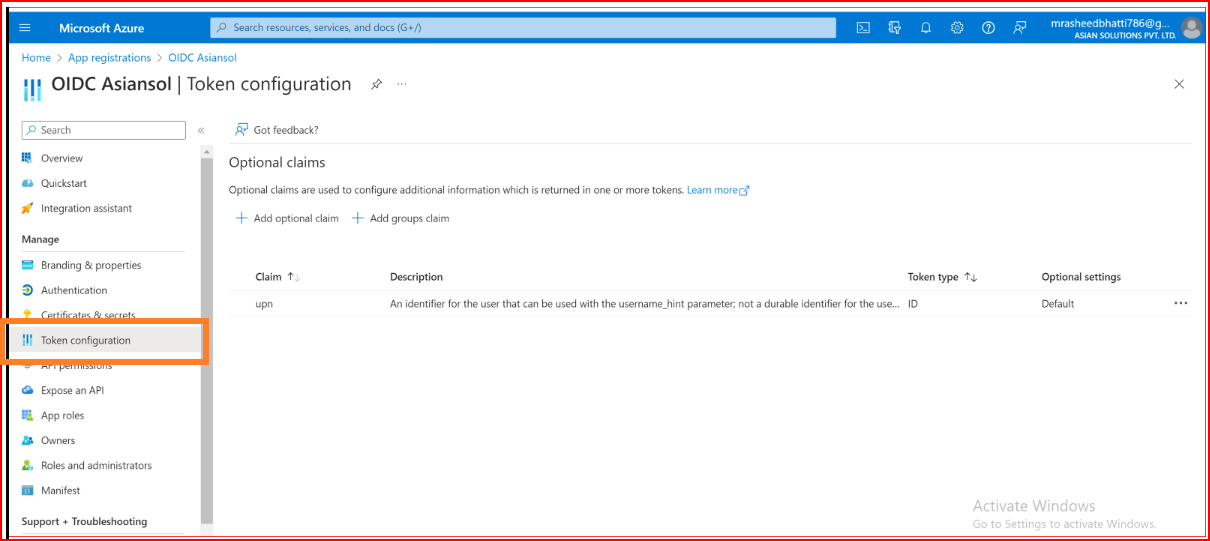
In Azure AD, include a UPN Claim
Begin by going to the Token Configuration section of your application.
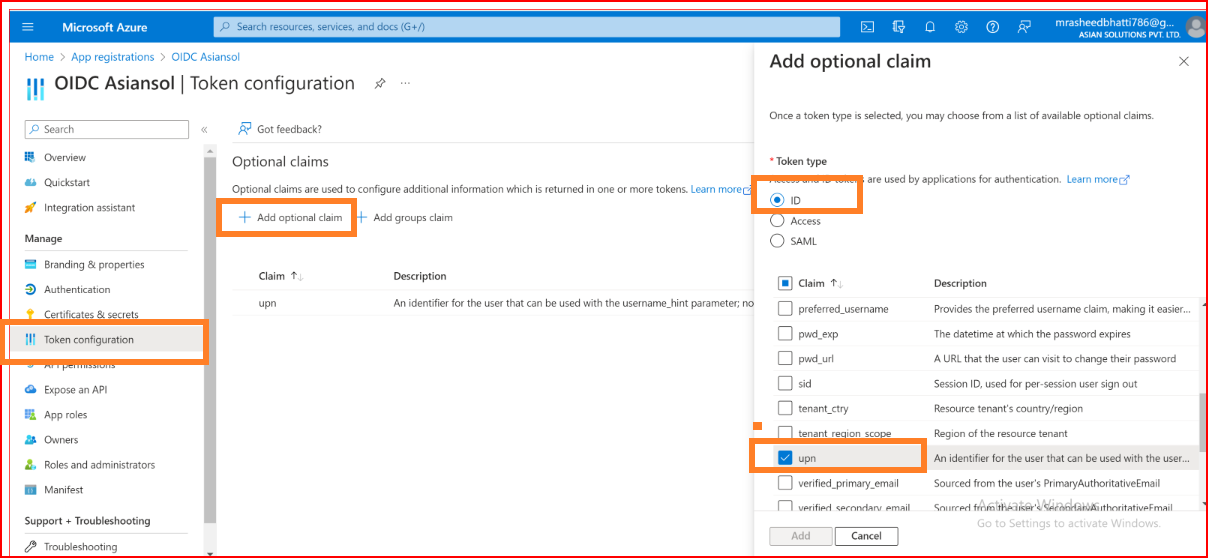
Press the "Add optional claim" button, opt for the ID token type, and pick the UPN claim.
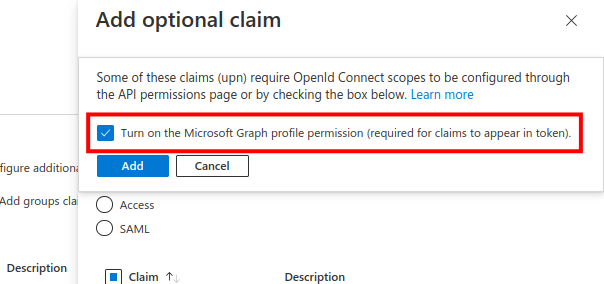
Press the "Add" button, ensuring that you check the "Turn on the Microsoft Graph profile permission" checkbox in the popup that appears.
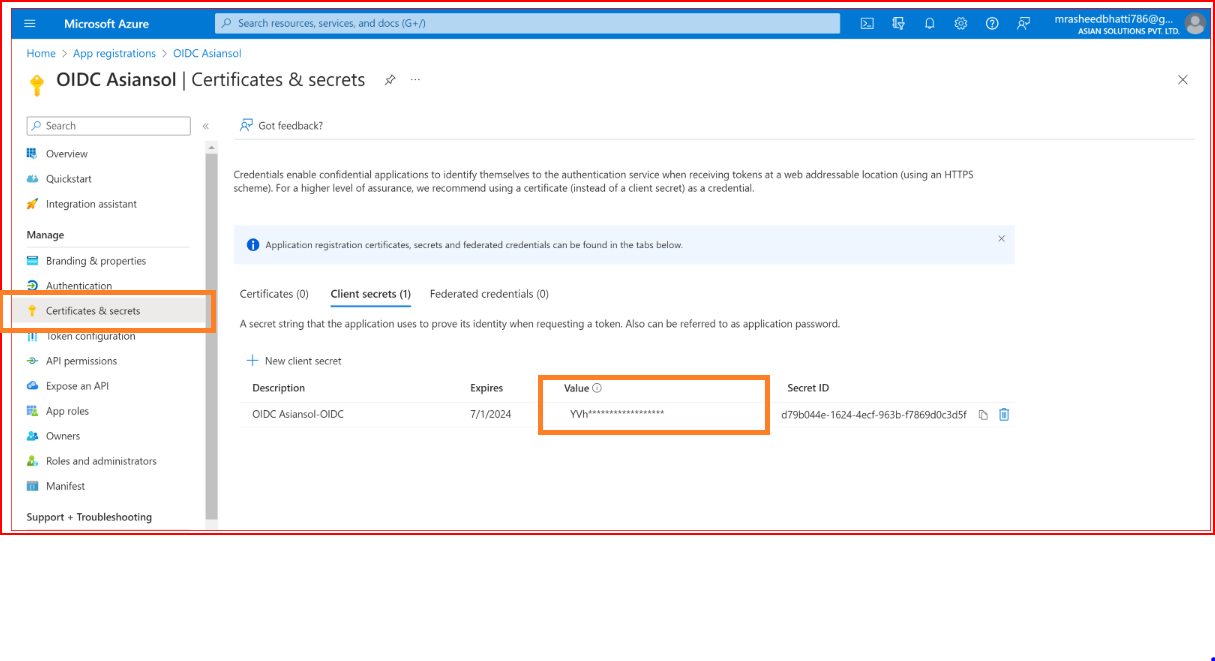
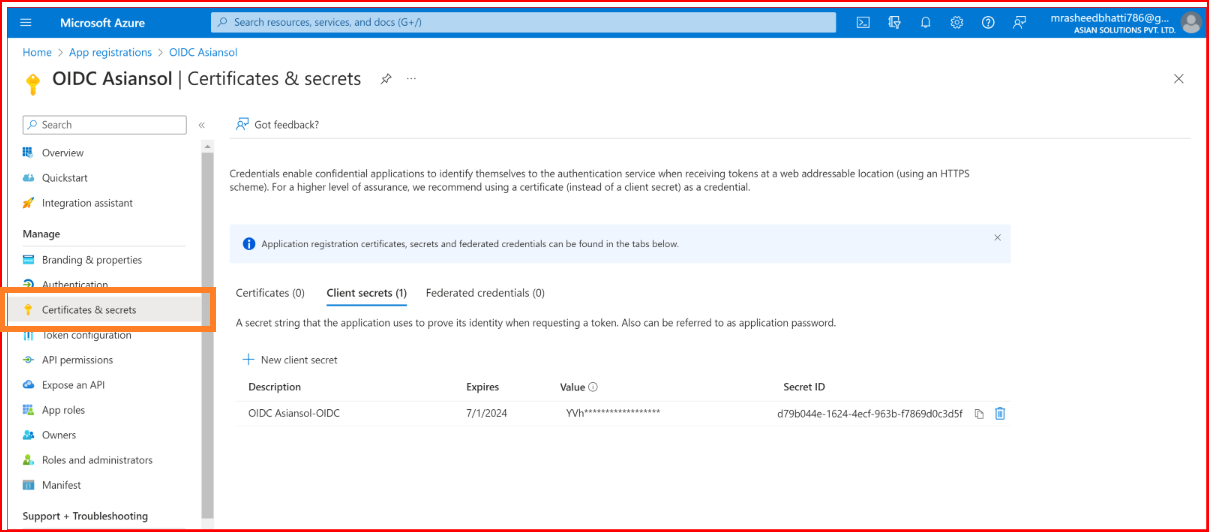
Azure AD Configure App Credentials
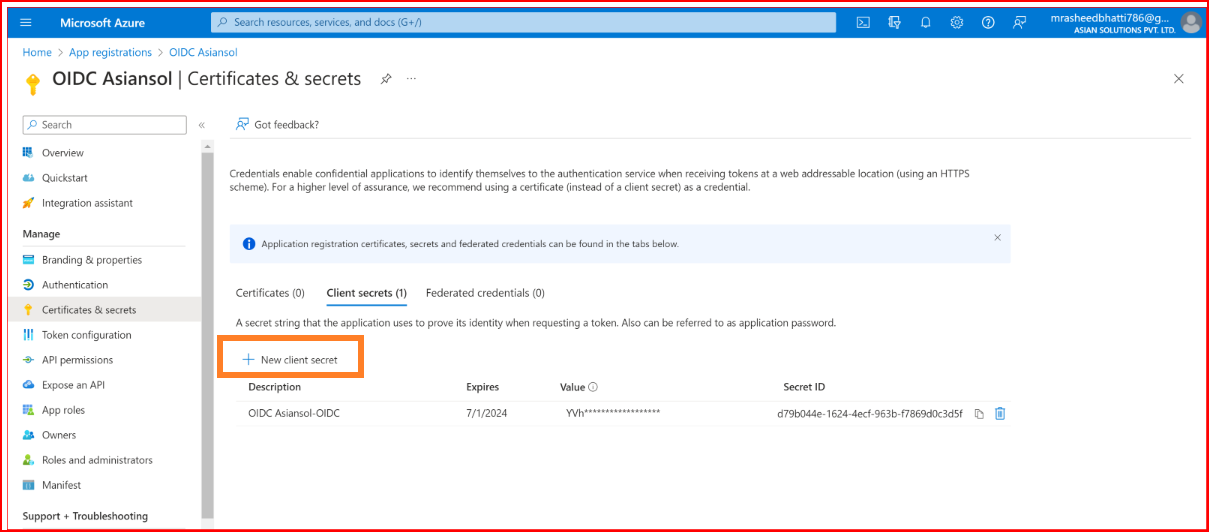
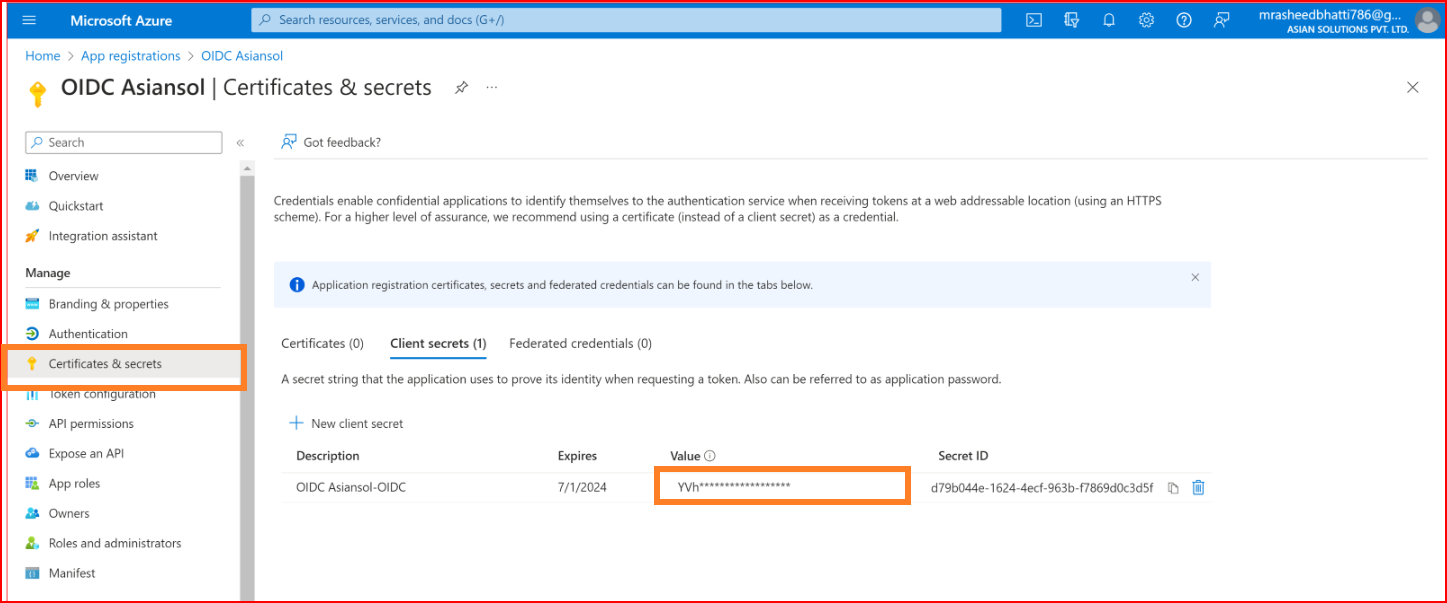
Go to the "Certificates & Secrets" section of your application.
Click the New client secret button.
Provide a description and set an expiration for your secret.
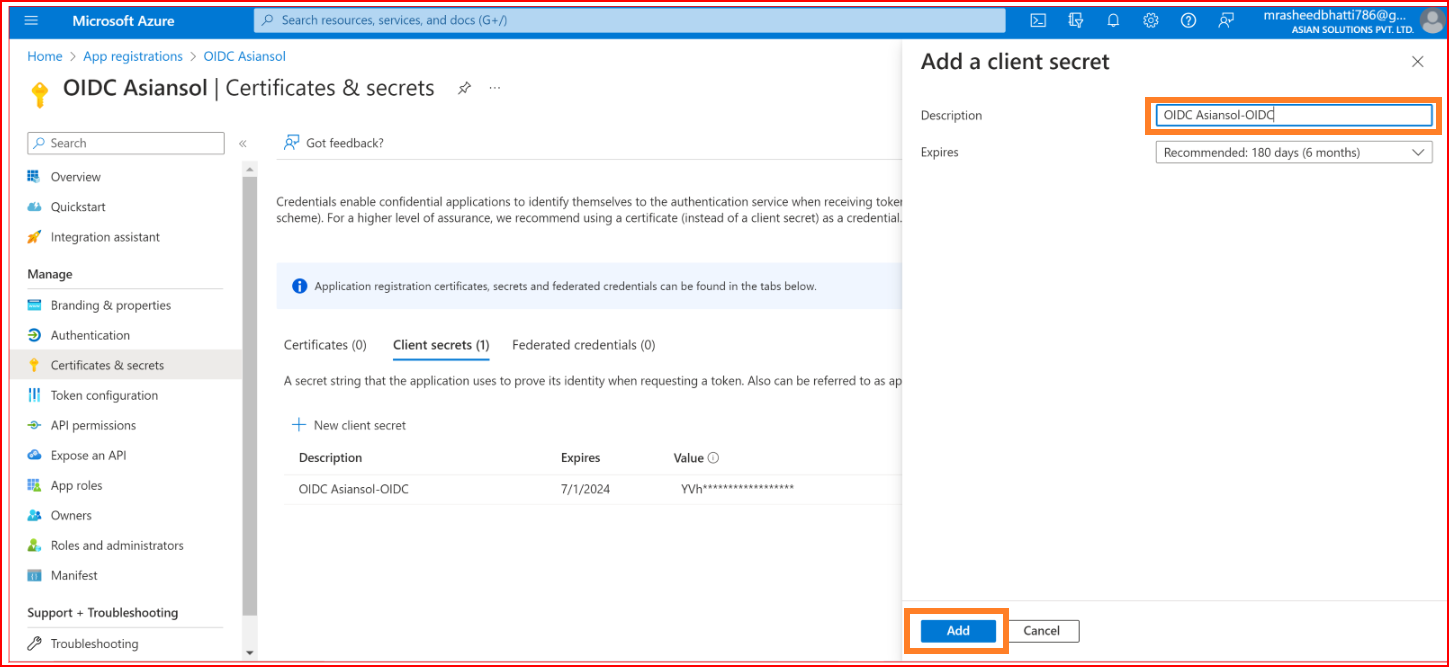
Press the "Add" button. Once your secret is generated, copy its value. Take the copied secret value and paste it into the Secret input within our SSO.ID OIDC settings.
For Azure AD configuration
You require two additional pieces of information the Client ID and the Provider URL.
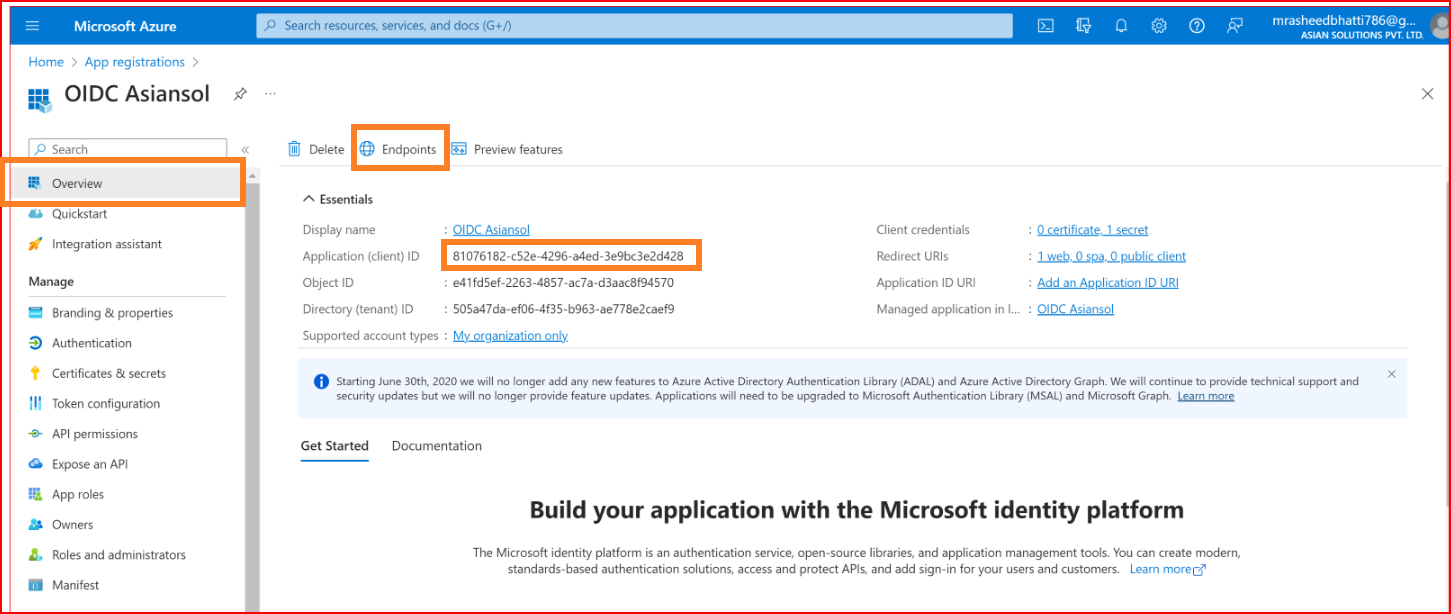
- The Client ID
- The Provider URL
Retrieve both pieces of information from the Overview section of your Azure AD application. Use the Application (client) ID from the "Application ID" field as the Client ID. Find the Provider URL in the "Open ID Connect metadata document" field by clicking on the "Endpoints" button.