OAuth Protocol
OAuth (Open Authorization) is an open-standard protocol that allows secure authorization of third-party applications to access resources on a user's behalf without sharing their credentials. It's commonly used in Single Sign-On (SSO) systems to enable seamless access across multiple services. In OAuth, users grant access to their resources (like profiles or data) hosted on one service to another service without revealing their credentials. This is achieved through the exchange of tokens, typically an access token and a refresh token, which are issued by the authentication server. These tokens grant limited access for a specific duration and scope defined by the user. Overall, OAuth facilitates secure and controlled access to user data across different platforms, enhancing both user experience and security in Single Sign-On systems.
Create Connections with Google
Google Connection in Single Sign-On Identity (SSO.ID) typically refers to the integration of Google as an identity provider within a Single Sign-On system. Single Sign-On (SSO.ID) is a system that allows users to access multiple applications with one set of login credentials. Instead of having separate usernames and passwords for each application, users can sign in once and gain access to all the connected applications within the SSO.ID environment. When Google is integrated as a connection in an SSO.ID system, it means that users can use their Google accounts (Google IDs and passwords) to authenticate themselves across various applications that are part of the SSO.ID setup. This integration leverages Google's authentication mechanisms to verify the user's identity. This setup provides convenience to users who already have Google accounts, as they can use their existing credentials to access other applications within the SSO.ID ecosystem without the need to create separate accounts for each application. Additionally, it simplifies identity management for administrators, as they can centrally manage user access and permissions through the SSO.ID system.
SSO.ID endpoints to configure the Google app
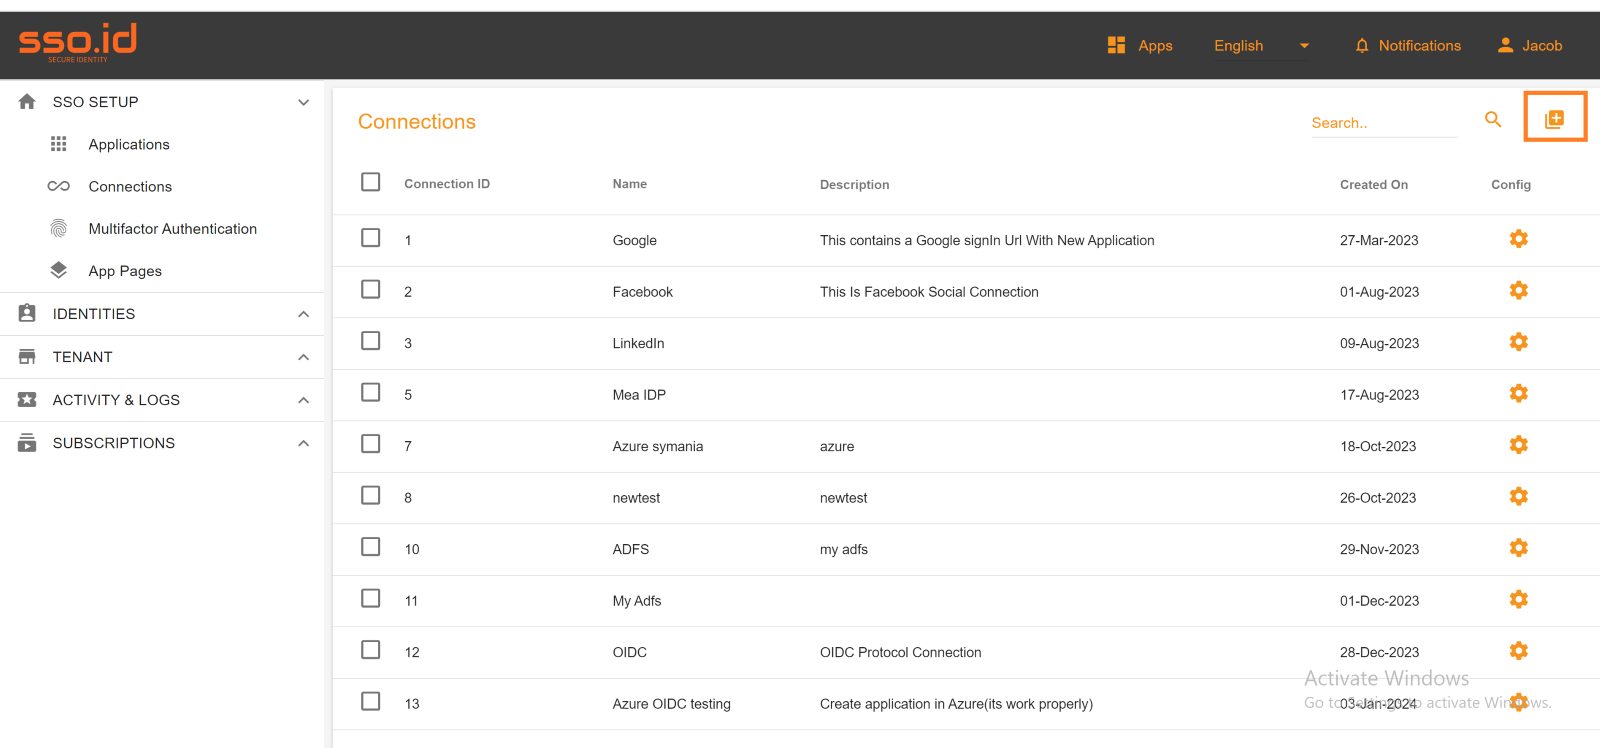
To create a new social connection and log in to your application on the connections page, you should click on the "Create Connection" button in the connection section of the SSO.ID.

Select the Google social connection to set up Google integration for your application within the Single Sign-On Identity (SSO.ID) platform).

Enter the valid Client ID and Client Secret Key from your generated Google application. Once you've entered the correct Client ID and Client Secret, click the "Create" button. This will successfully establish the Google connection.
Test Connection
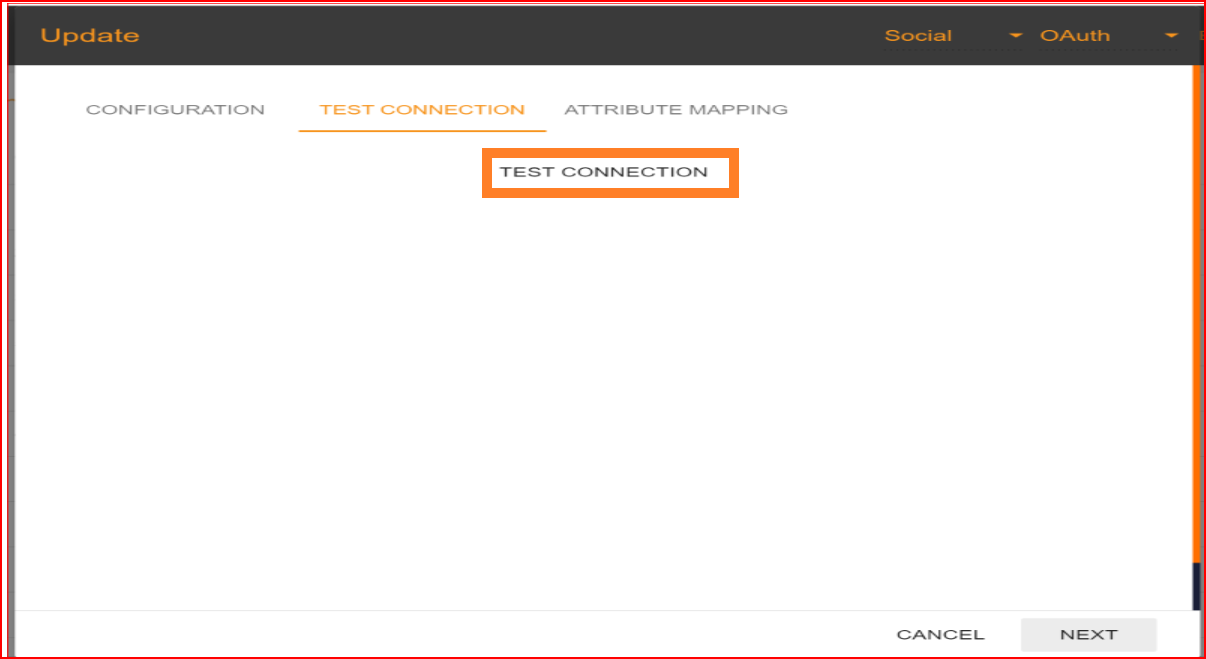
After configuring the Client ID and Client Secret, you should proceed by clicking the "NEXT" button to test the connection. In the test connection section, SSO.ID offers a feature to verify whether your connection has been established successfully or not. To perform the test, click on the "TEST CONNECTION" button.

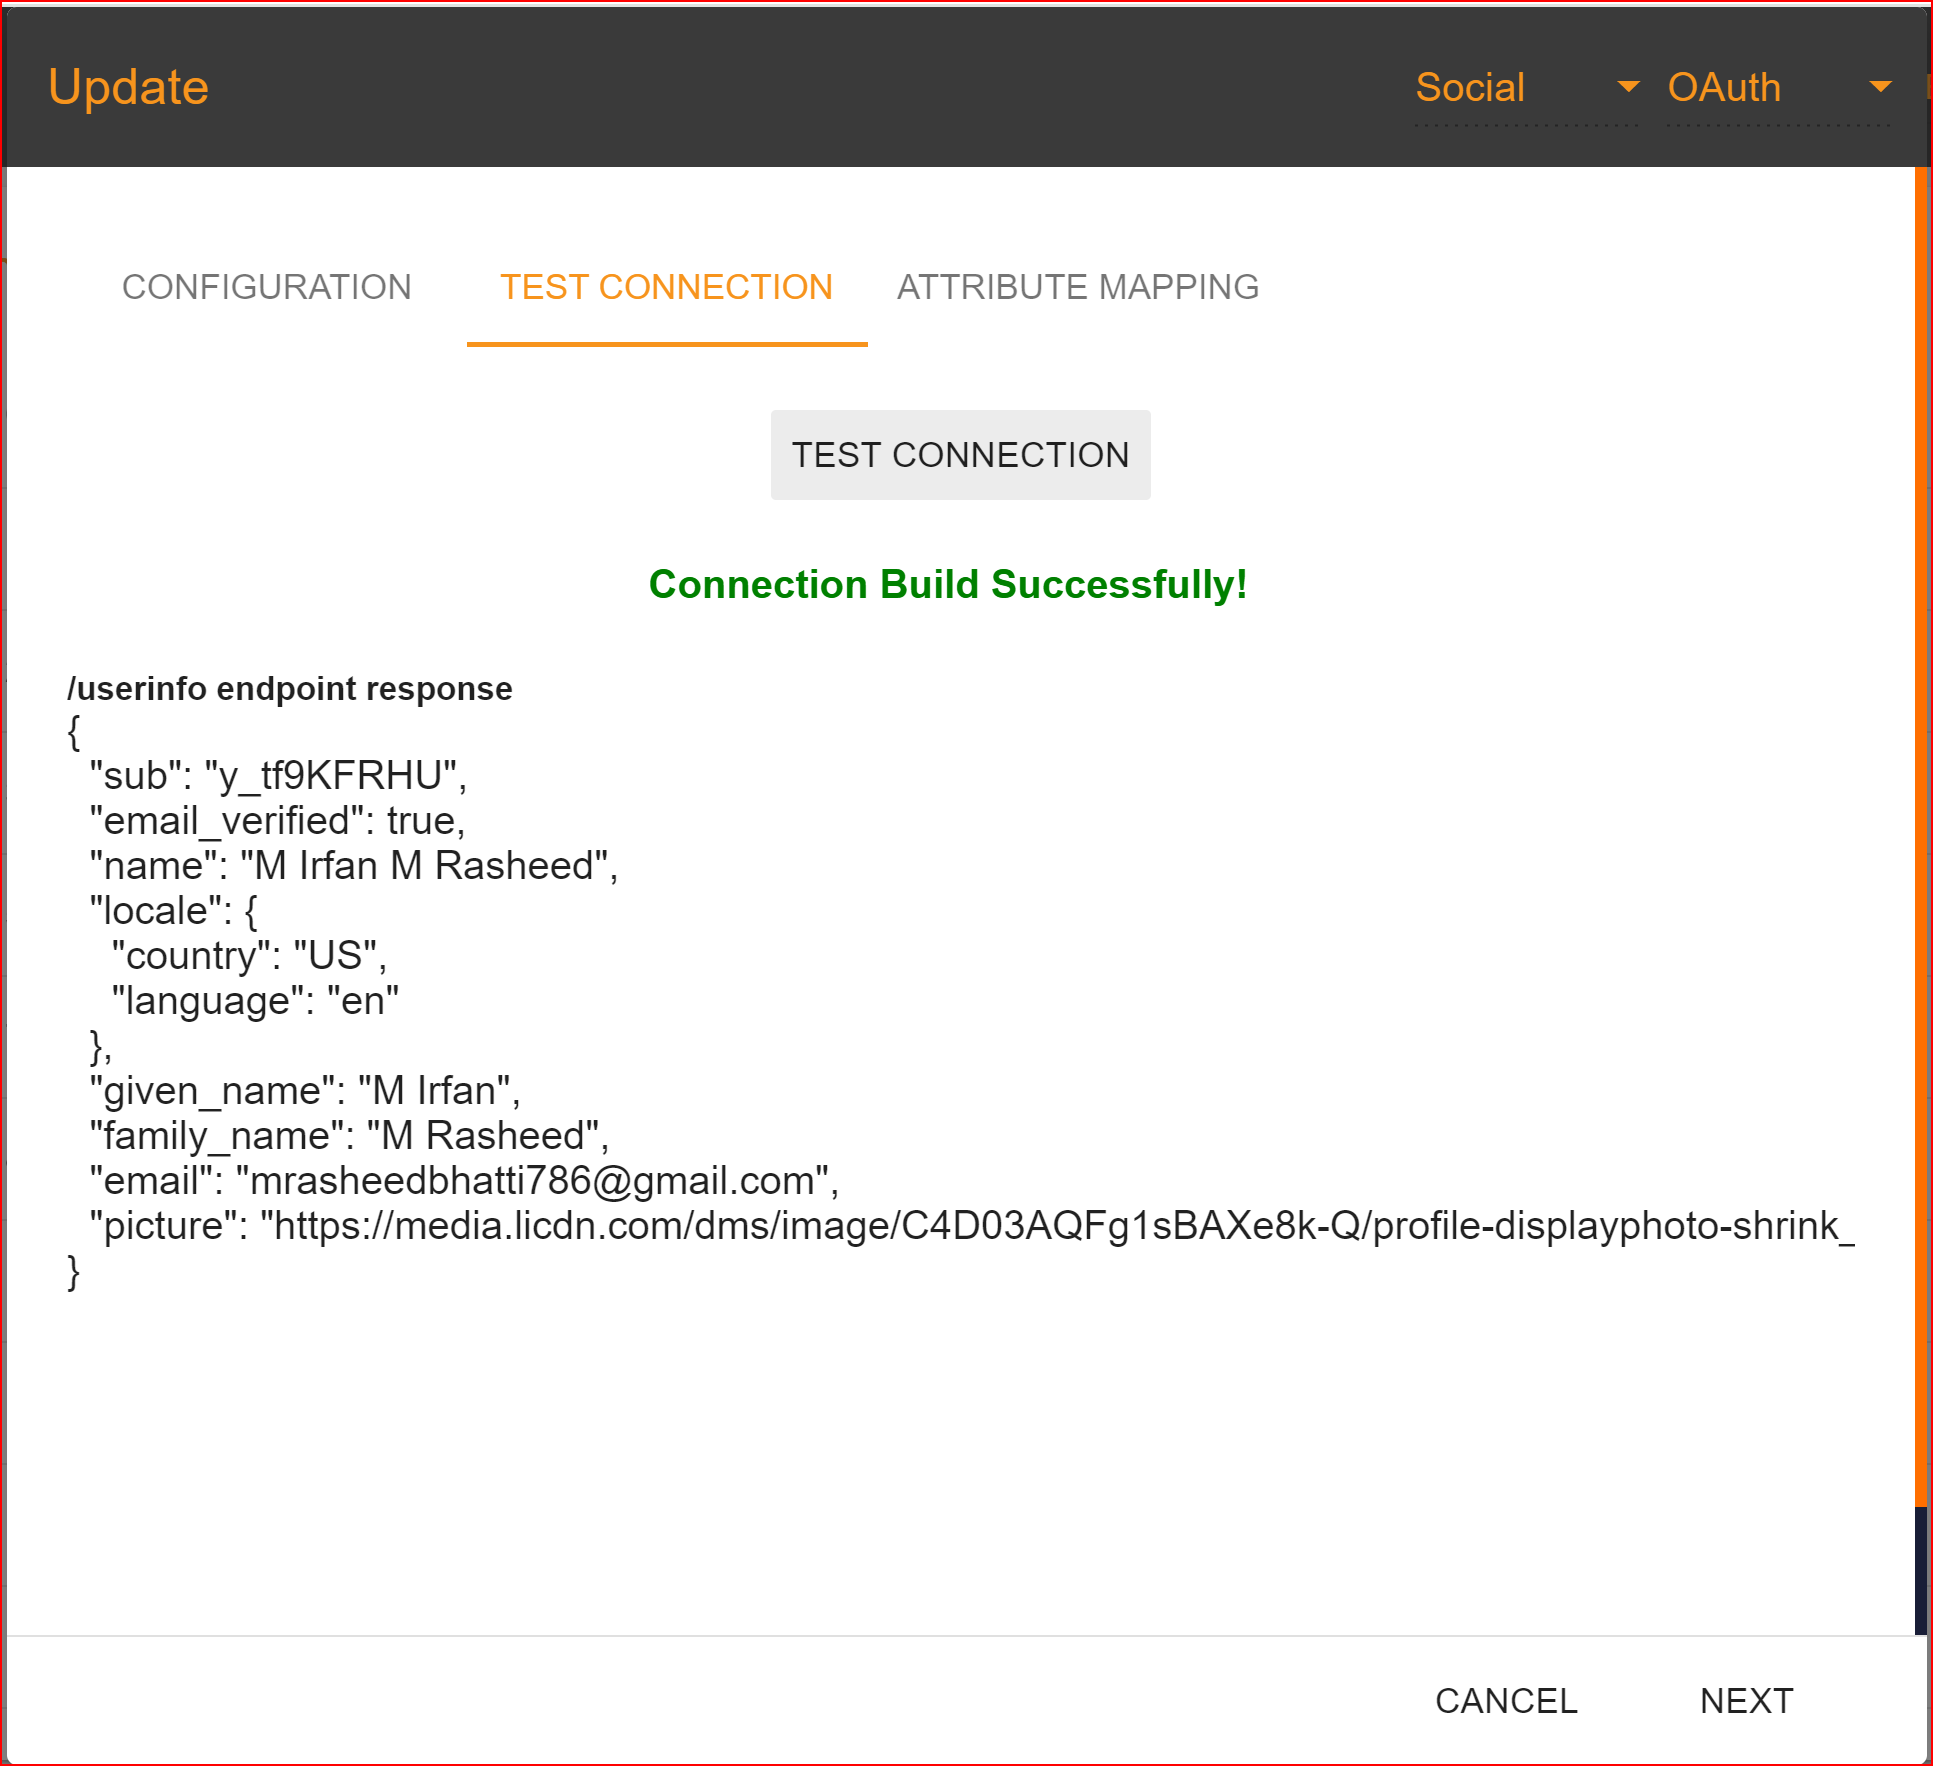
If all your configuration parameters are correct, including a valid Client ID and Client Secret, you will see a message stating, "Connection built successfully." Then, proceed by clicking on the "NEXT" button to proceed to attribute mapping.

Attribute Mapping
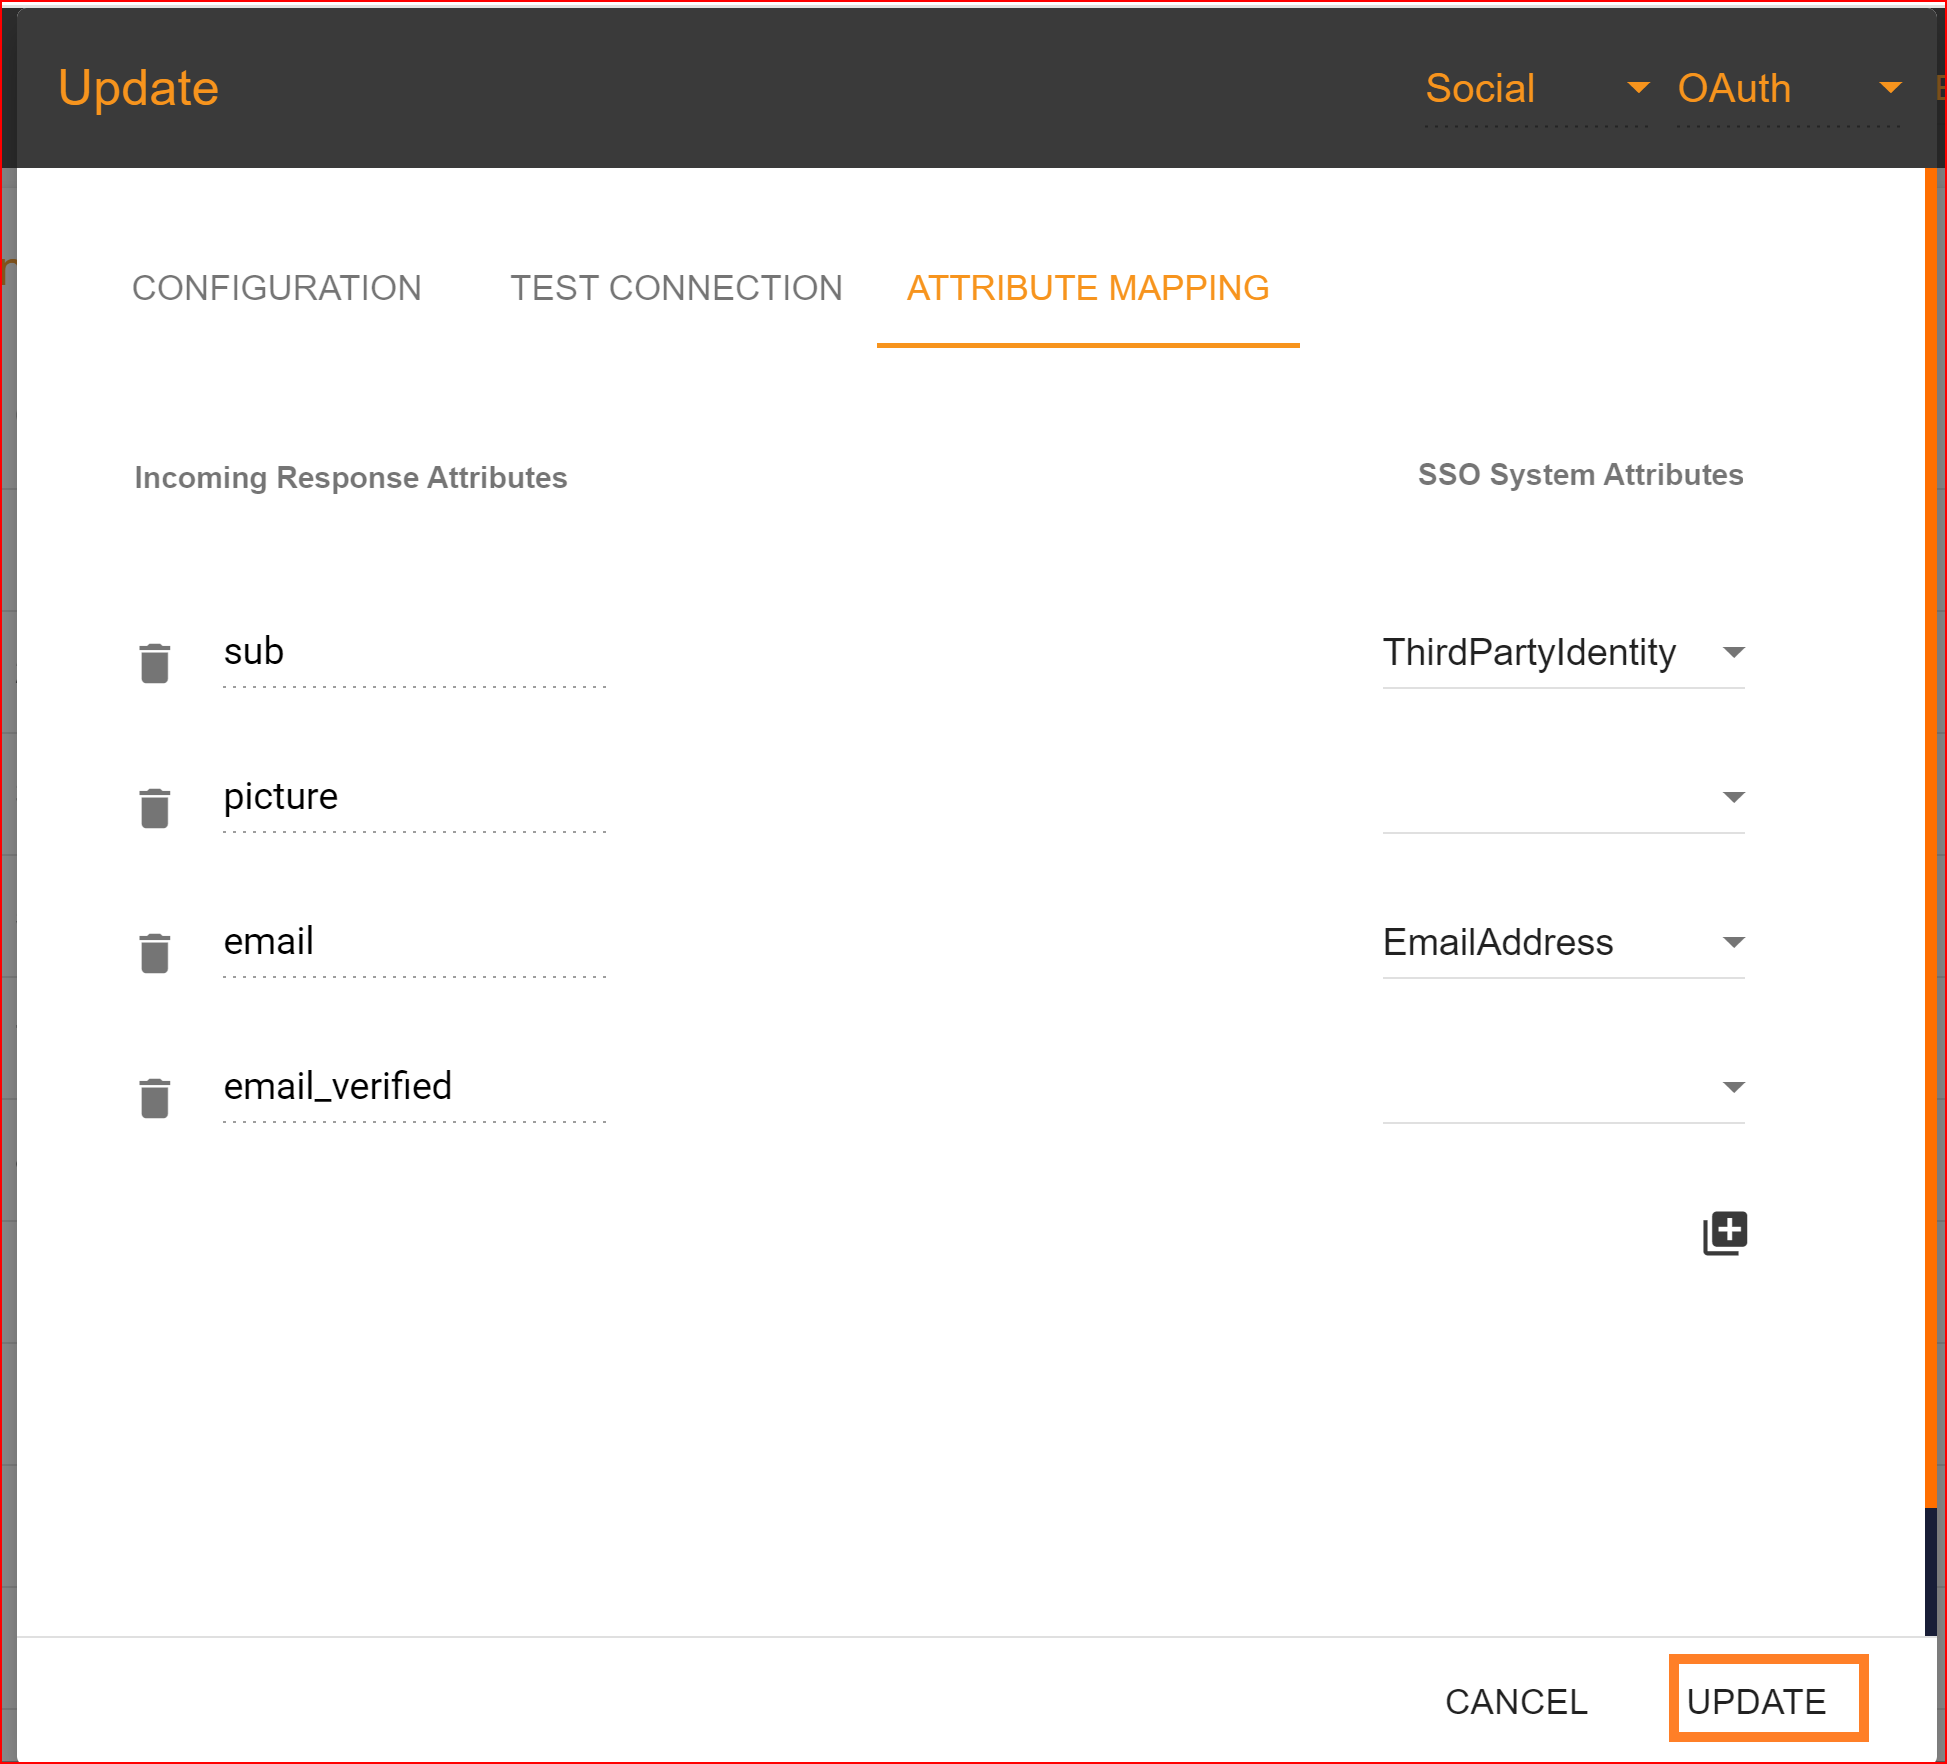
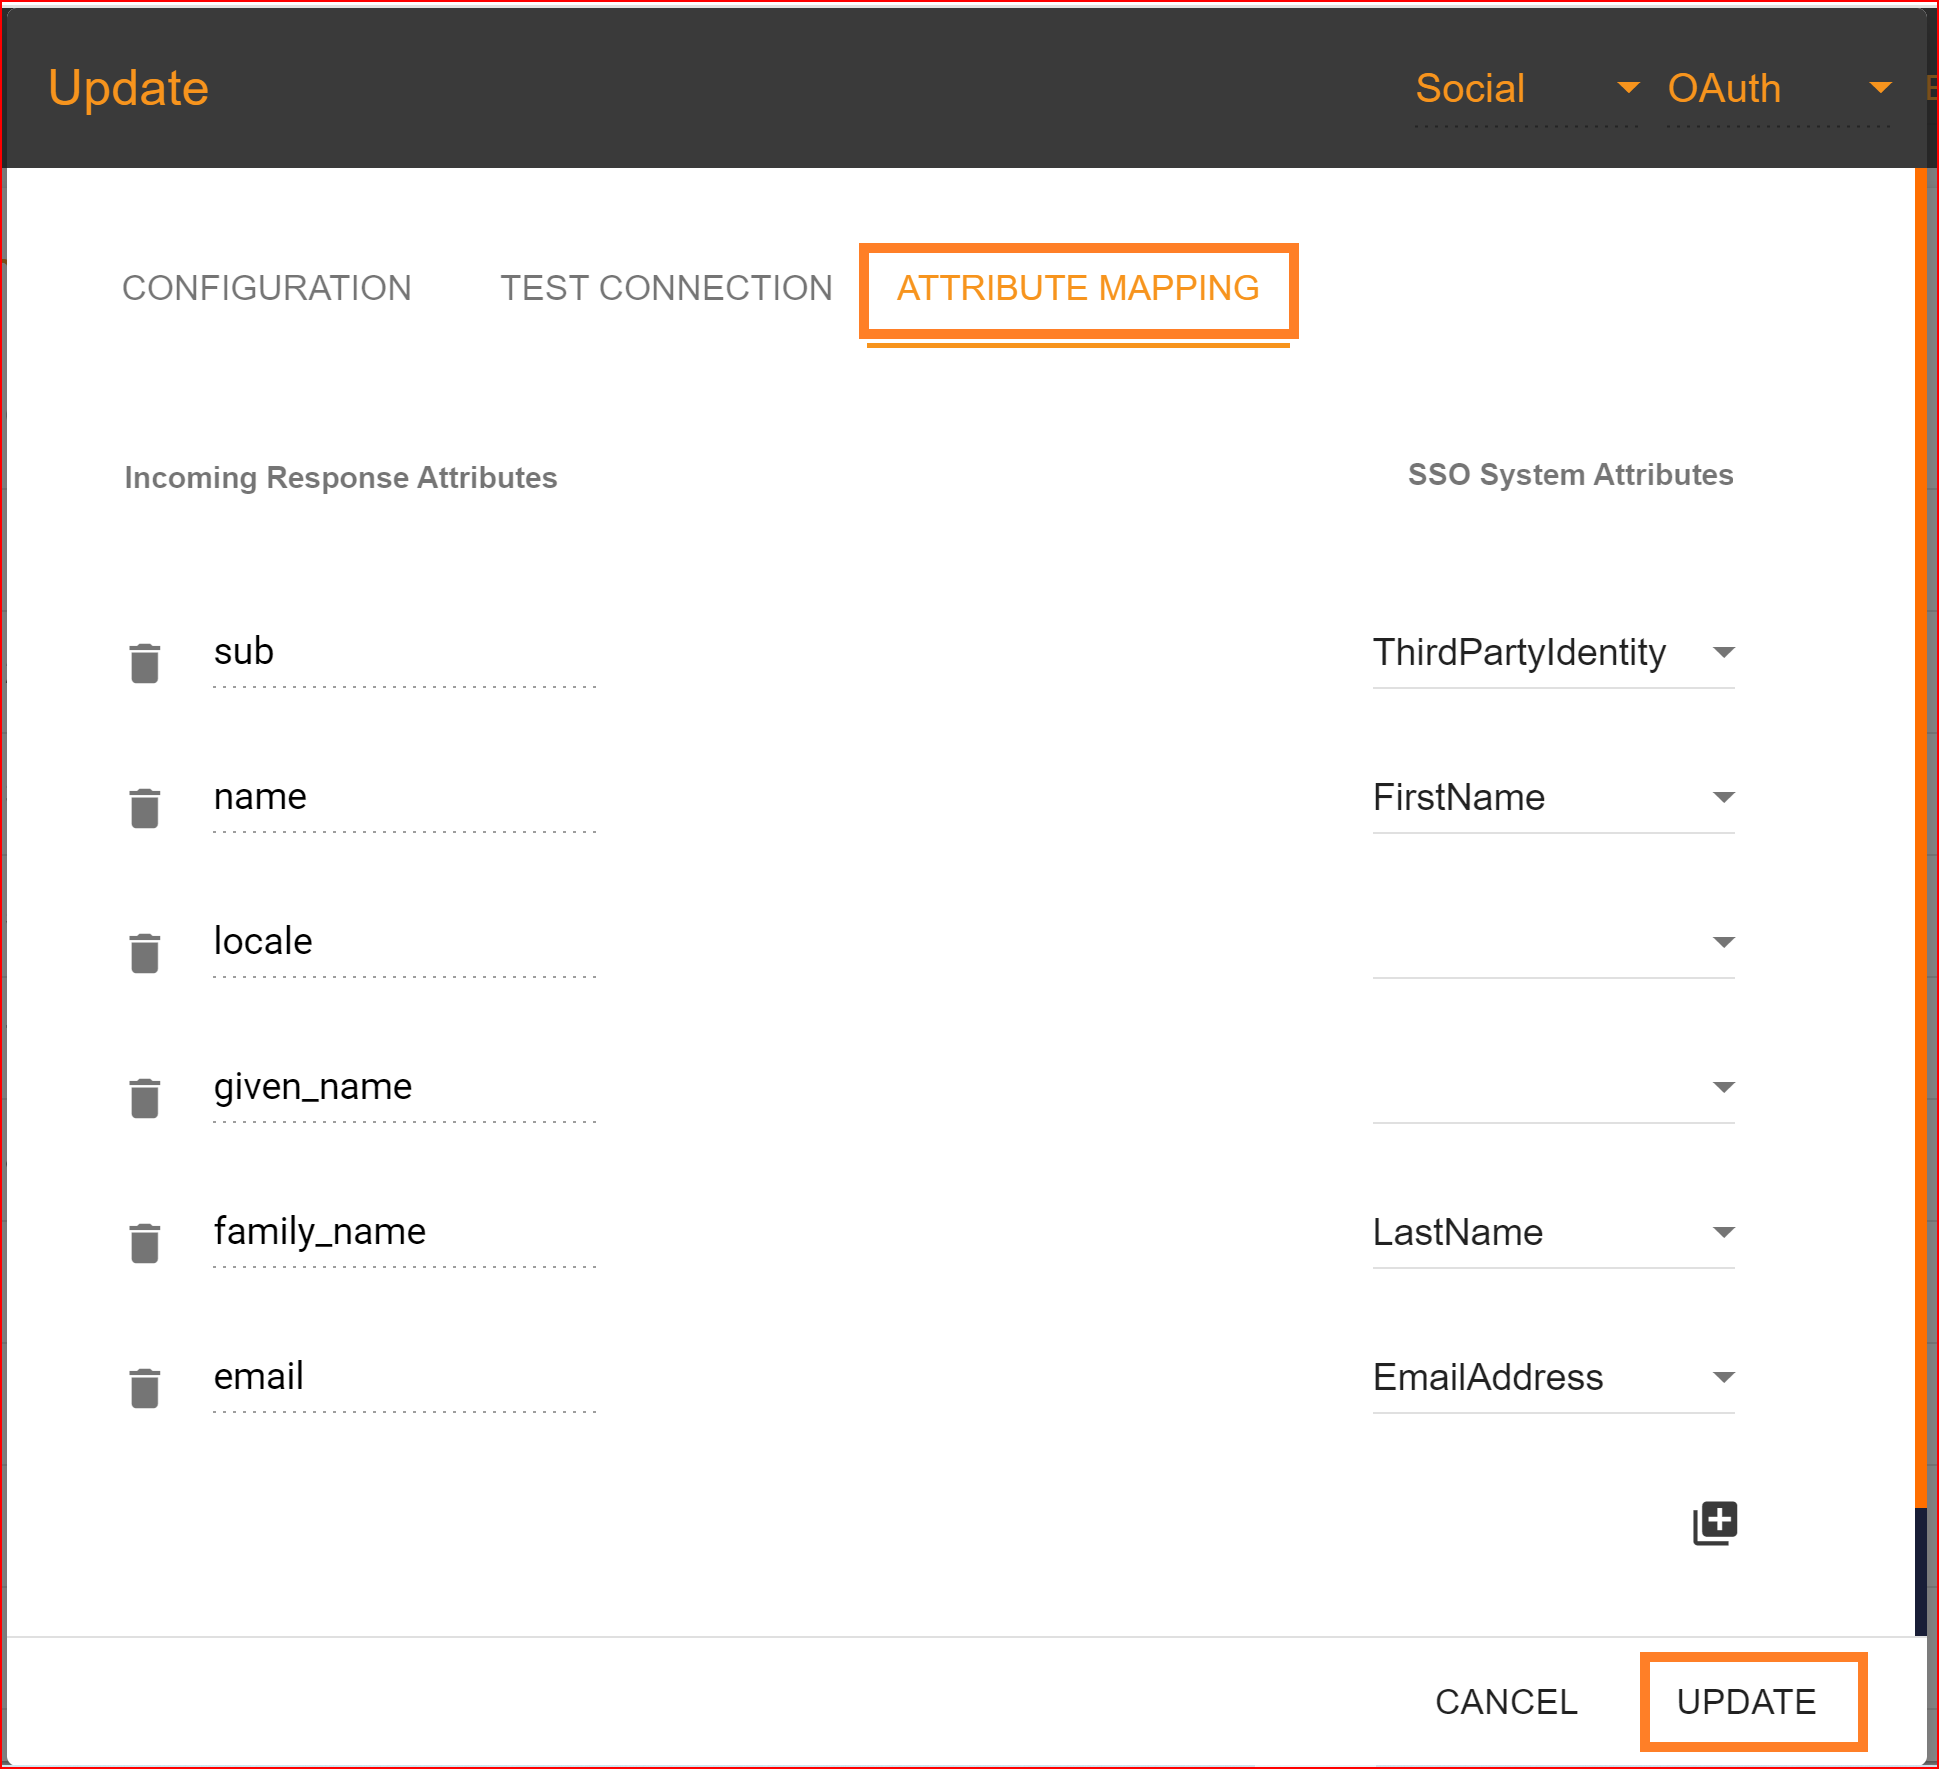
In Single Sign-On Identity (SSO.ID), attribute mapping involves linking attributes or user information from the identity provider (IdP) with corresponding attributes in the service provider (SP) system. This ensures that relevant user data is accurately transferred between the IdP and SP during authentication. In the attribute mapping section, the "Email Address" attribute is mandatory, while other attributes are optional. After completing the attribute mapping, click the "Update" button to finalize the connection establishment process, which is now successfully completed.
To check attribute mapping correctly in Single Sign-On (SSO.ID) To check the attribute mapping process in the SSO.ID, navigate your application configuration setting.
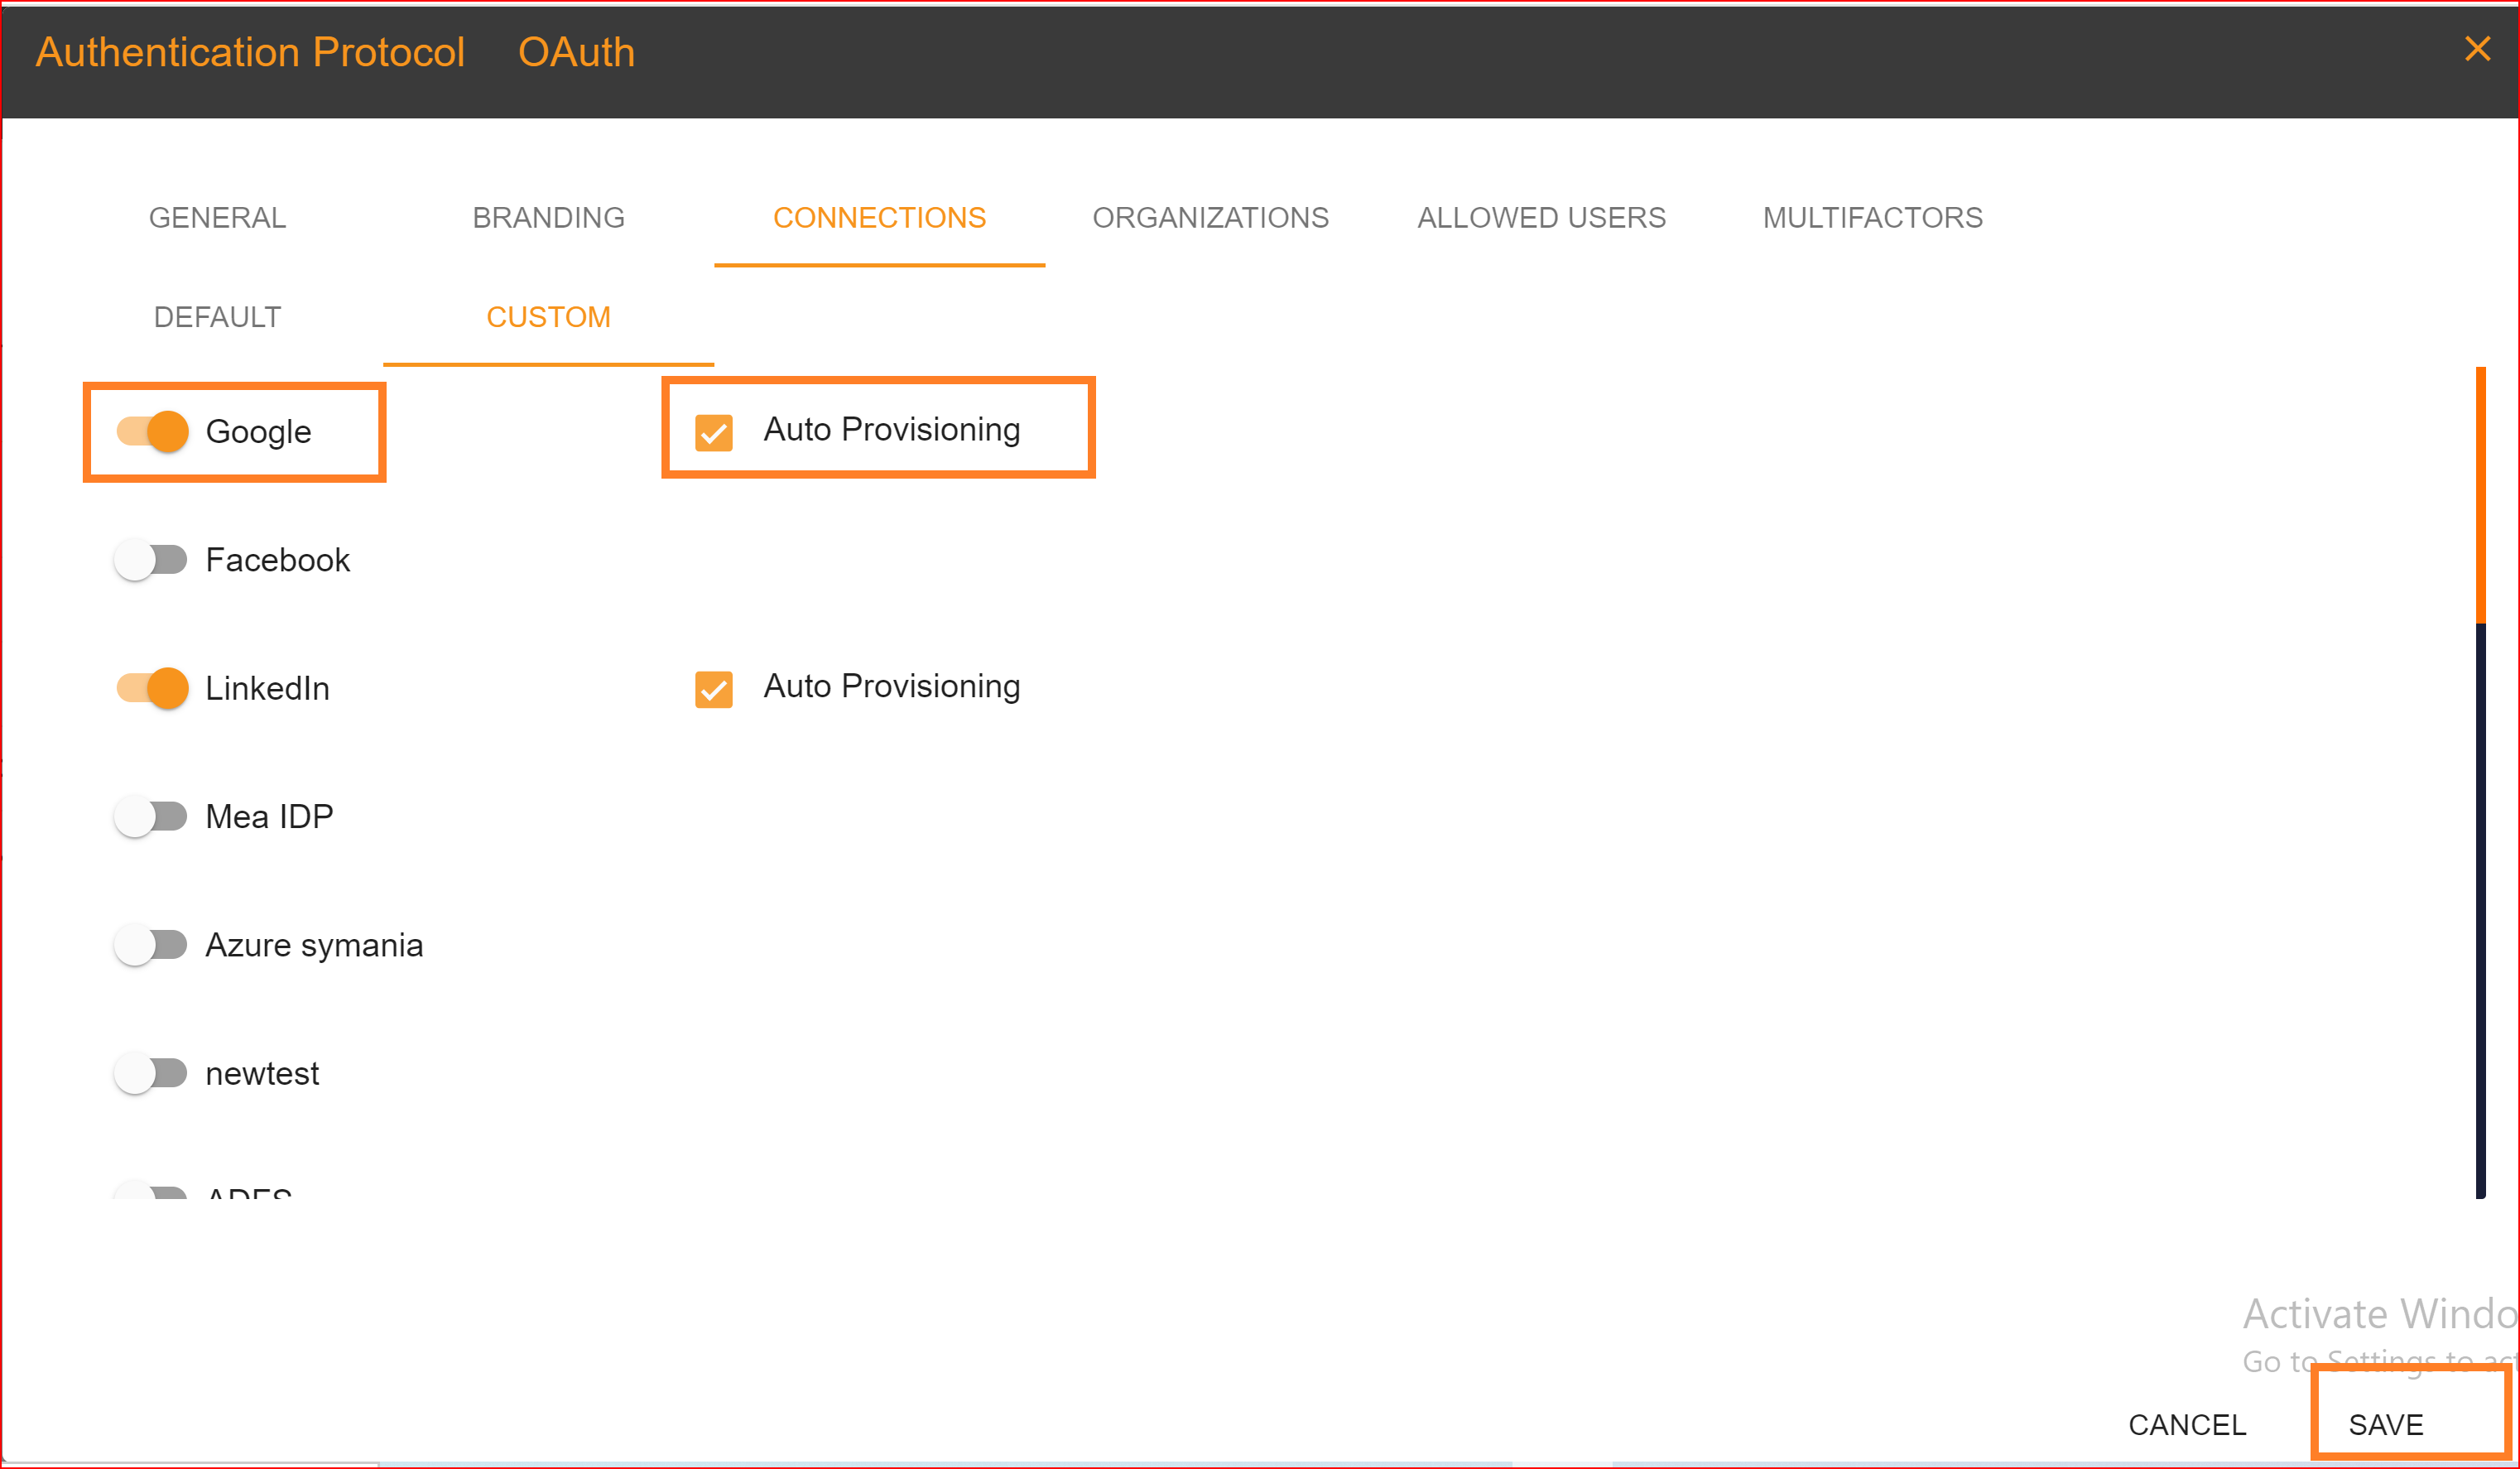
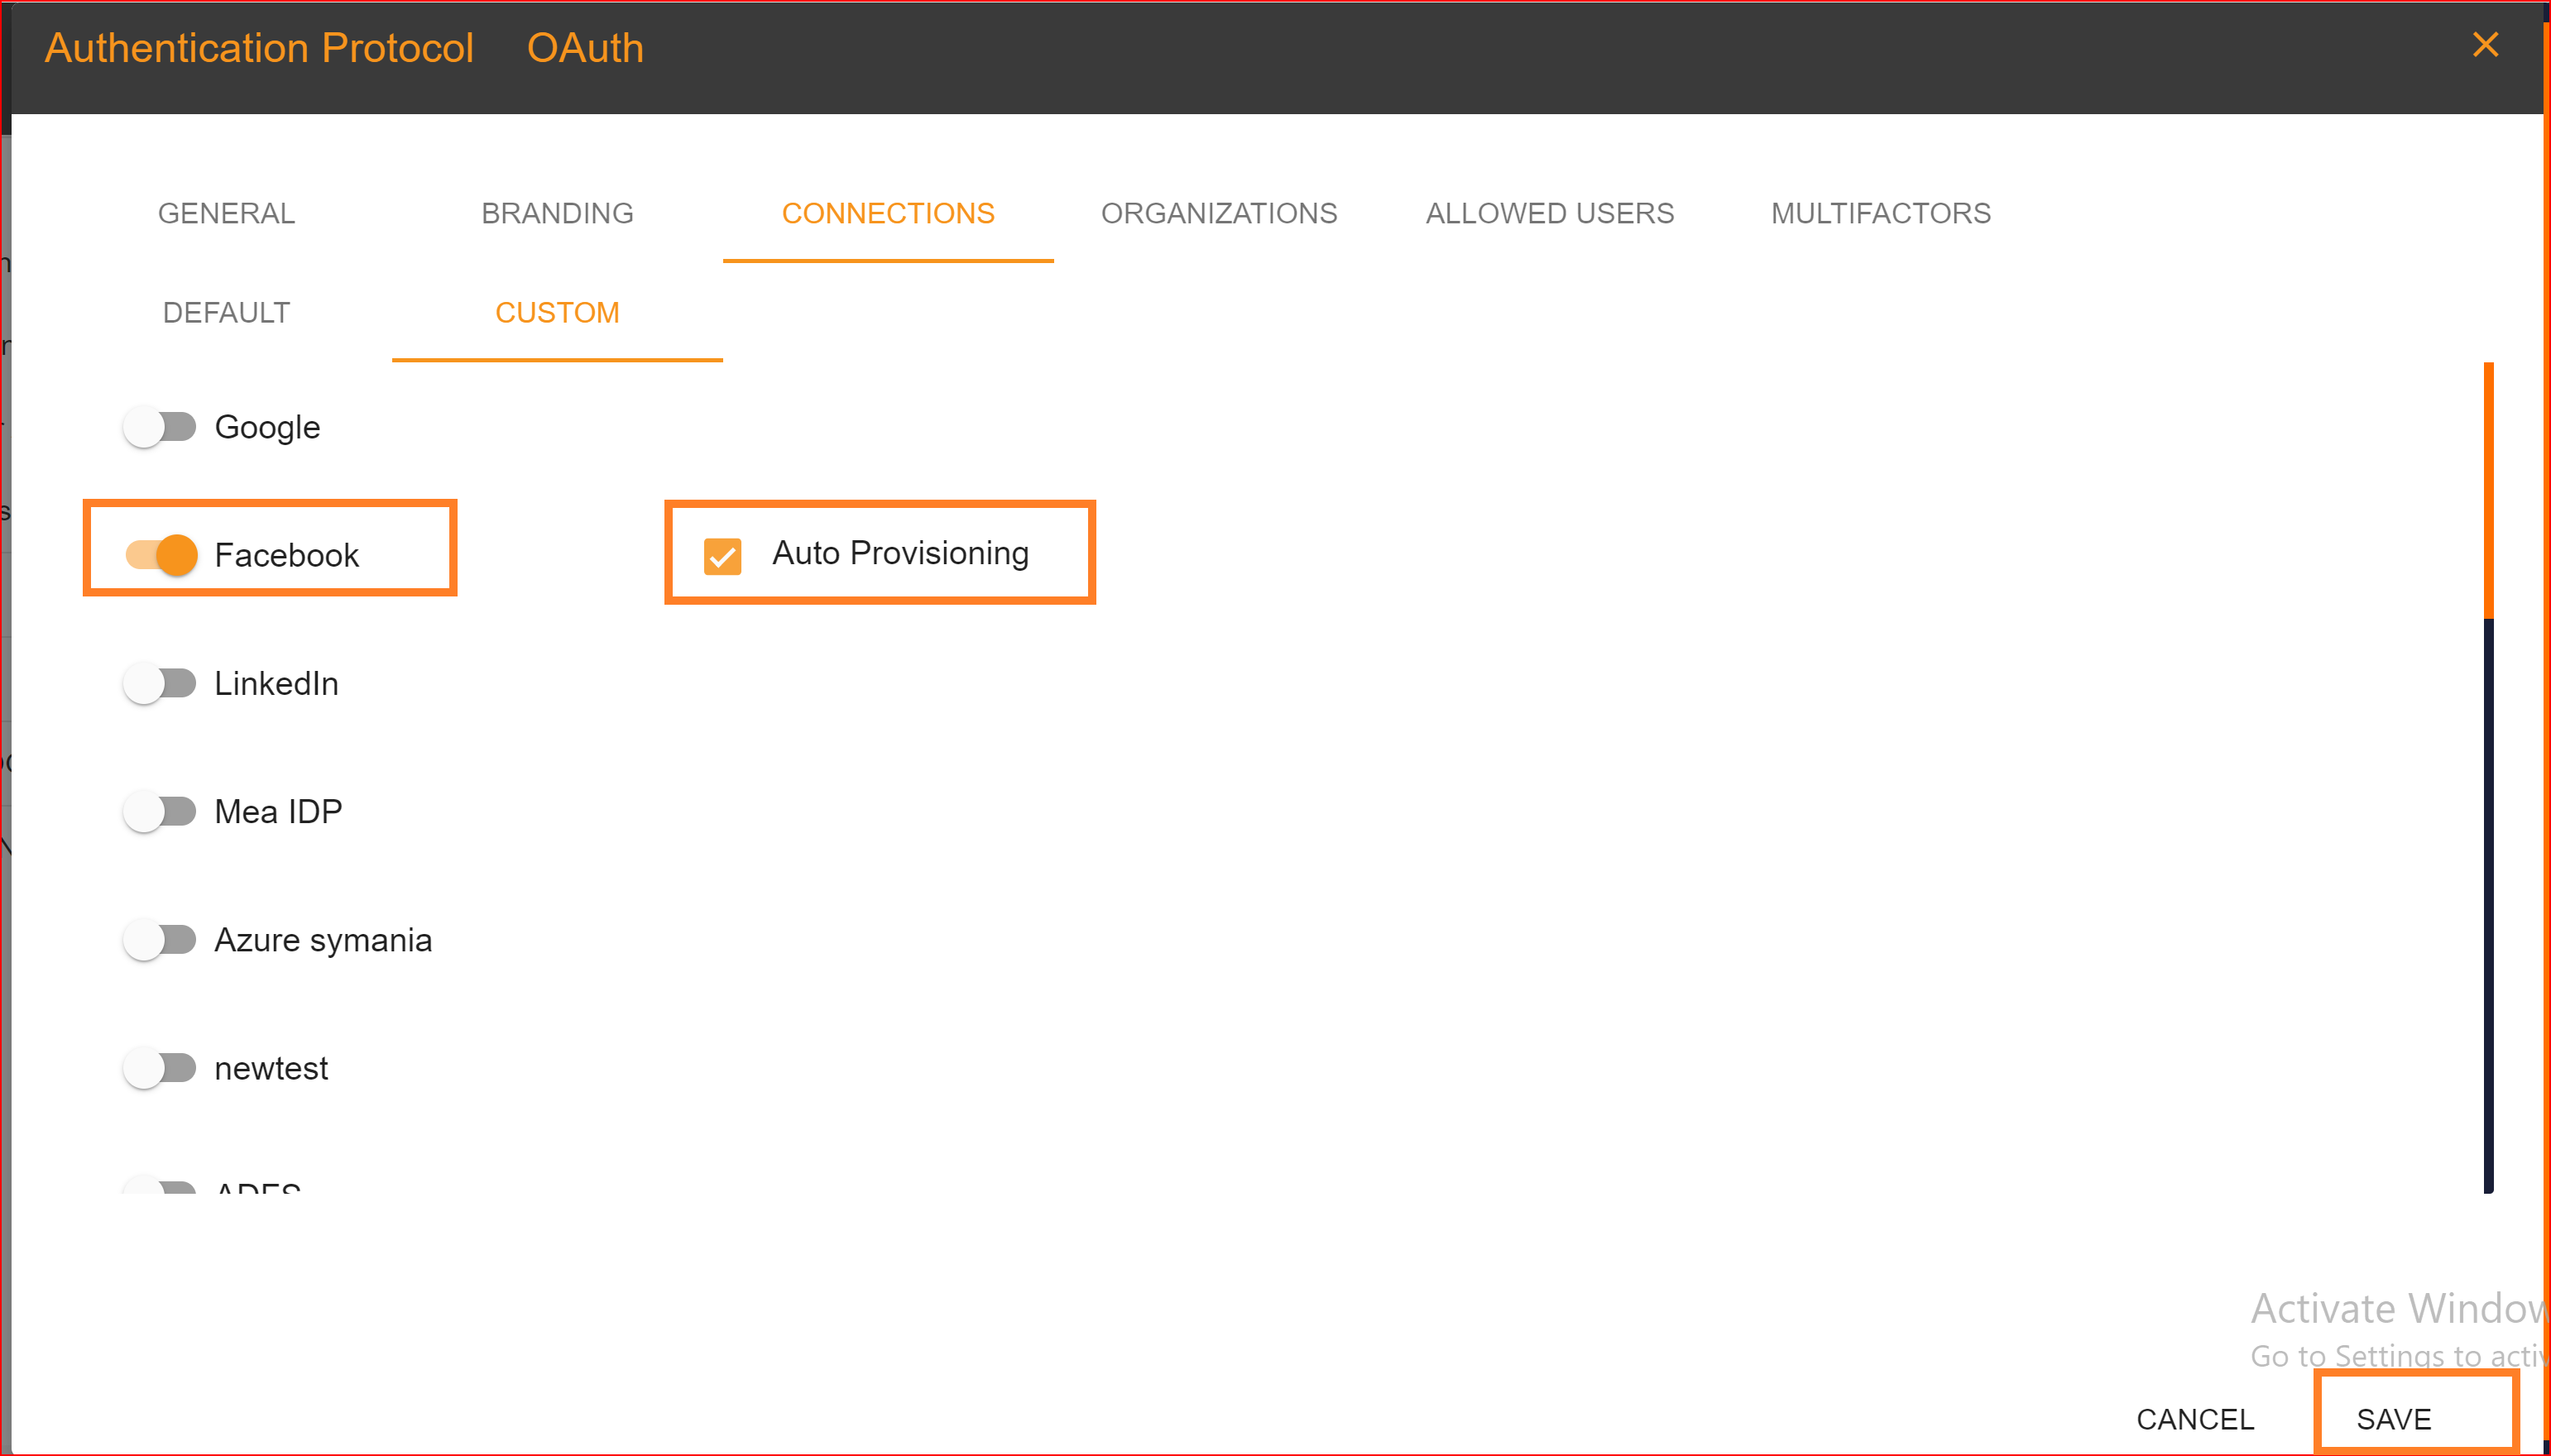
After configuration setting, go to Connection section and enable both google connection and auto provisioning.
What is Auto Provisioning: Auto-provisioning in Single Sign-On Identity (SSO.ID) refers to the automatic creation and management of user accounts within applications or services based on the user's authentication through the SSO system. Note: To verify the attribute mapping process, please ensure that when Auto Provisioning is enabled, the user has not already registered in the SSO system. After enabling it, you'll see the Google connection details in the redirect Uniform Resource Identifier (URI) of your application.
To confirm that the connection is properly set up, look for the "Login with SSO" button on the redirect URI of your application.
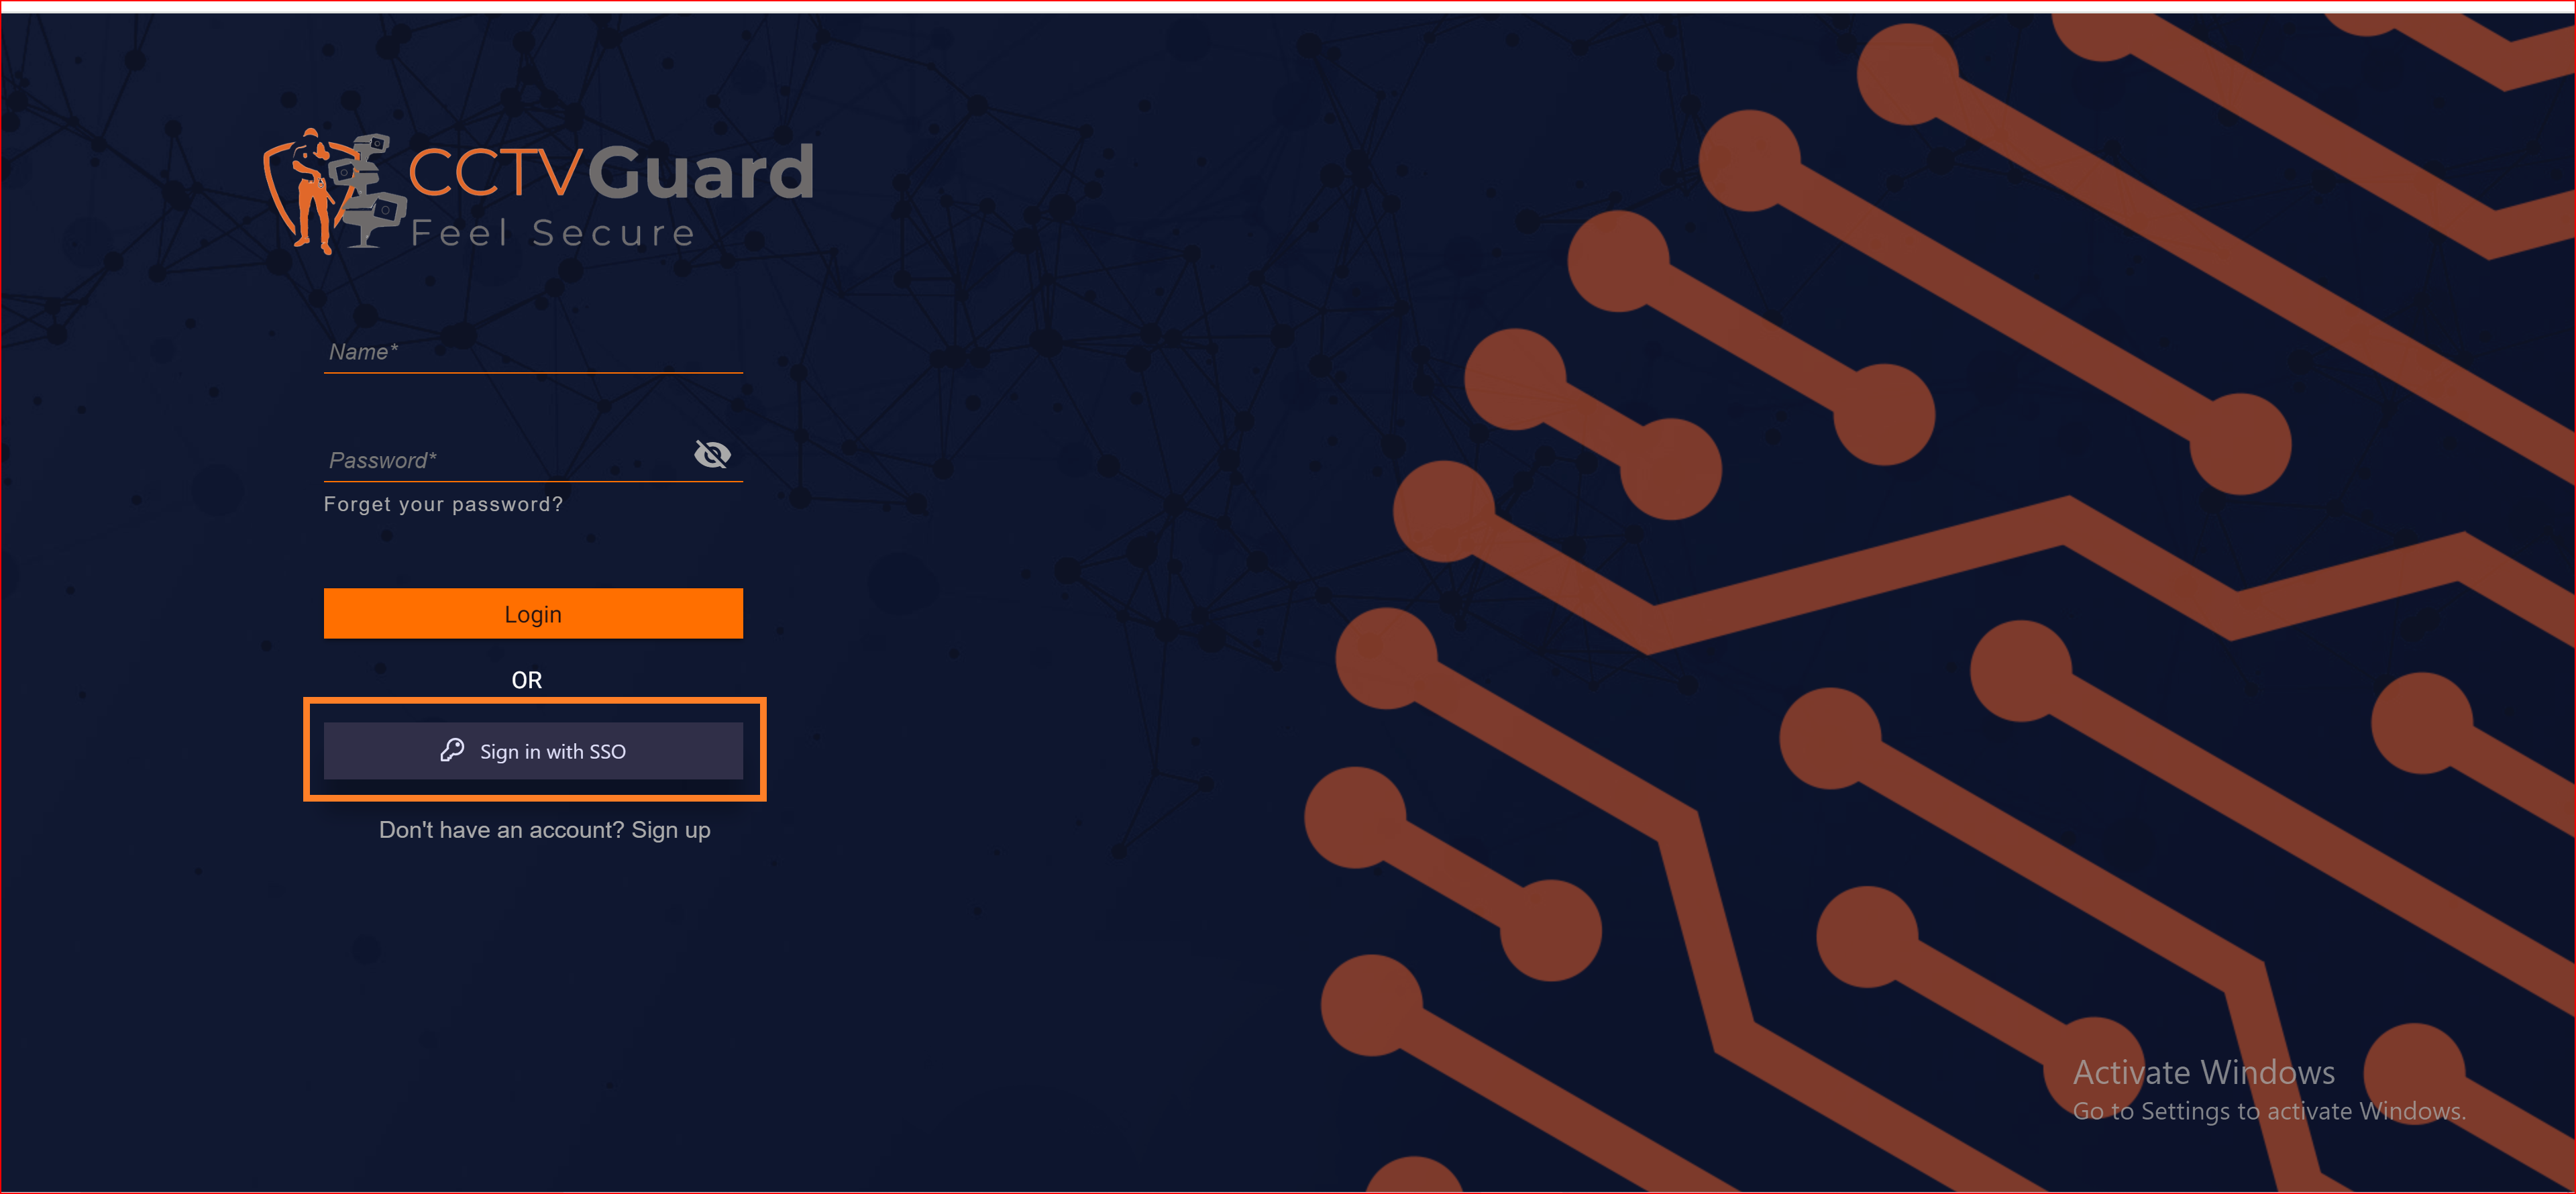
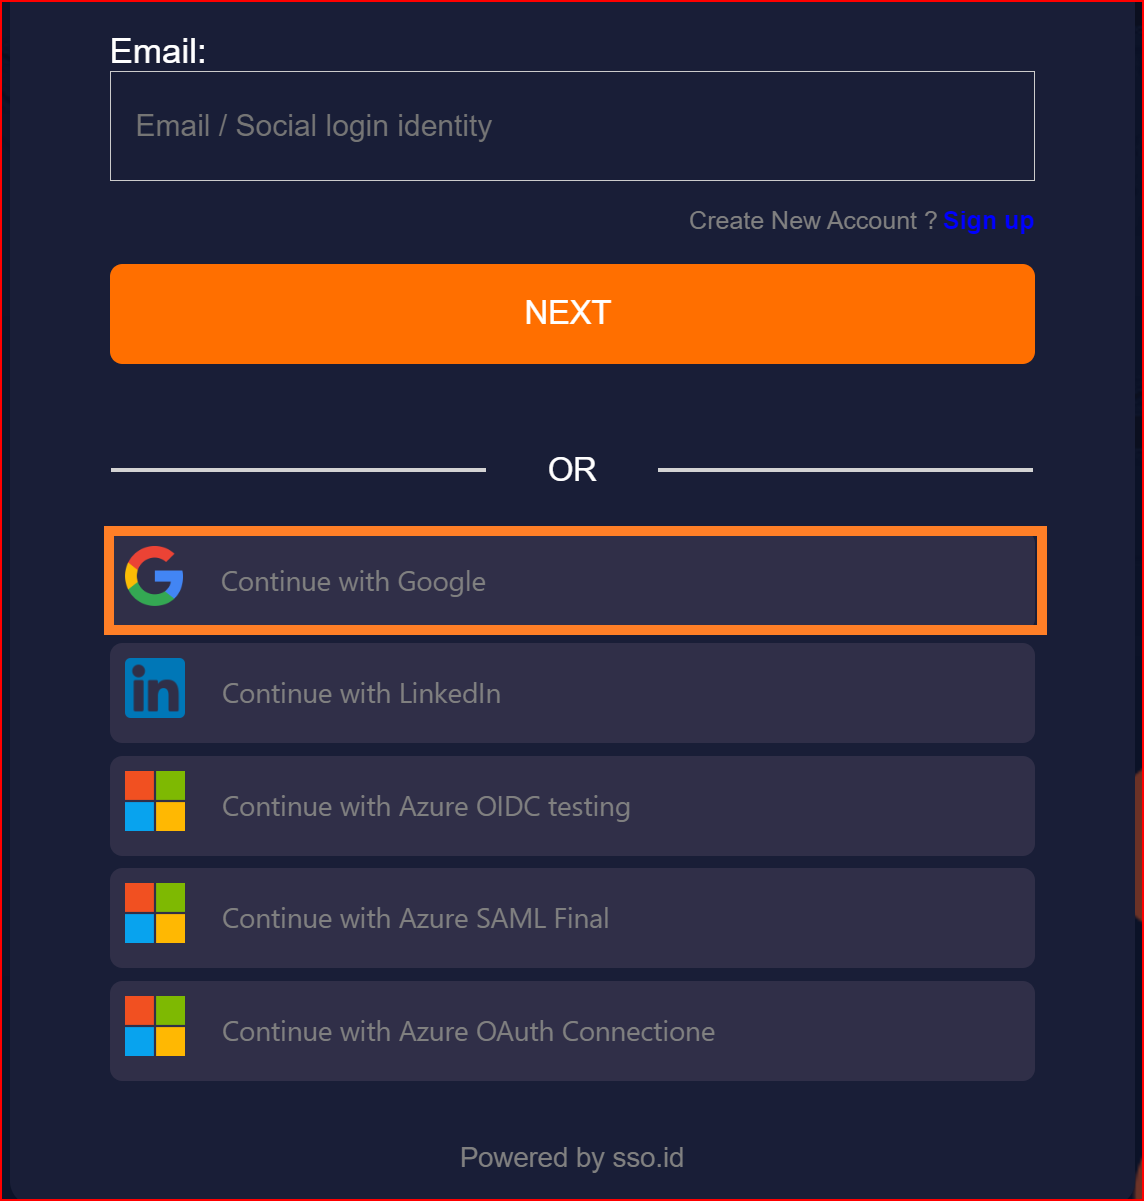
Make sure your established connection displays on your redirect URL and click on your Google connection.
Once the connection is successfully established, this screen will appear on your system. Finally, choose a "Gmail" account.
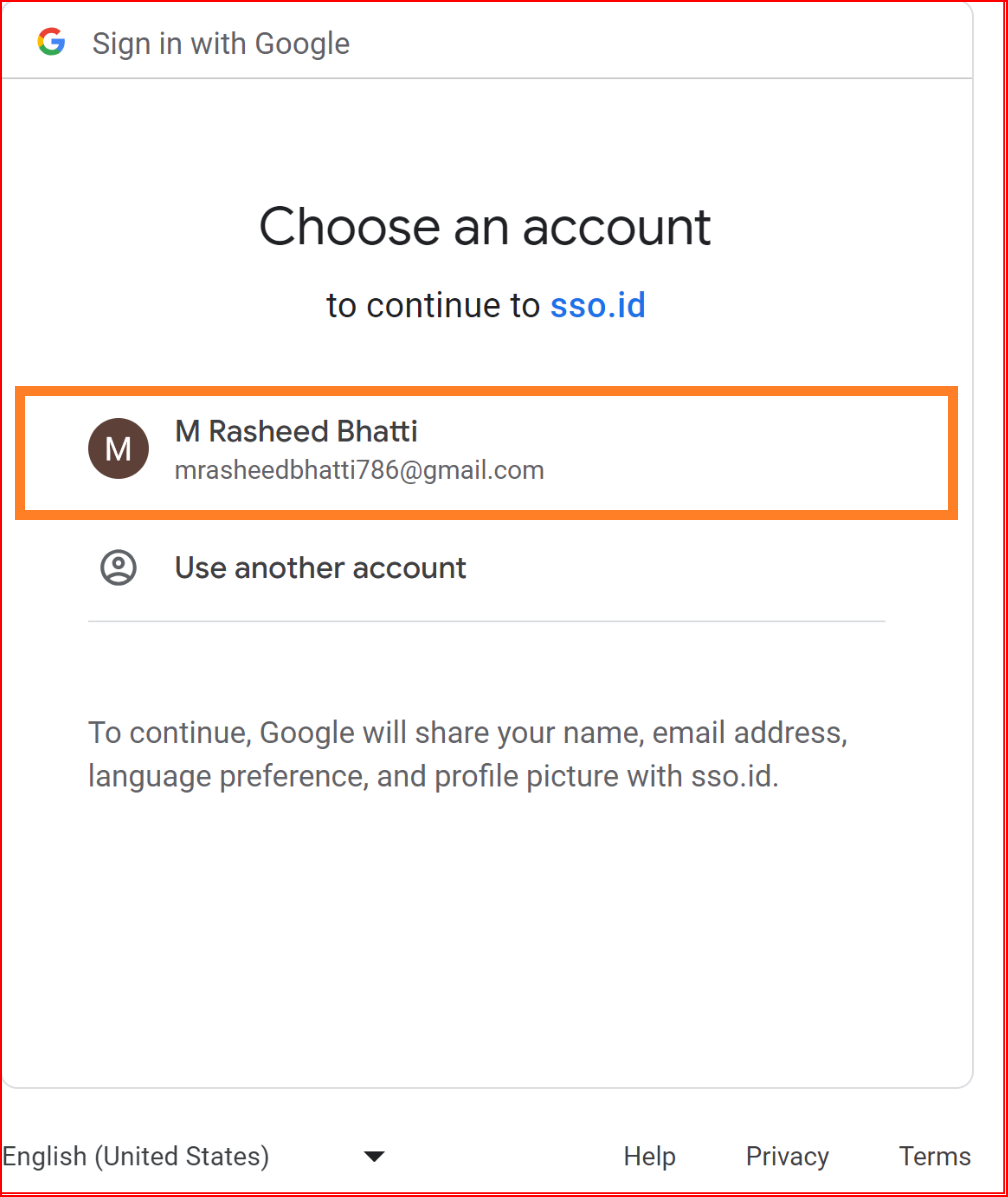
You will be able to log in to your application using Google through SSO.ID.
To check the auto-provisioning and attribute mapping process, you should navigate to the user management section of your SSO.ID provider's dashboard. Ensure that the user is successfully created through the Google connection with the attributes you have specified in the attribute mapping settings.
Create a Google App
Creating a Google app for Single Sign-On Identity (SSO.ID) login involves a few steps that typically involve using Google's identity services. Here is a general guideline on how you can create a Google app for SSO.ID login.
Google Developers Console
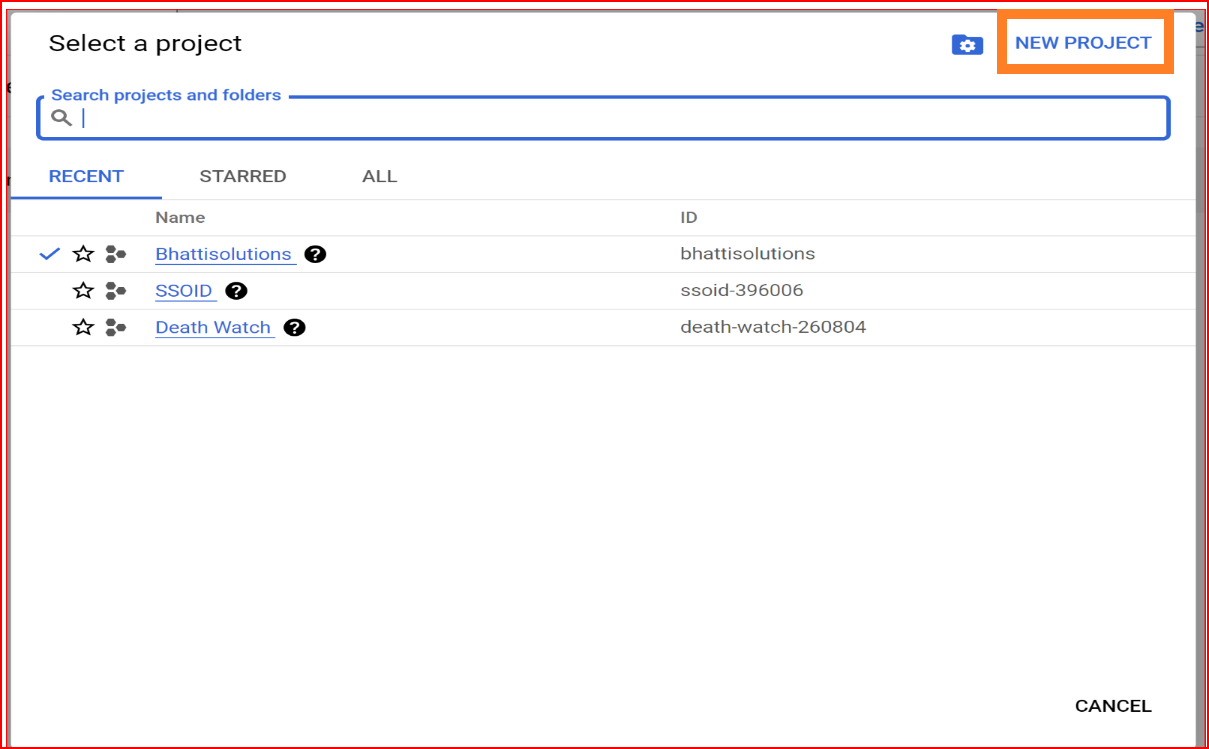
Go to the Google Developers Console. Create a new project by clicking on "Select a project" in the top left corner and then clicking on the "+ New Project" button.
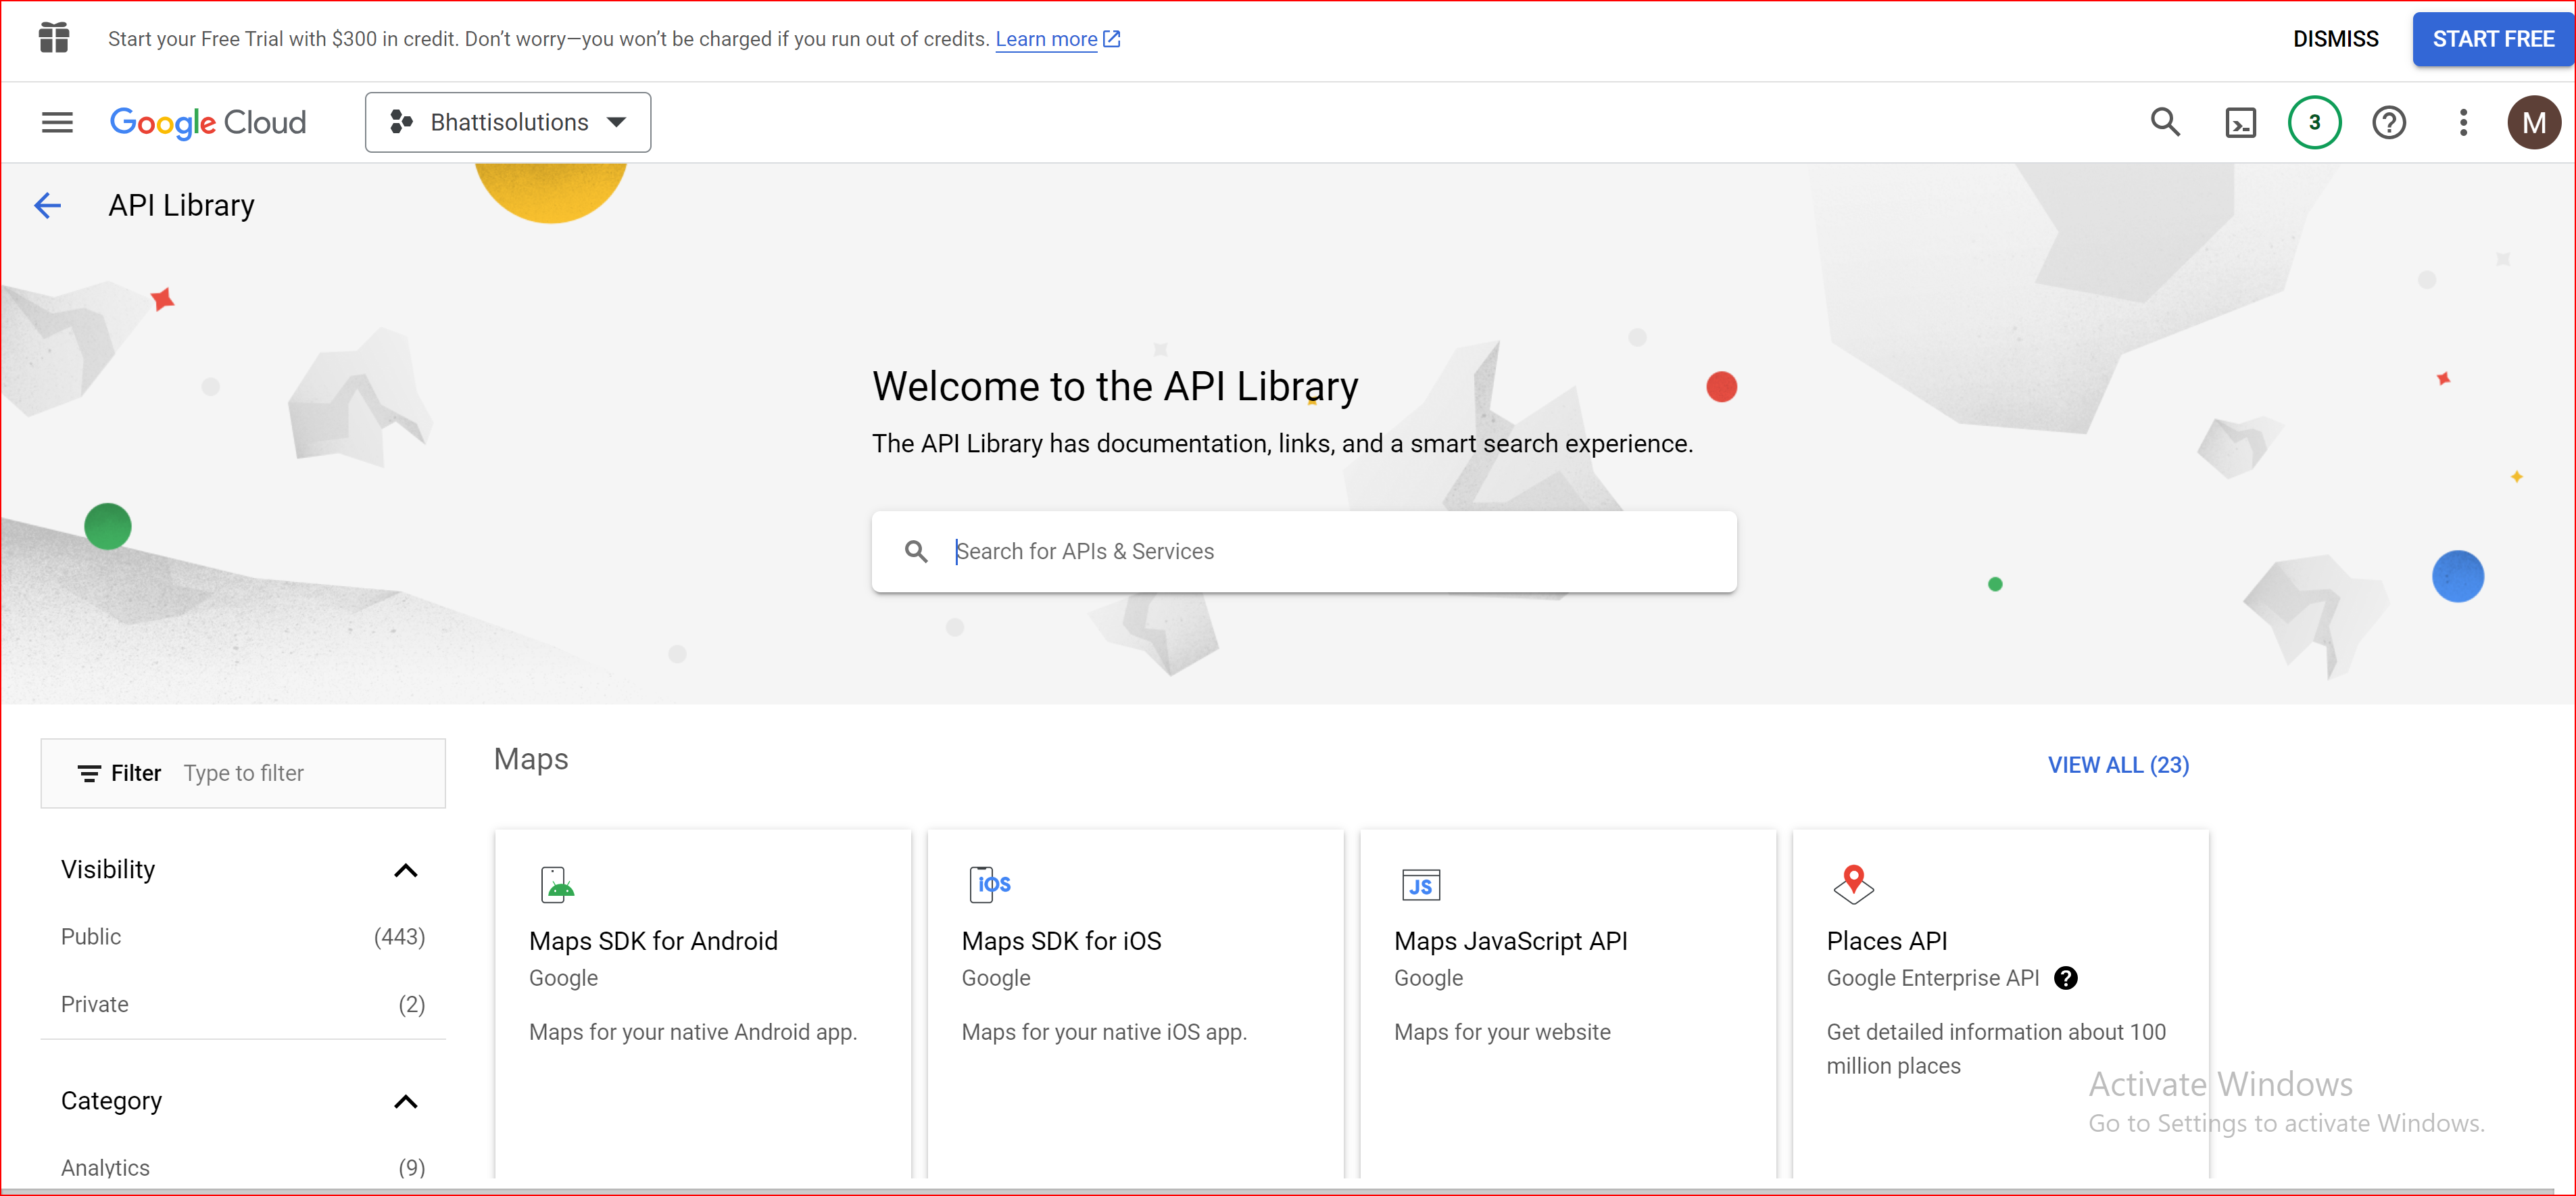
Enable Google Identity Services
In the dashboard, select your newly created project. Enable the necessary APIs for your application. For SSO, you'll likely want to enable the "Google Identity Platform" or "Google Sign-In" API.
Create OAuth Client ID
Navigate to the "Credentials" section in the left-hand menu. Click on "Create credentials" and select "OAuth client ID".
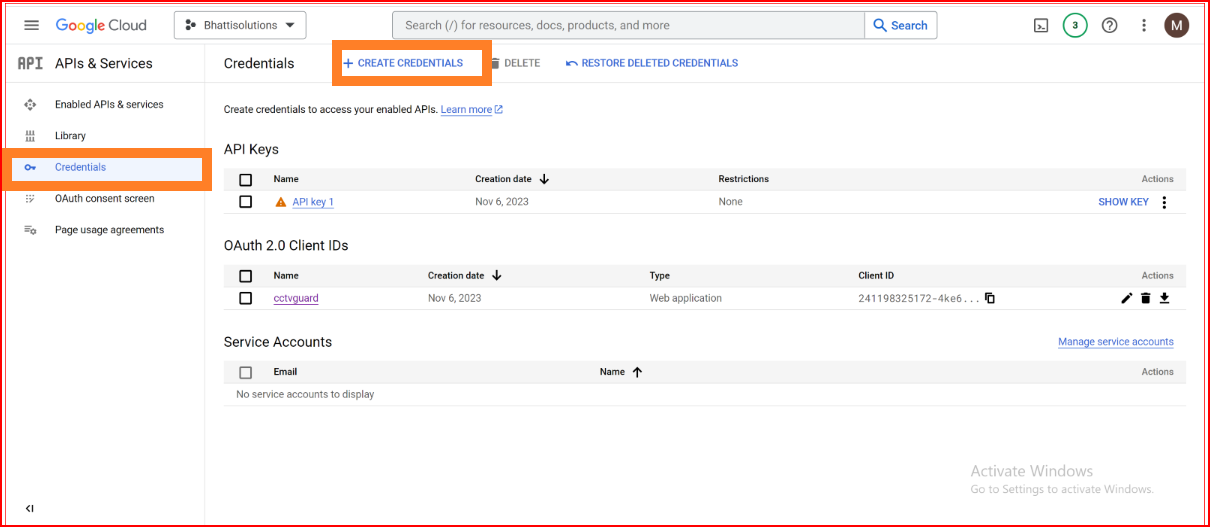
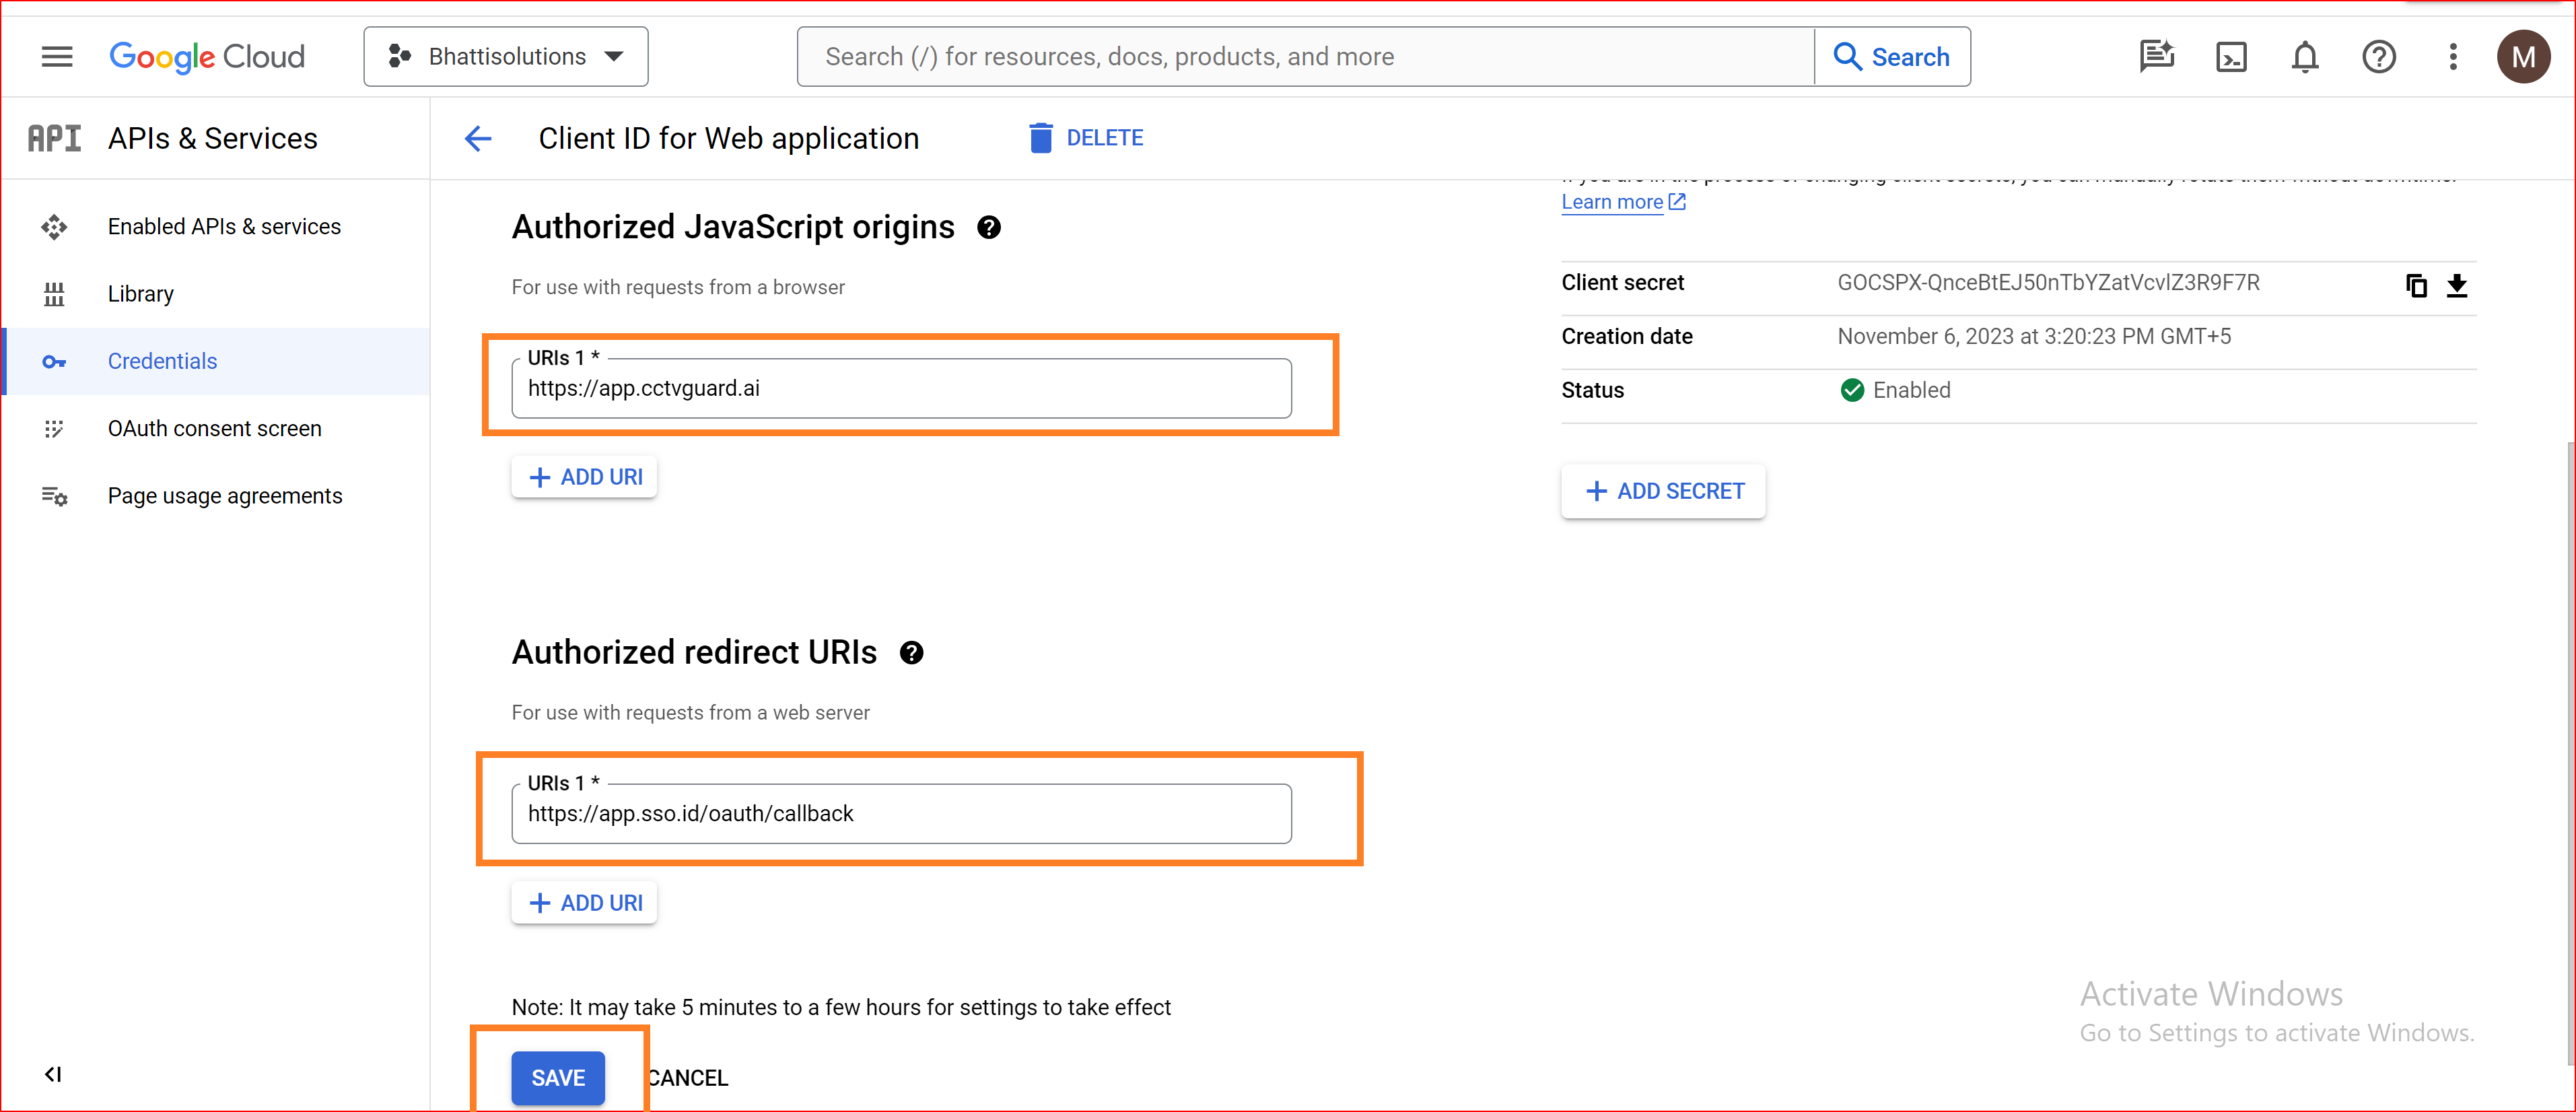
Choose the application type based on your needs (web application, mobile app, etc.). Configure the authorized redirect URIs (where users will be redirected after authentication).
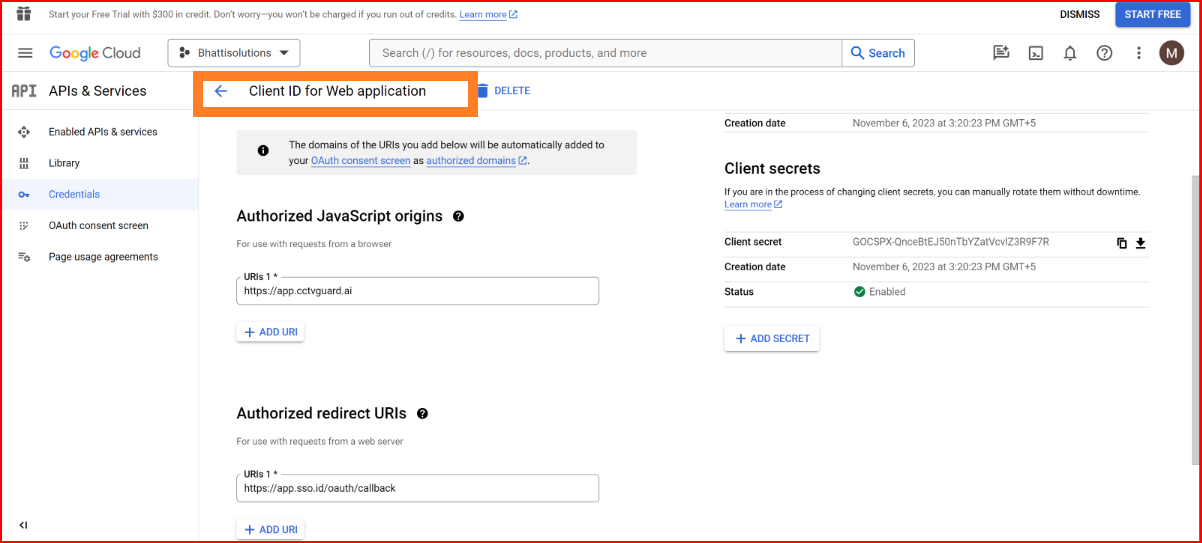
Authorized redirect URIs
Configure the authorized redirect URIs (where users will be redirected after authentication). Please click on the "ADD URI" button and specify the OAuth redirect URI. Since you have established a connection with SSO.ID, you should set the URL to https://app.sso.id/oauth/callback for the OAuth base connection.
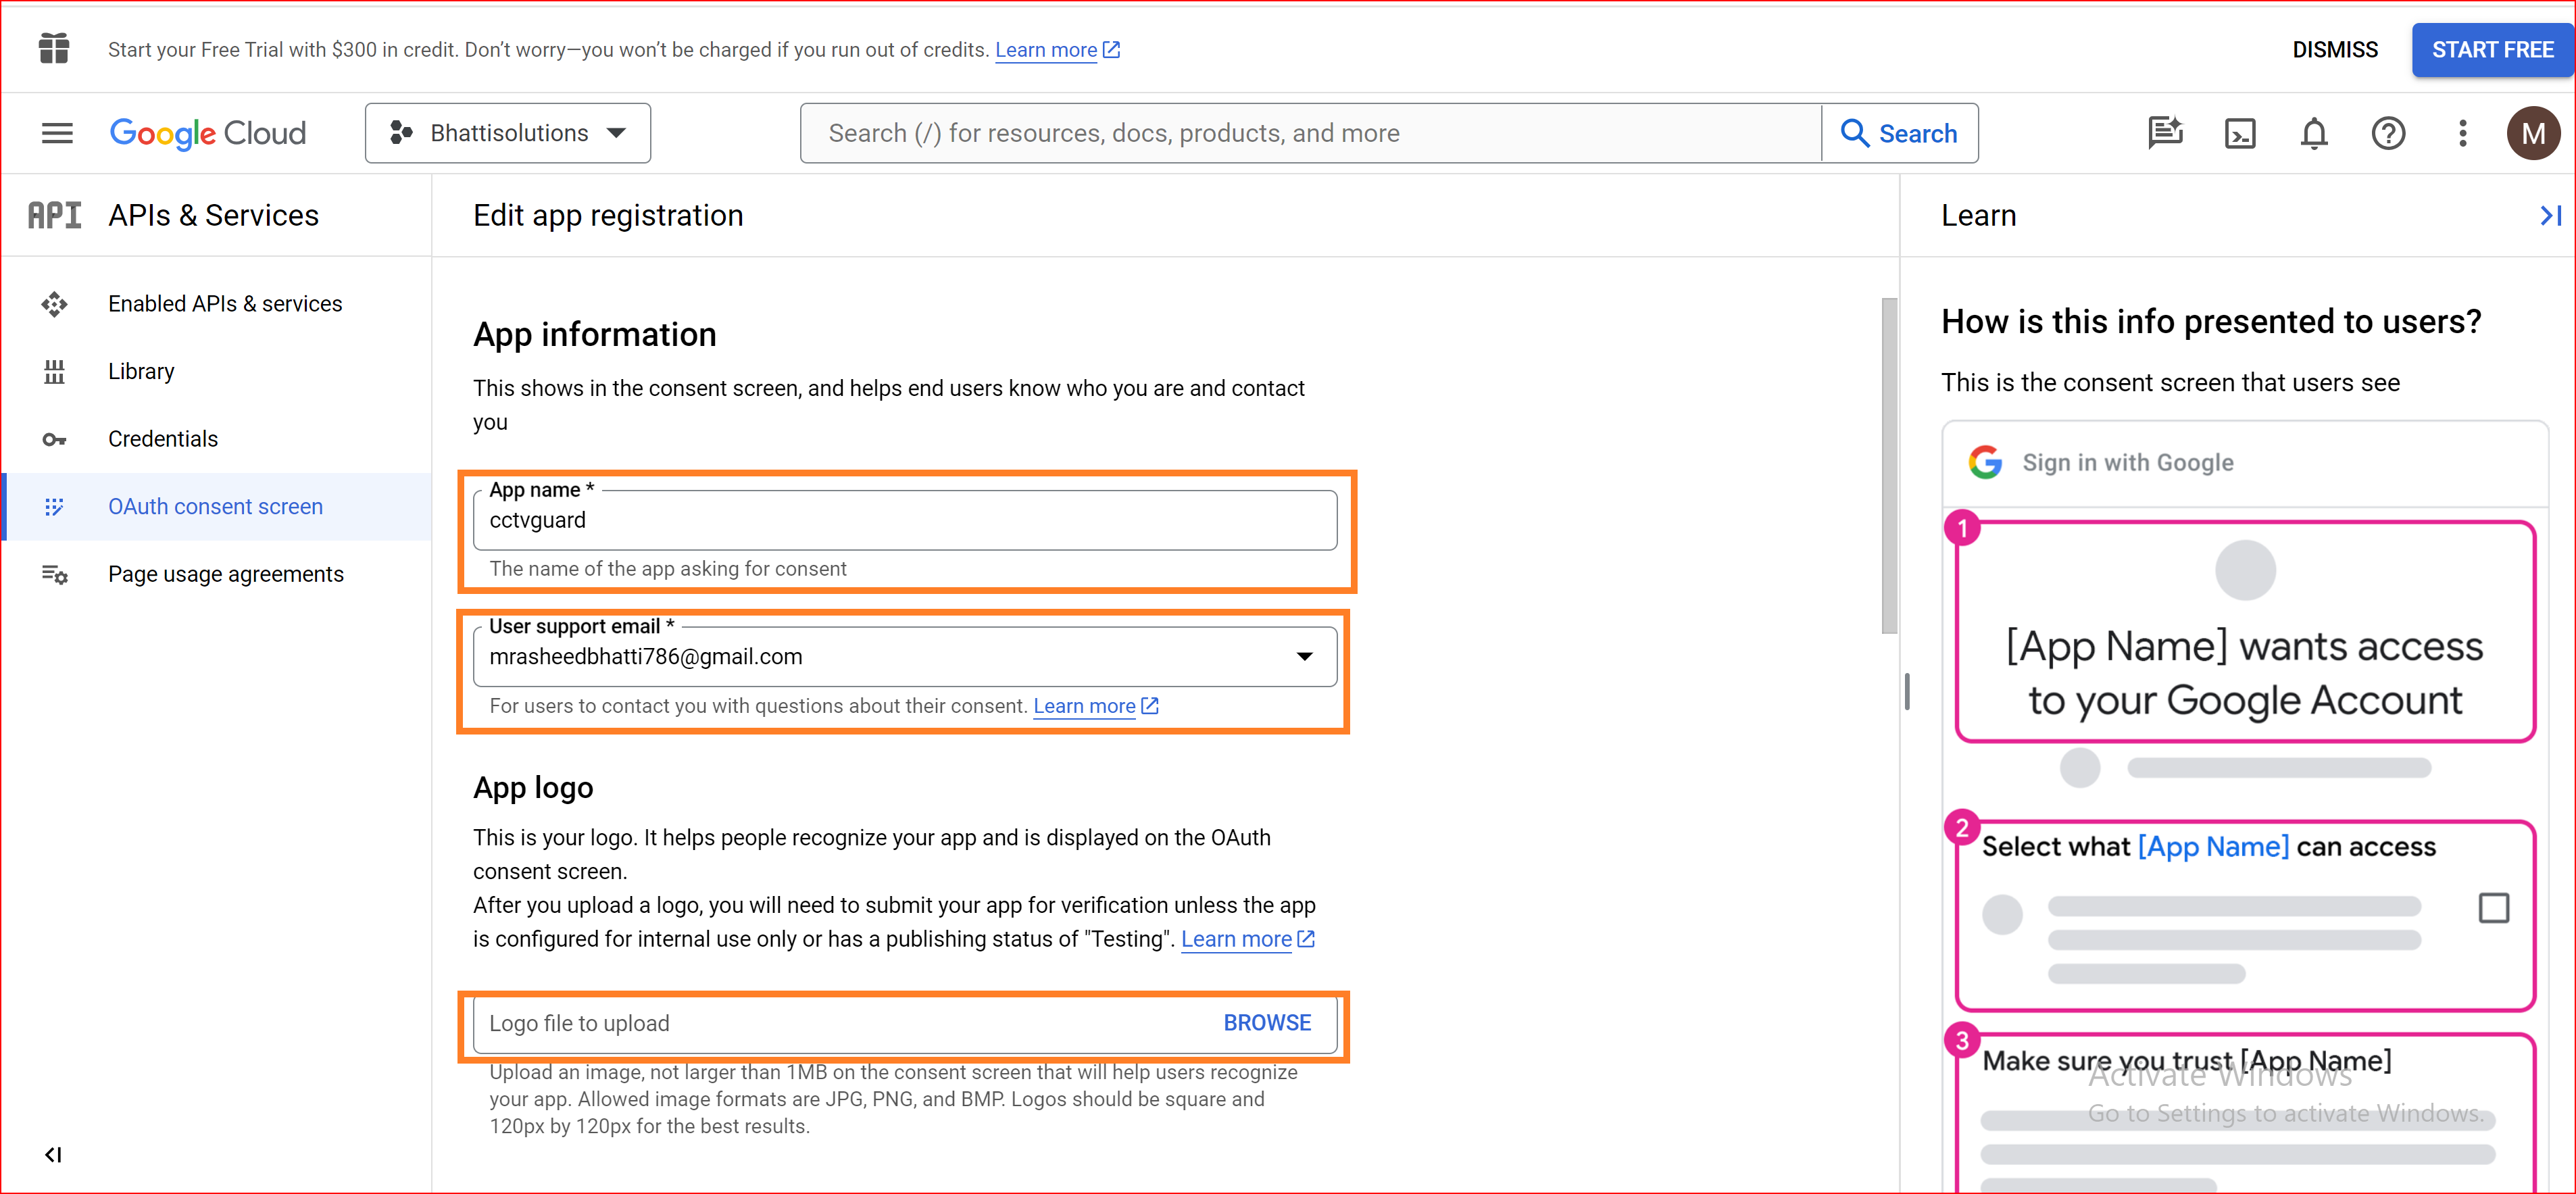
OAuth consent screen
The OAuth consent screen is an important part of the OAuth 2.0 authentication flow, including for Single Sign-On Identity (SSO.ID) implementations. It's the screen that informs users about the permissions and data access requested by the application before they authenticate.
Navigate to the OAuth Consent Screen
On the left-hand side, click on "APIs & Services" and then "Credentials". Click on "OAuth consent screen".
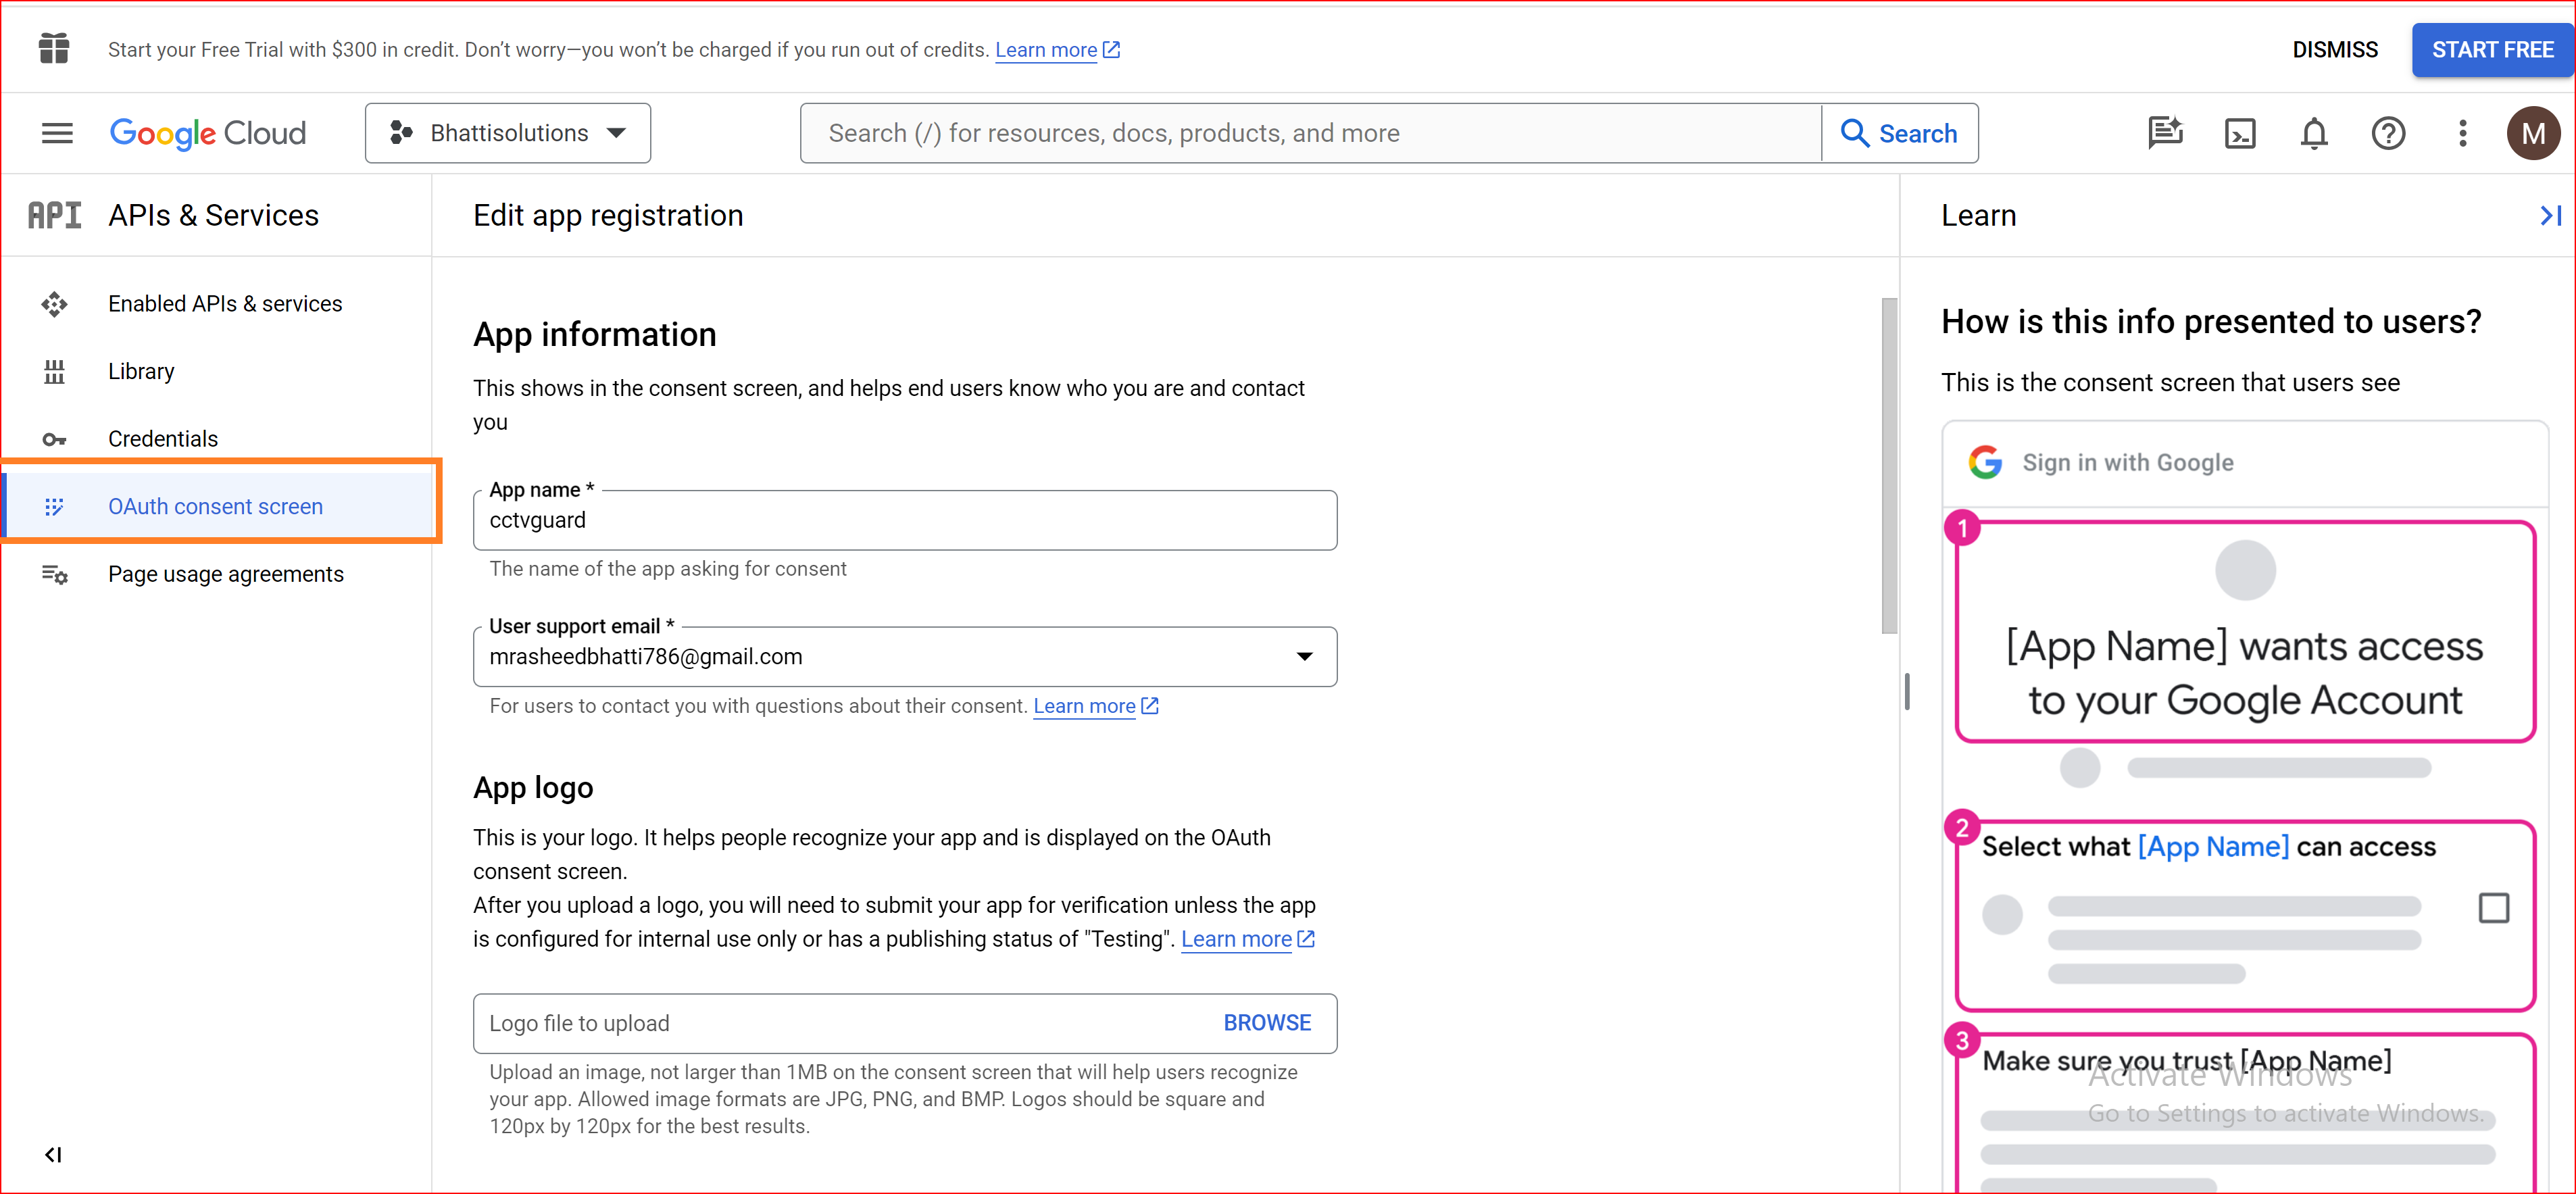
Configure Consent Screen
You'll have options to set up user consent details. You can specify the application name, logo, and other details that users will see when prompted for consent. Define the required scopes and permissions that your application will request. Clearly explain why your app needs these permissions to the end-users.
Create Connections with Facebook
User Convenience: Many users already have Facebook accounts, so allowing them to use their existing credentials to log in to other services can enhance the user experience by reducing the number of usernames and passwords they need to remember.
Increased User Adoption: By providing users with the option to log in using Facebook, you can potentially attract more users to your platform who might be hesitant to create yet another account elsewhere.
Streamlined Authentication Process: SSO.ID systems aim to simplify the authentication process for users across multiple services. Integrating Facebook as an identity provider streamlines this process, allowing users to access various services without repeatedly entering their credentials.
SSO.ID endpoints to configure the Facebook app
To create a new social connection and log in to your application on the connections page, you should click on the "Create Connection" button in the connection section of the SSO.ID.
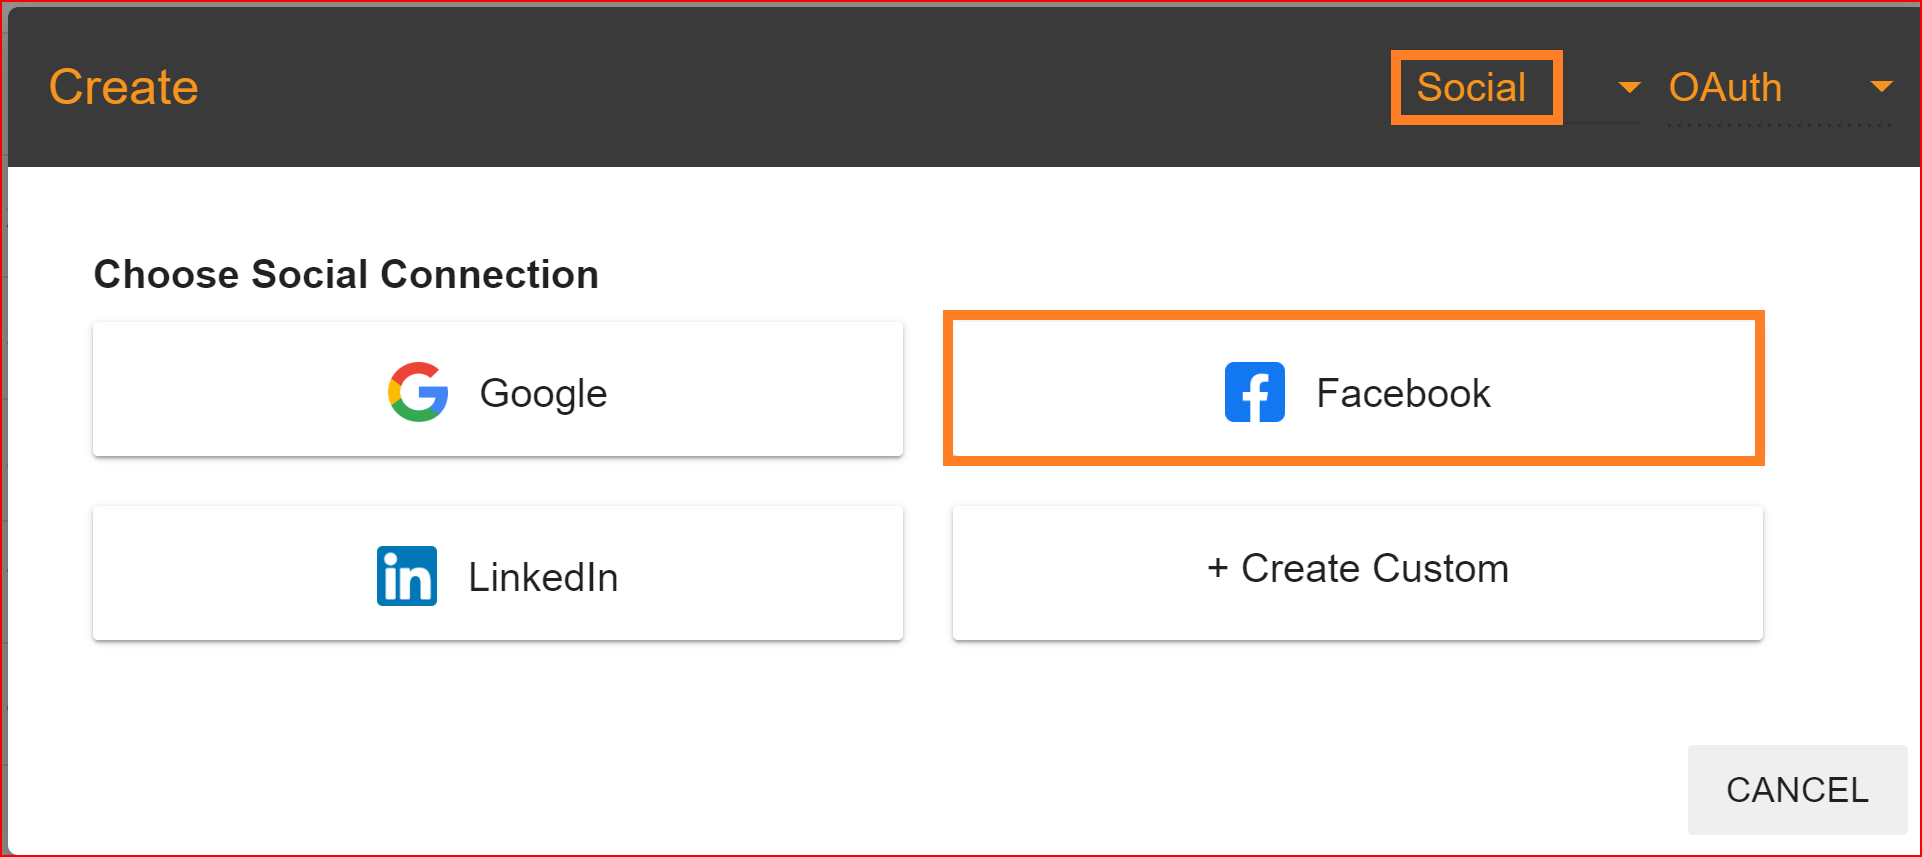
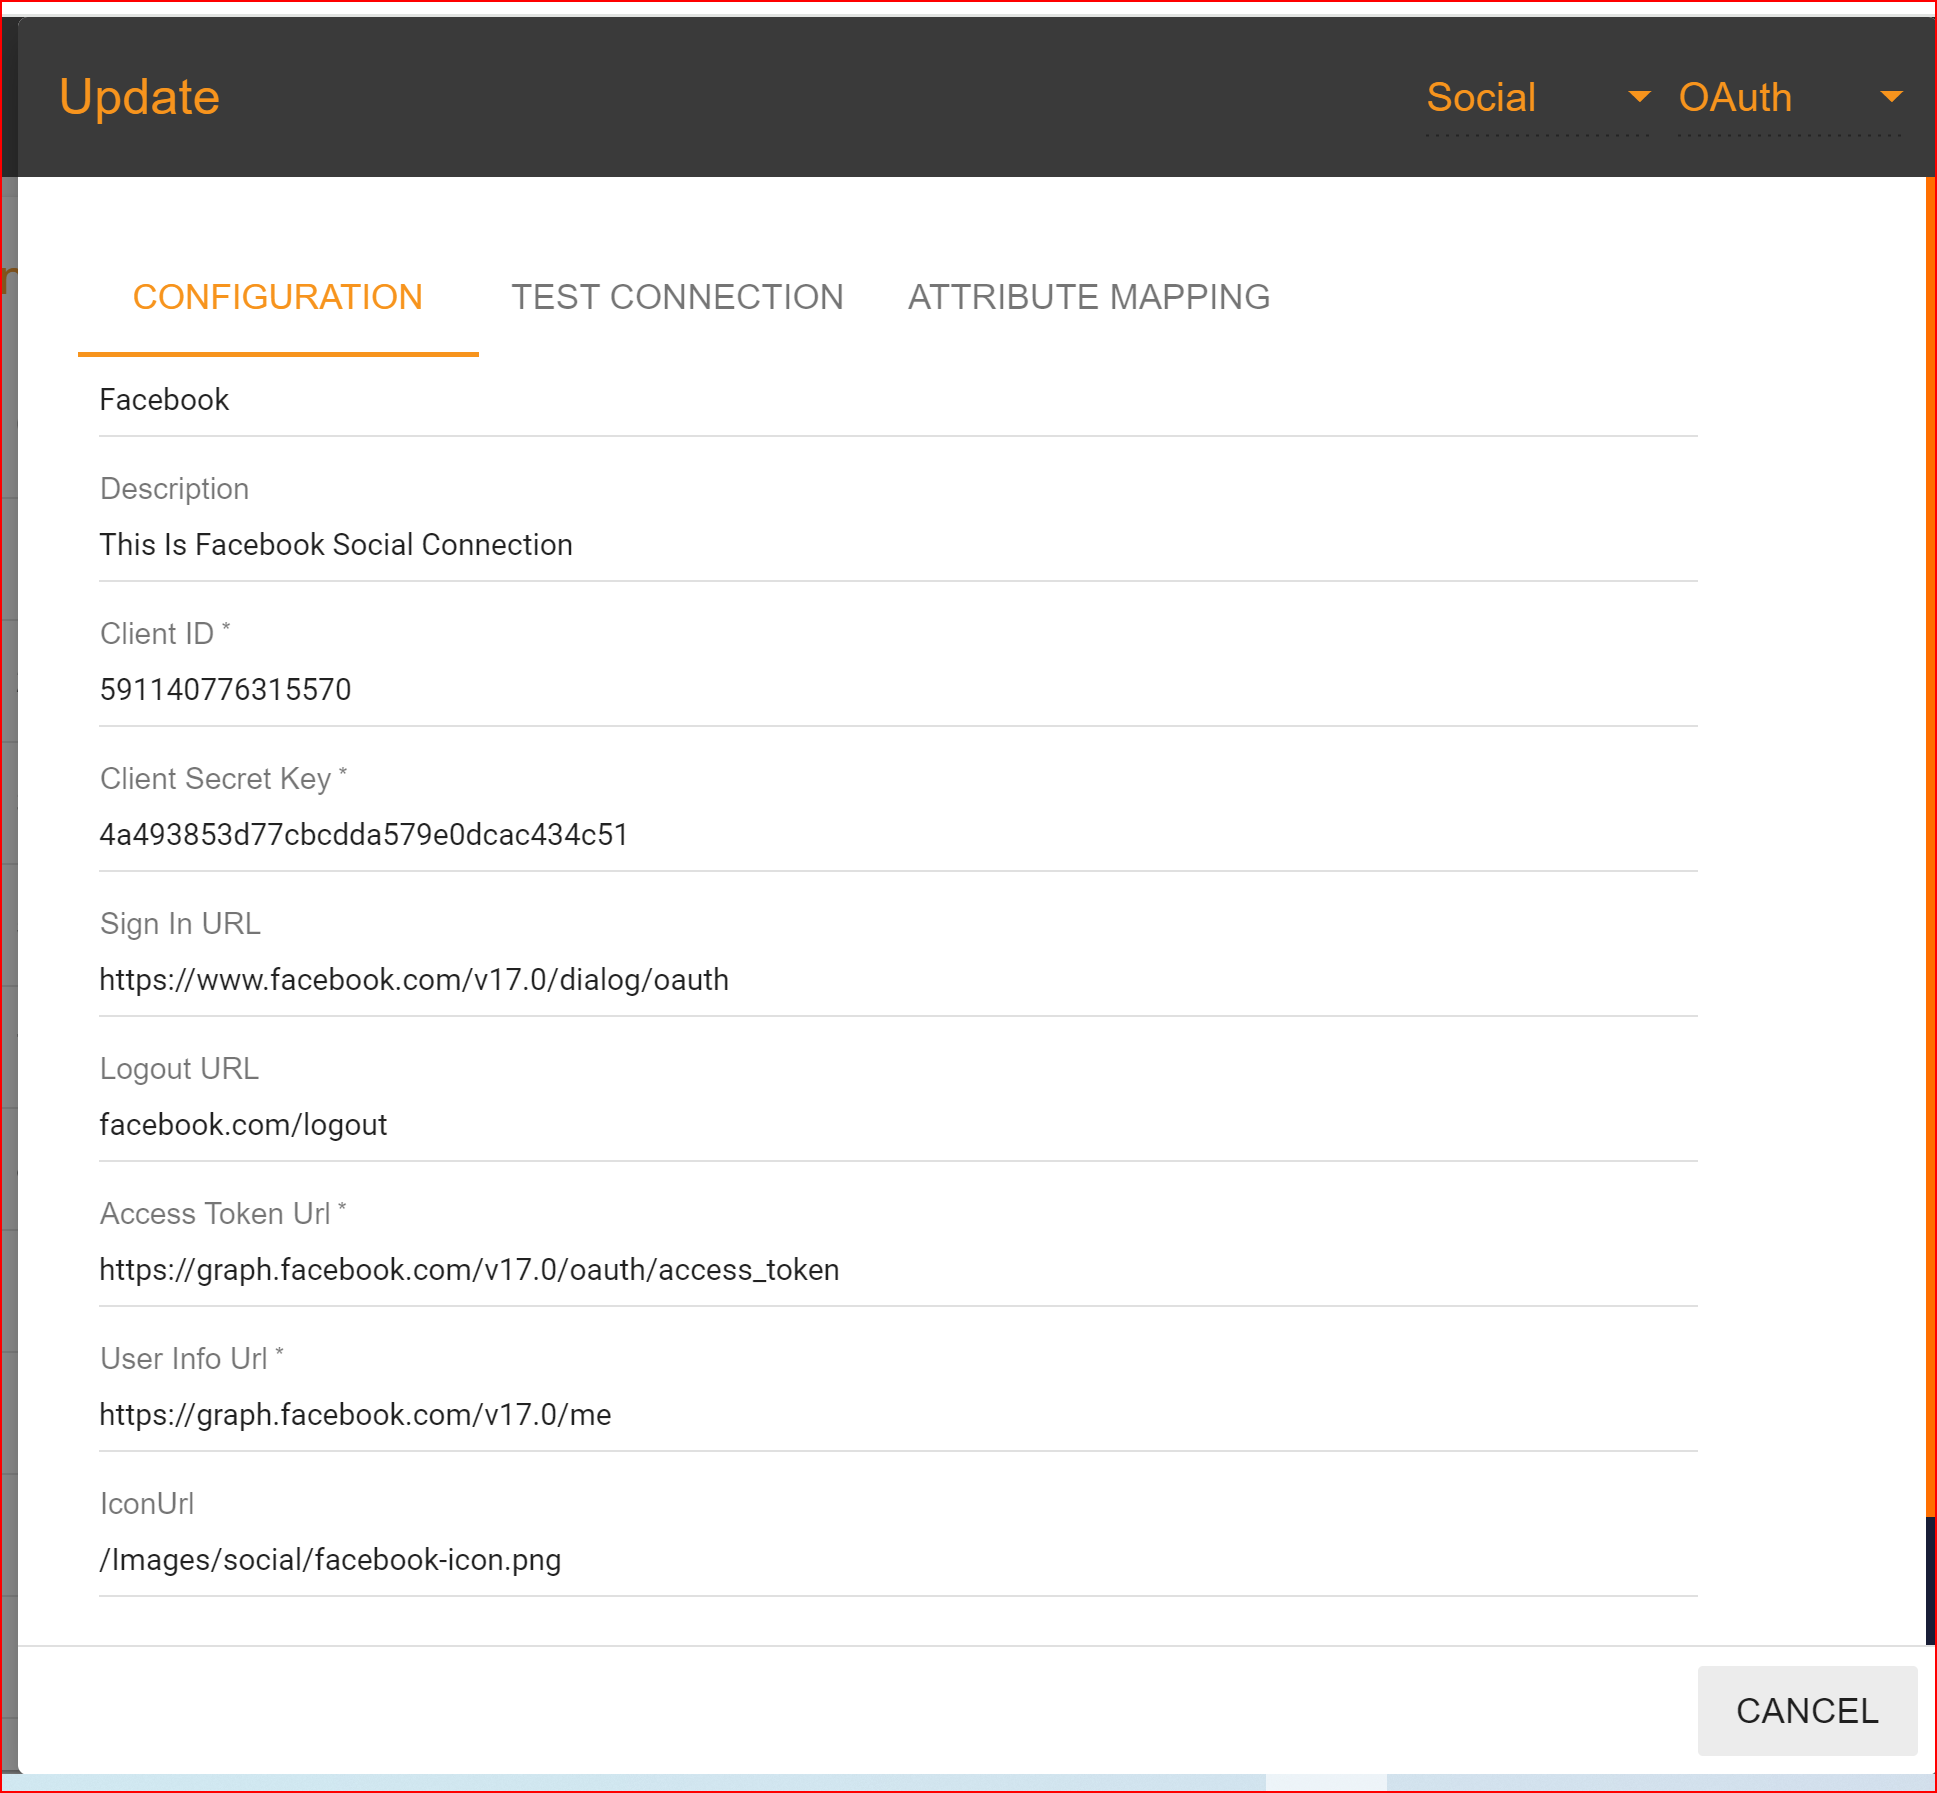
Select the Facebook social connection to set up Facebook integration for your application within the Single Sign-On Identity (SSO.ID) platform).
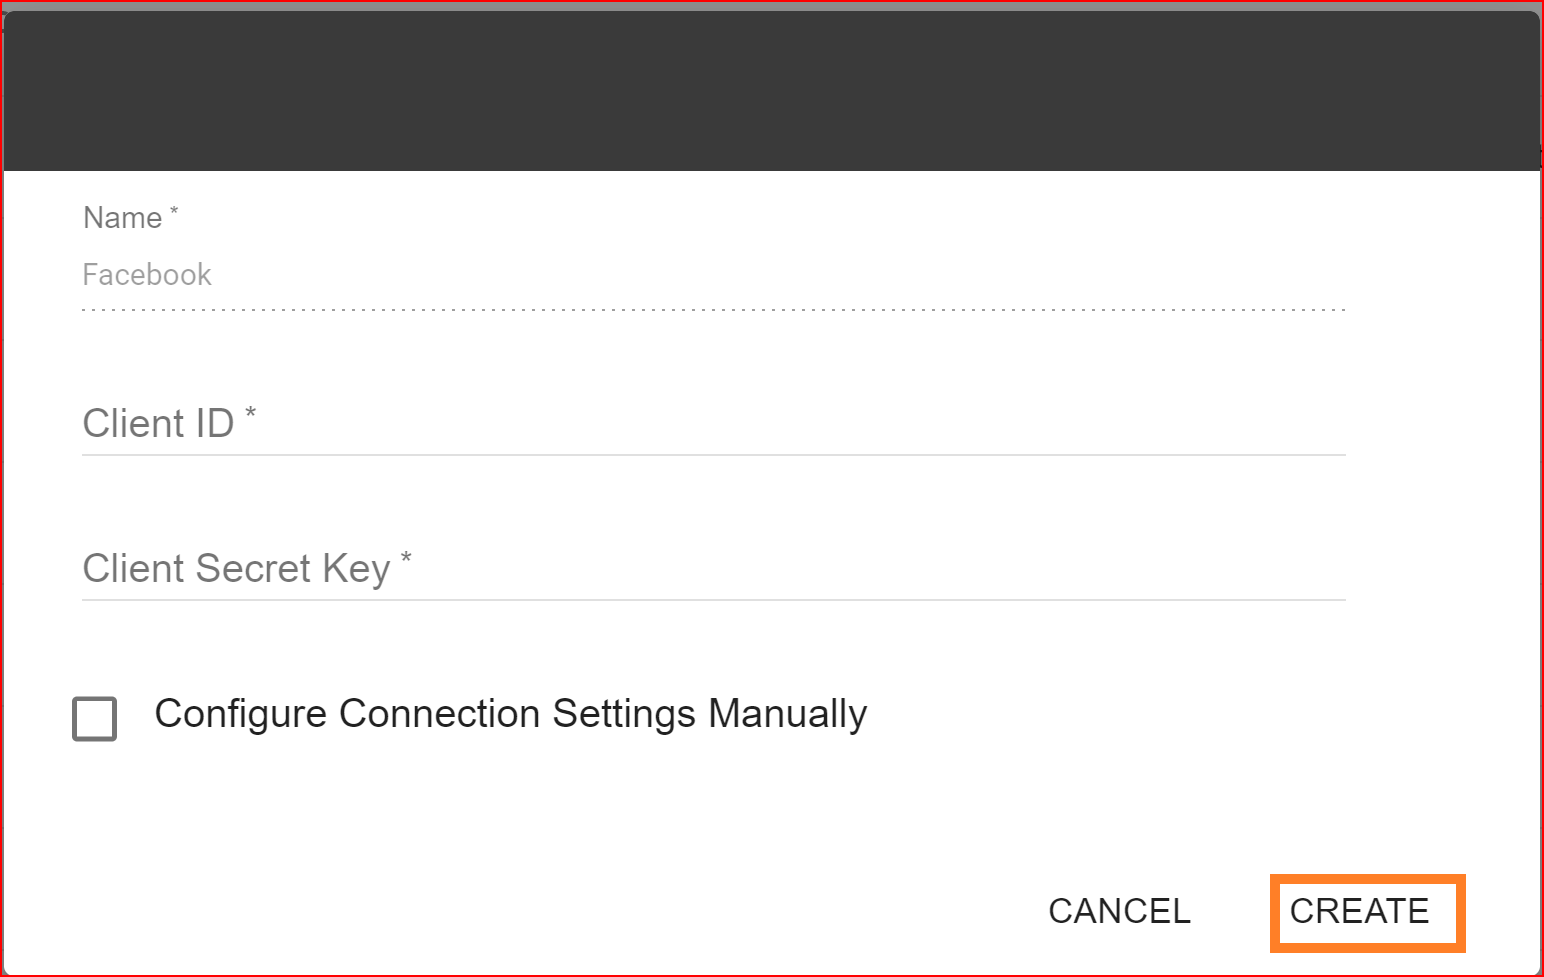
Enter the valid Client ID and Client Secret Key from your generated Facebook application. Once you've entered the correct Client ID and Client Secret, click the "Create" button. This will successfully establish the Facebook connection.
Test Connection
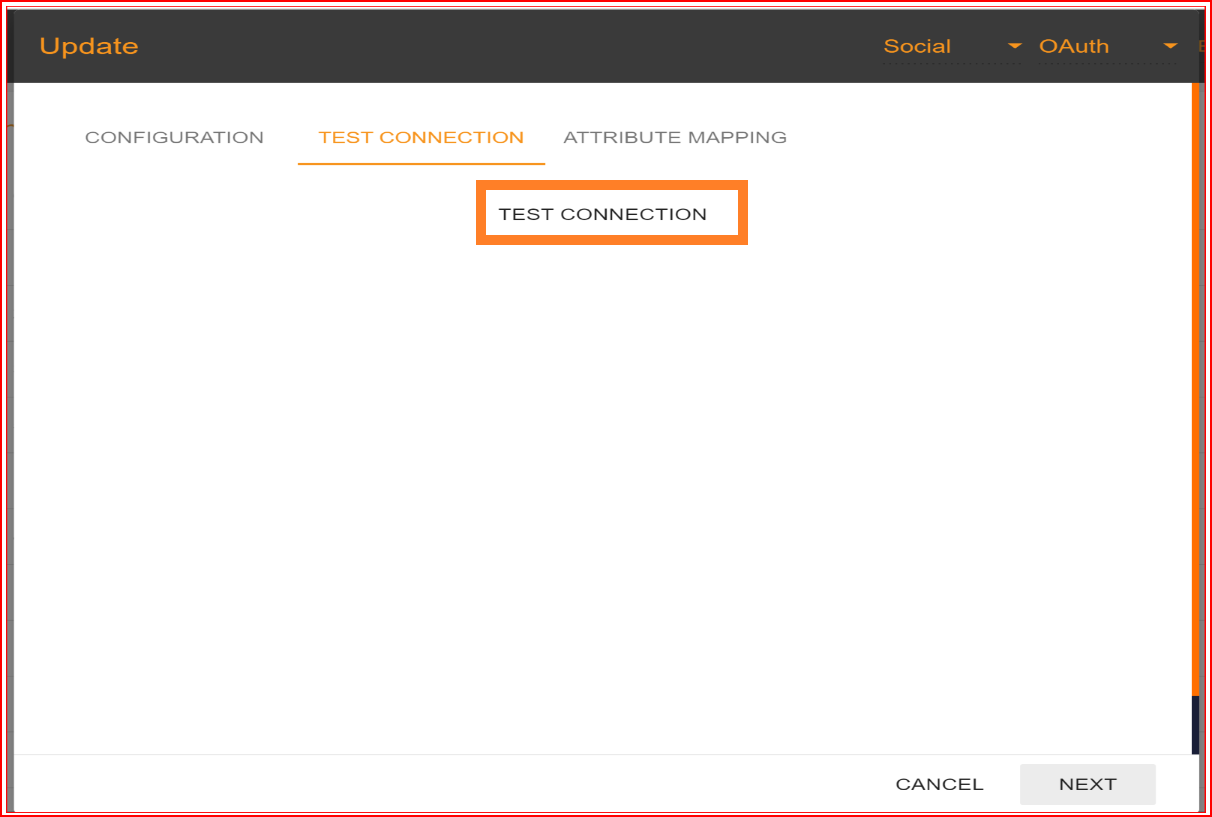
After configuring the Client ID and Client Secret, proceed by clicking the "NEXT" button to test the connection. In the test connection section, SSO.ID provides a feature to verify whether your connection has been established successfully or not. To perform the test, click on the "TEST CONNECTION" button.
To perform the test, click on the "TEST CONNECTION" button.
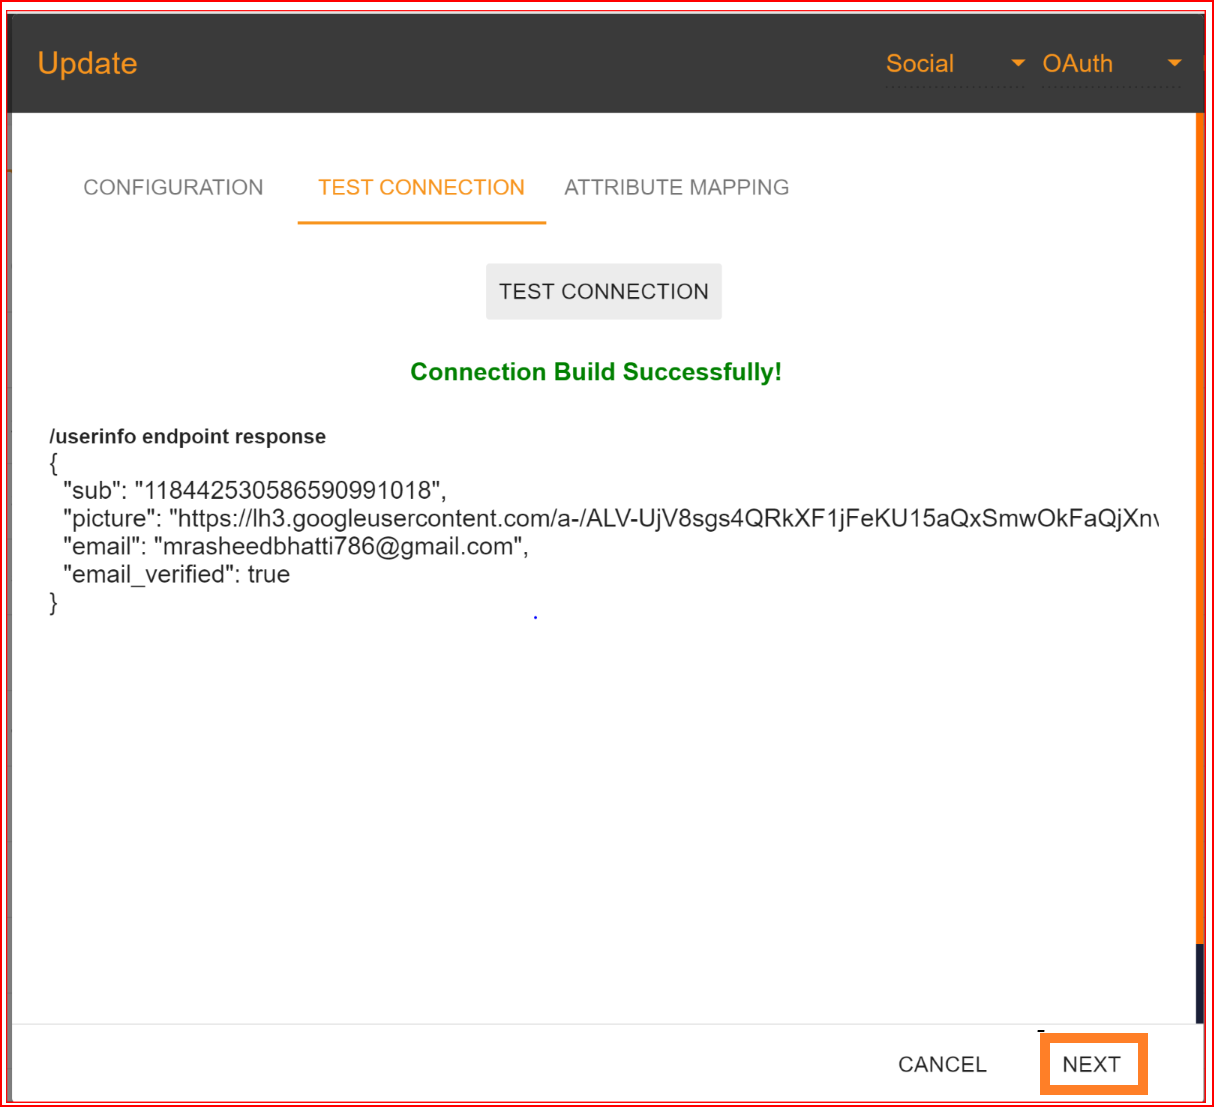
If all your configuration parameters are correct, including a valid Client ID and Client Secret, you will see a message stating, "Connection built successfully." Then, proceed by clicking on the "NEXT" button to proceed to attribute mapping.
Attribute Mapping
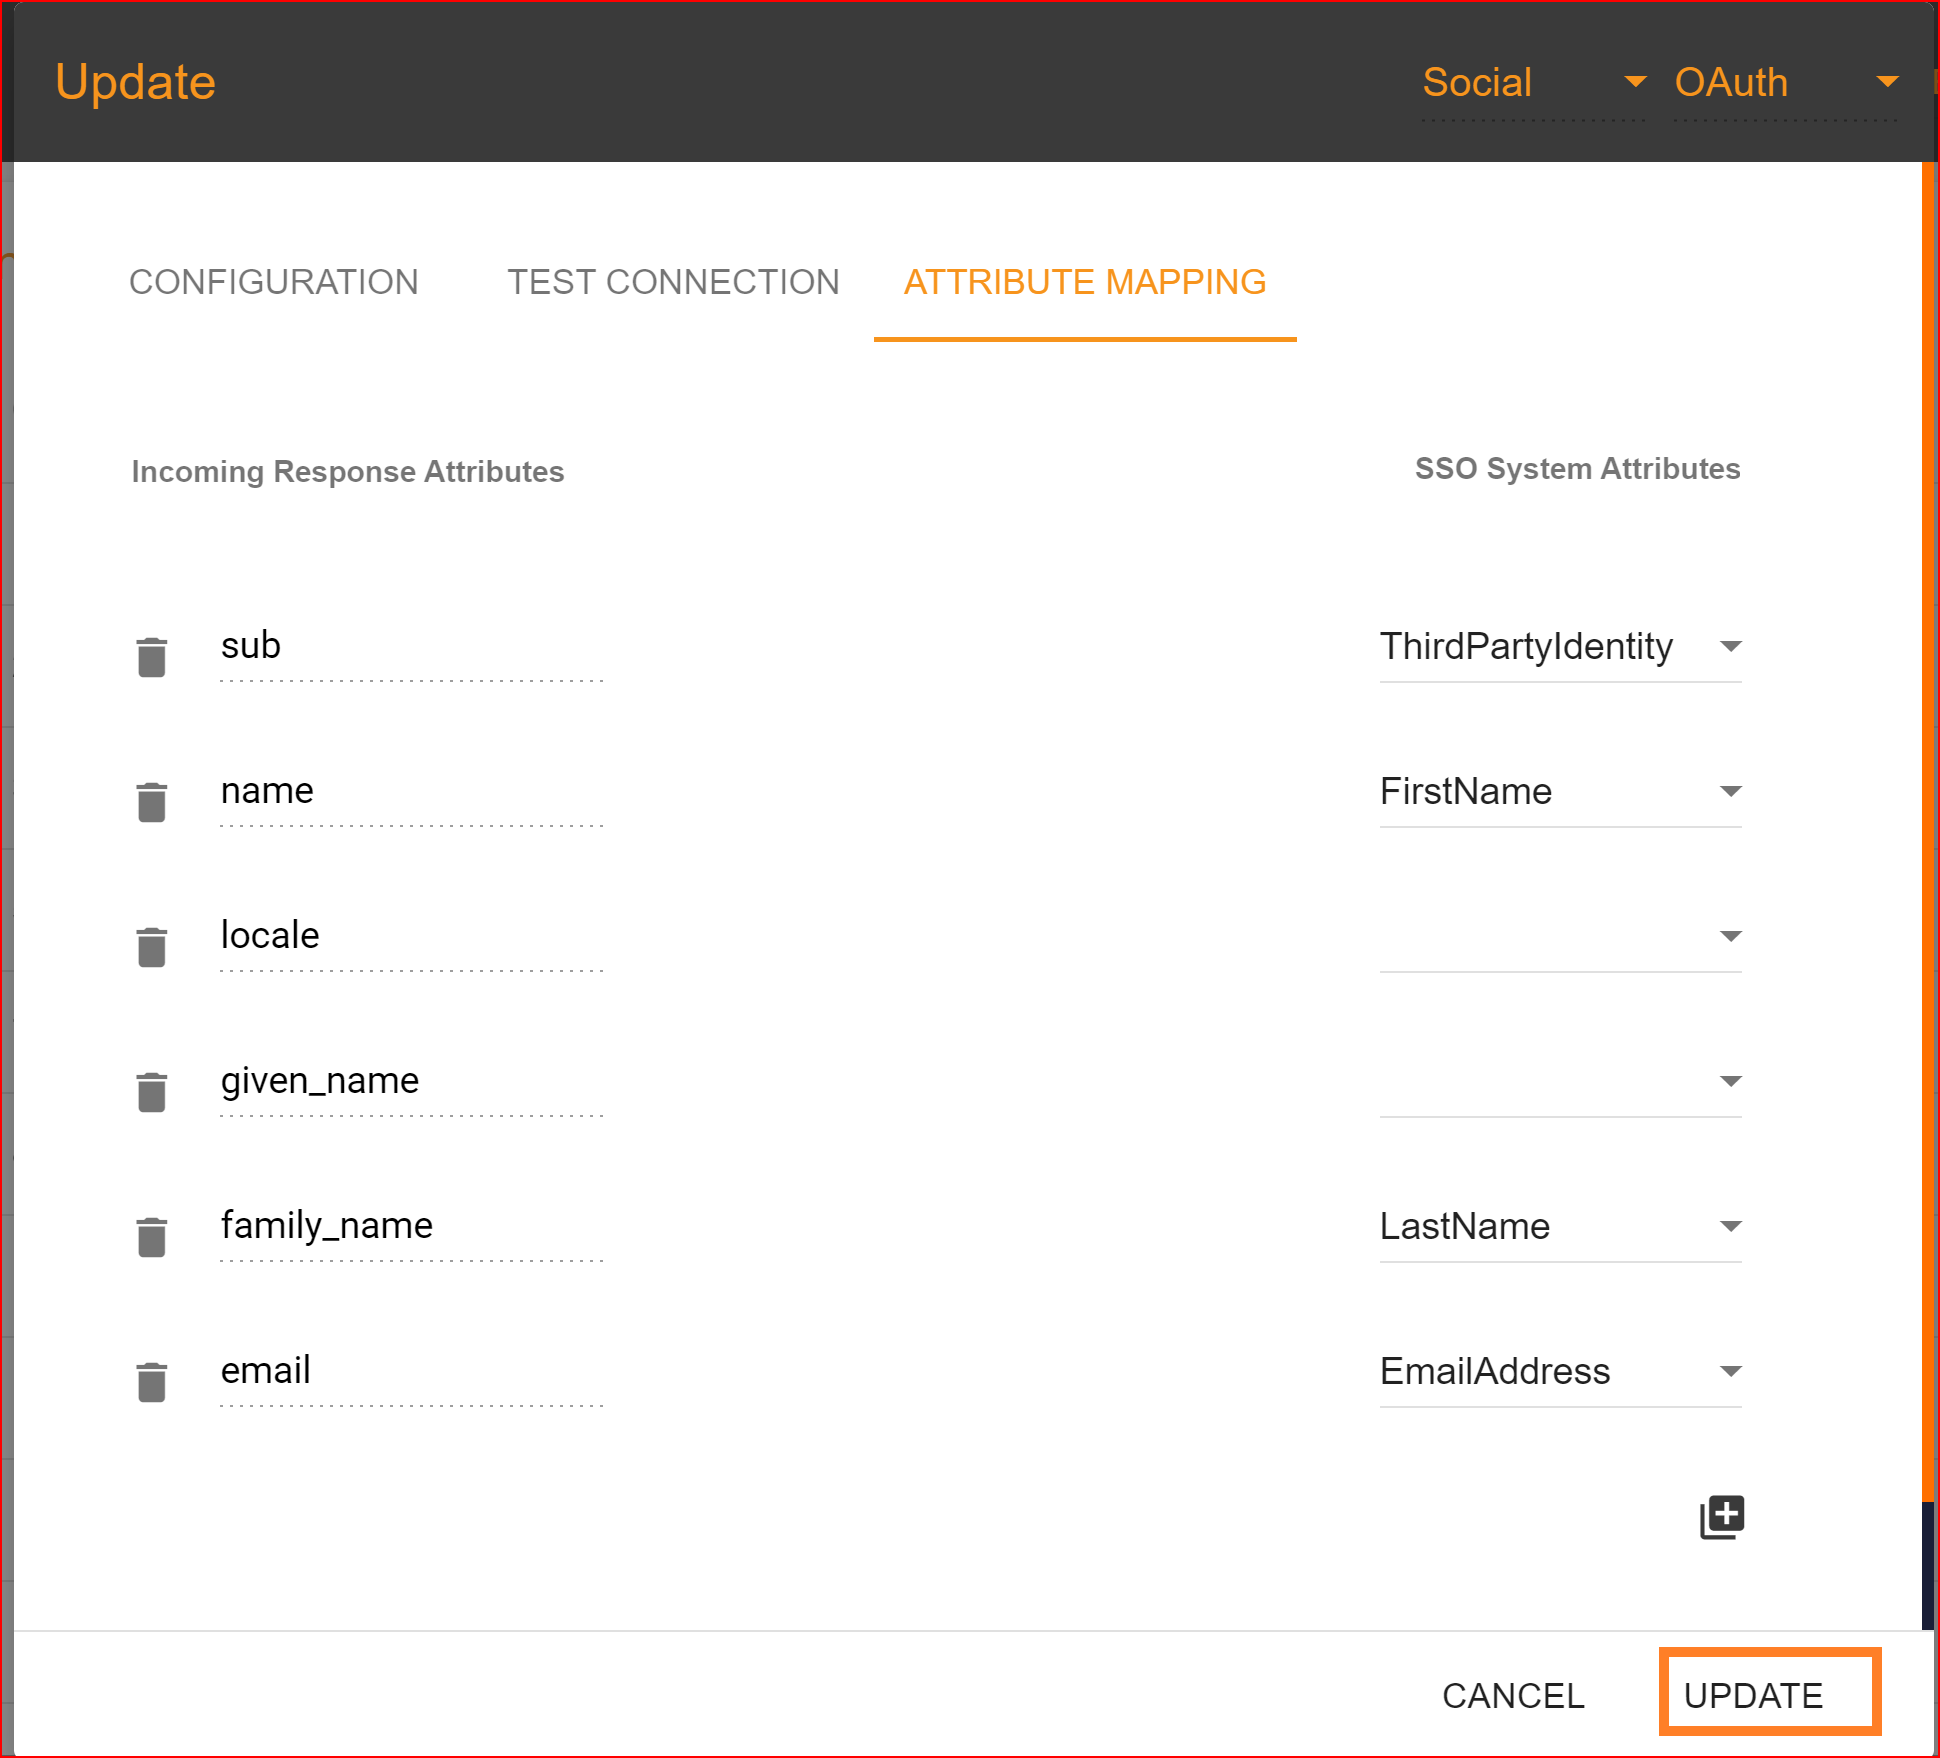
In Single Sign-On Identity (SSO.ID), attribute mapping involves linking attributes or user information from the identity provider (IdP) with corresponding attributes in the service provider (SP) system. This ensures that relevant user data is accurately transferred between the IdP and SP during authentication. In the attribute mapping section, the "Email Address" attribute is mandatory, while other attributes are optional. After completing the attribute mapping, click the "Update" button to finalize the connection establishment process, which is now successfully completed.
Check attribute mapping: To check the attribute mapping process in the SSO.ID, navigate your application configuration setting.

After configuration setting, go to Connection section and enable both Facebook connection and auto provisioning. What is Auto Provisioning: Auto-provisioning in Single Sign-On Identity (SSO.ID) refers to the automatic creation and management of user accounts within applications or services based on the user's authentication through the SSO system. Note: To verify the attribute mapping process, please ensure that when Auto Provisioning is enabled, the user has not already registered in the SSO system. After enabling it, you'll see the Facebook connection details in the redirect Uniform Resource Identifier (URI) of your application.
To confirm that the connection is properly set up, look for the "Login with SSO" button on the redirect URI of your application.
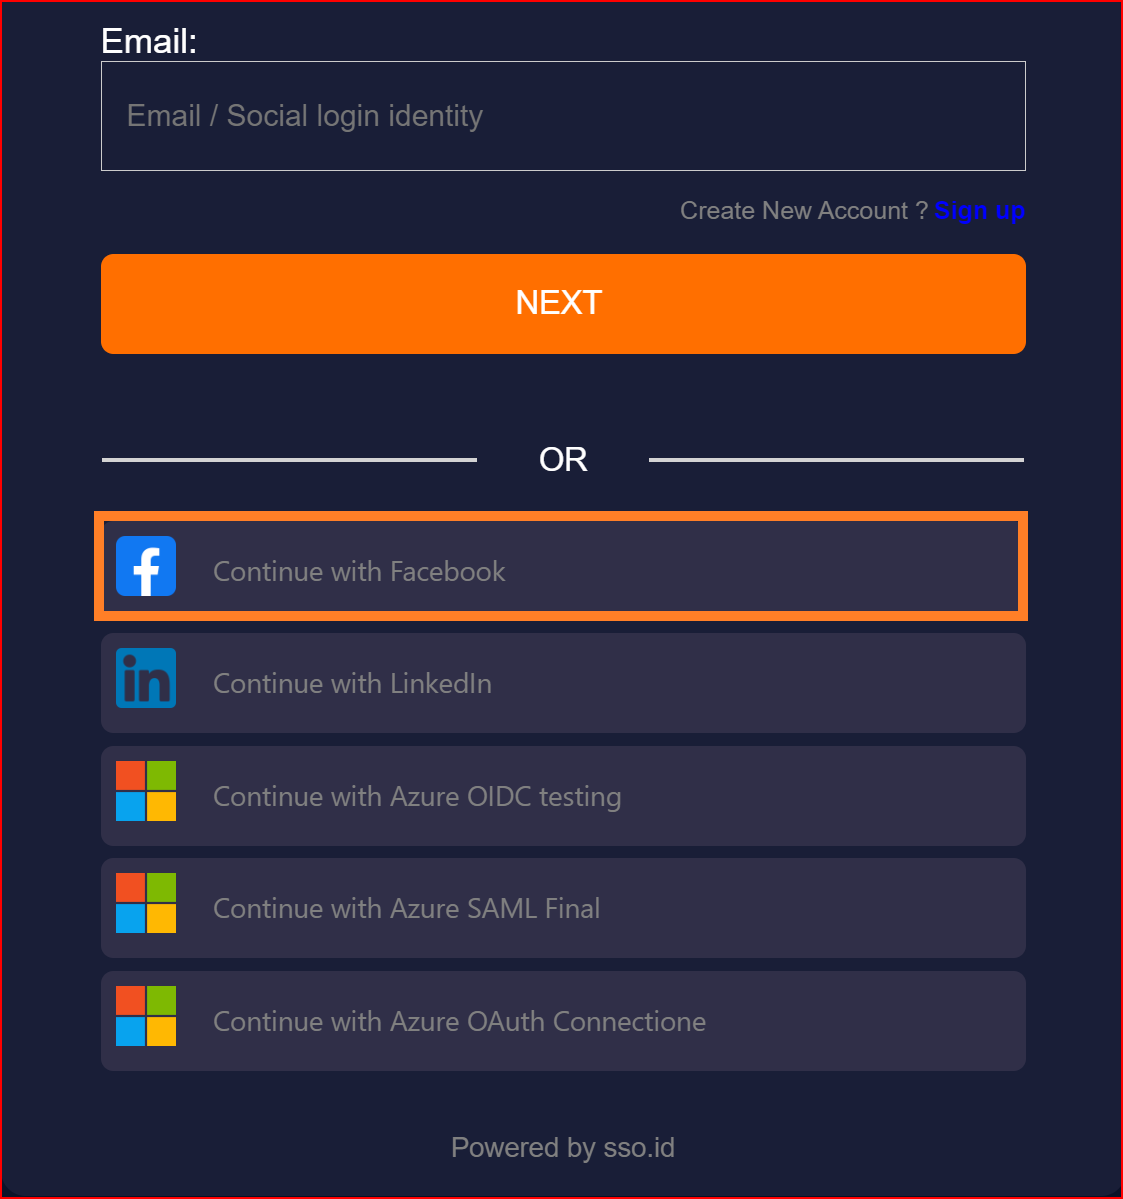
Make sure your established connection displays on your redirect URL and click on your Facebook connection. Once the connection is successfully established, this screen will appear on your system. Finally click on “Continue with Facebook” button.
You will be able to log in to your application using Facebook through SSO.ID.
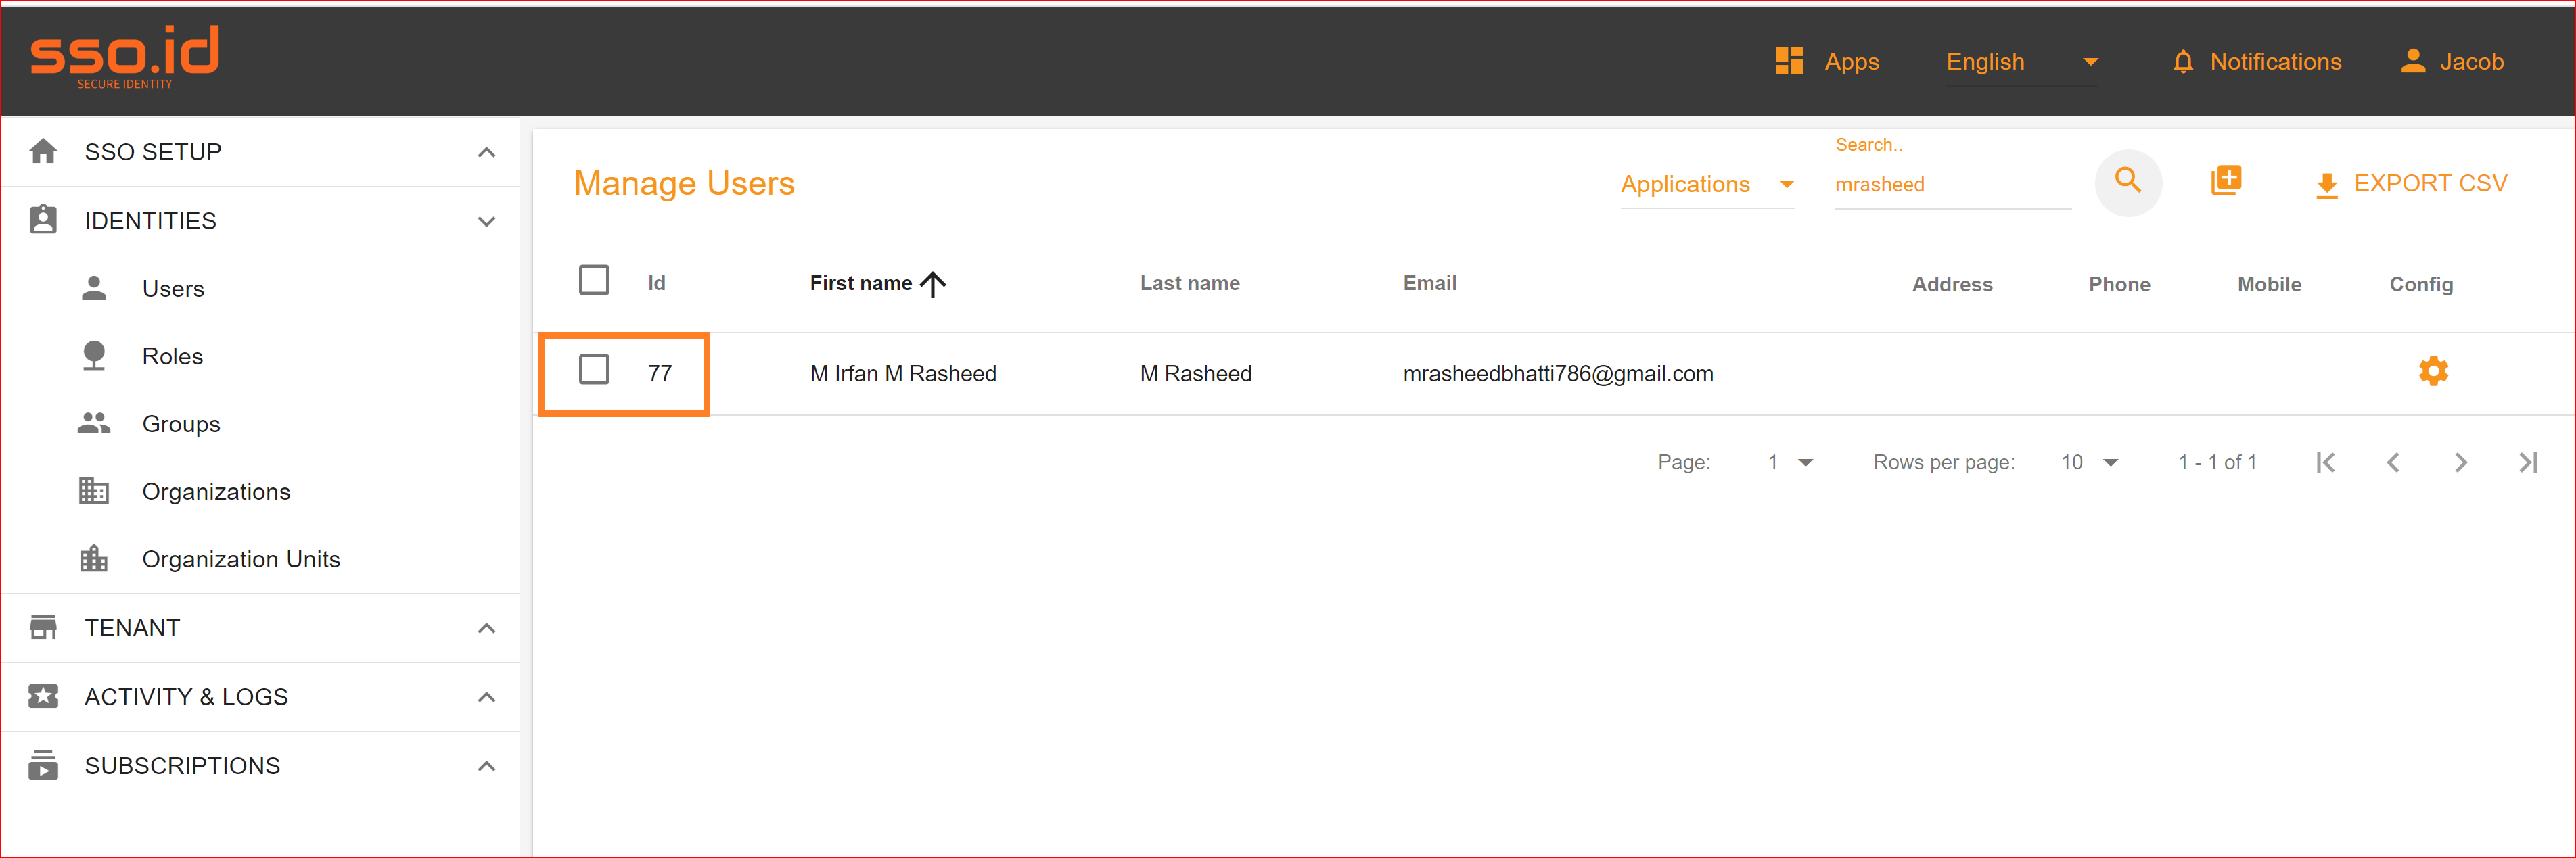
To check the auto-provisioning and attribute mapping process, you should navigate to the user management section of your SSO.ID provider's dashboard. Ensure that the user is successfully created through the Facebook connection with the attributes you have specified in the attribute mapping settings.
Generate a Facebook App
The process of creating a Facebook app collects the essential information required to generate a unique ID for your app. Once you finish this process, you'll be directed to the App Dashboard, where you can furnish additional details.
Prior to beginning
- You need to be logged in to your Facebook developer console
- Make sure you haven't surpassed your app limit.
- As a developer, you're allowed to hold a developer or administrator role for up to 15 apps.
Initiate the process of creating a Facebook app
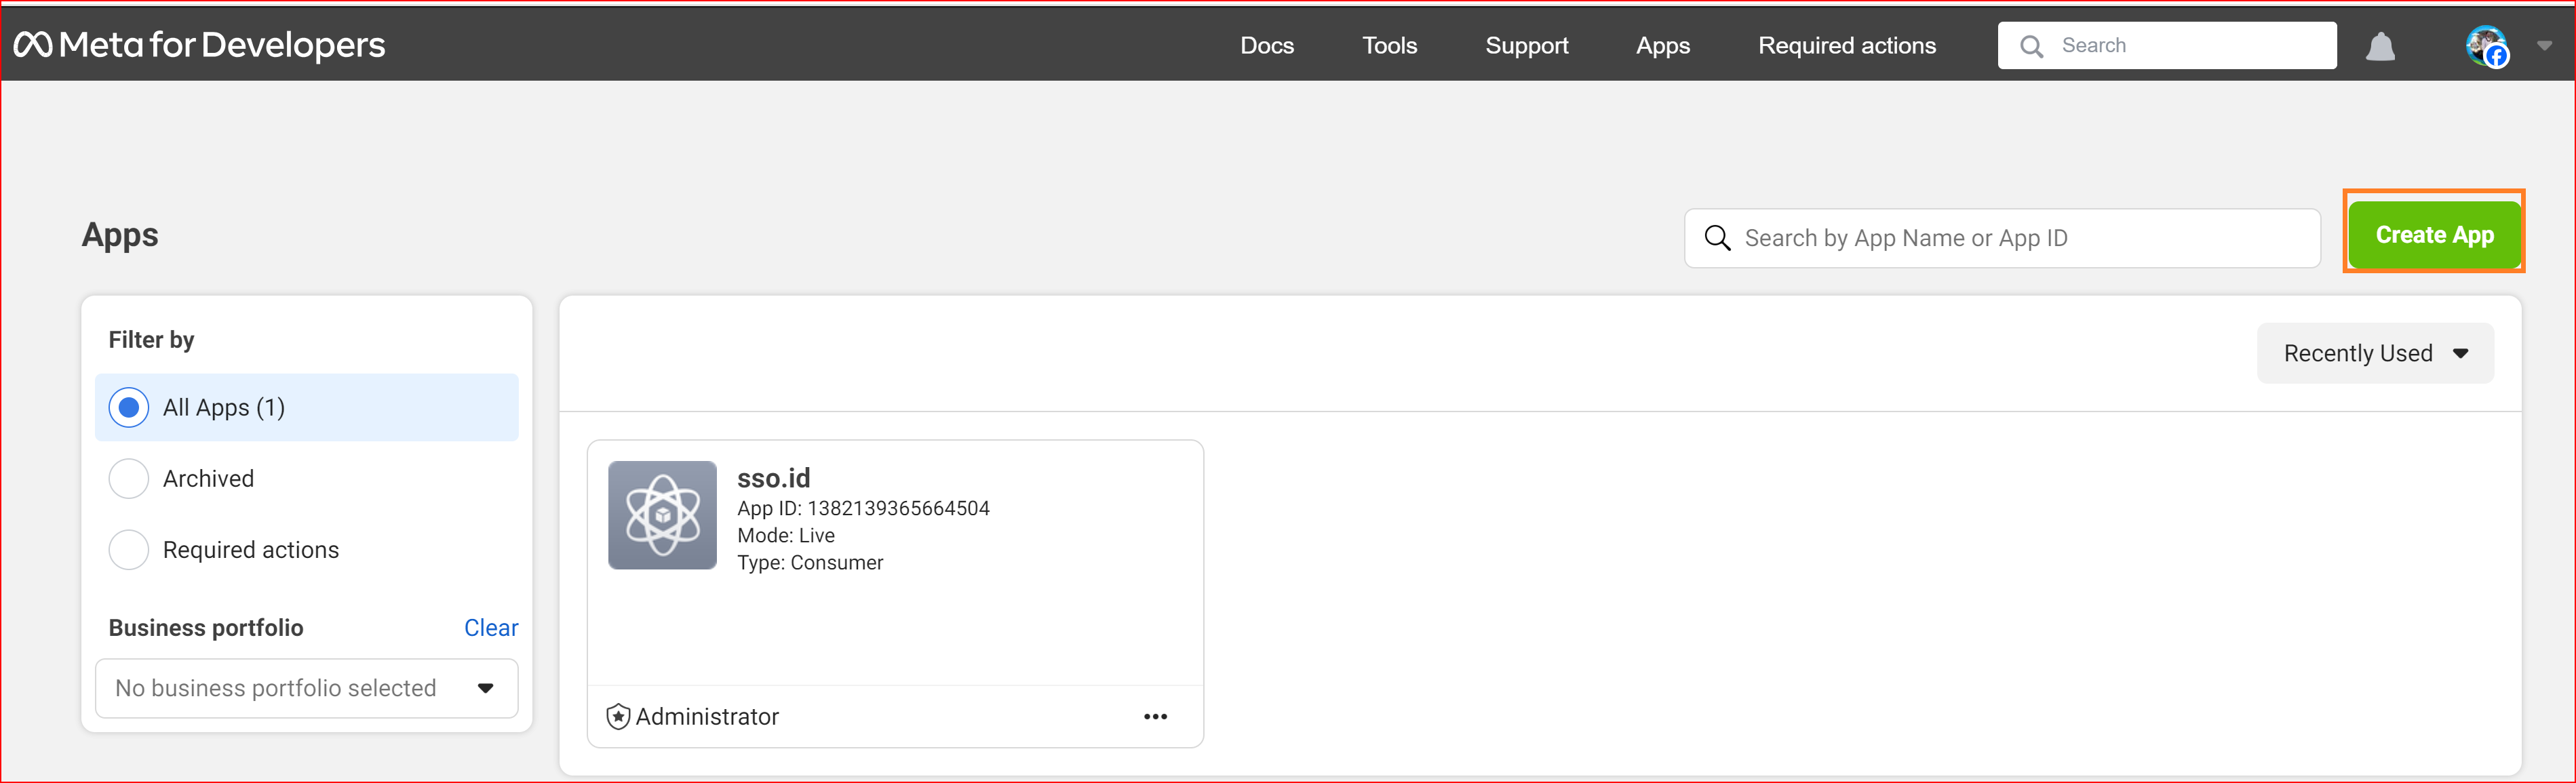
If you have recently completed the registration process, please click the "My Apps" button.
Click the 'Create App' button to generate a new Facebook application.
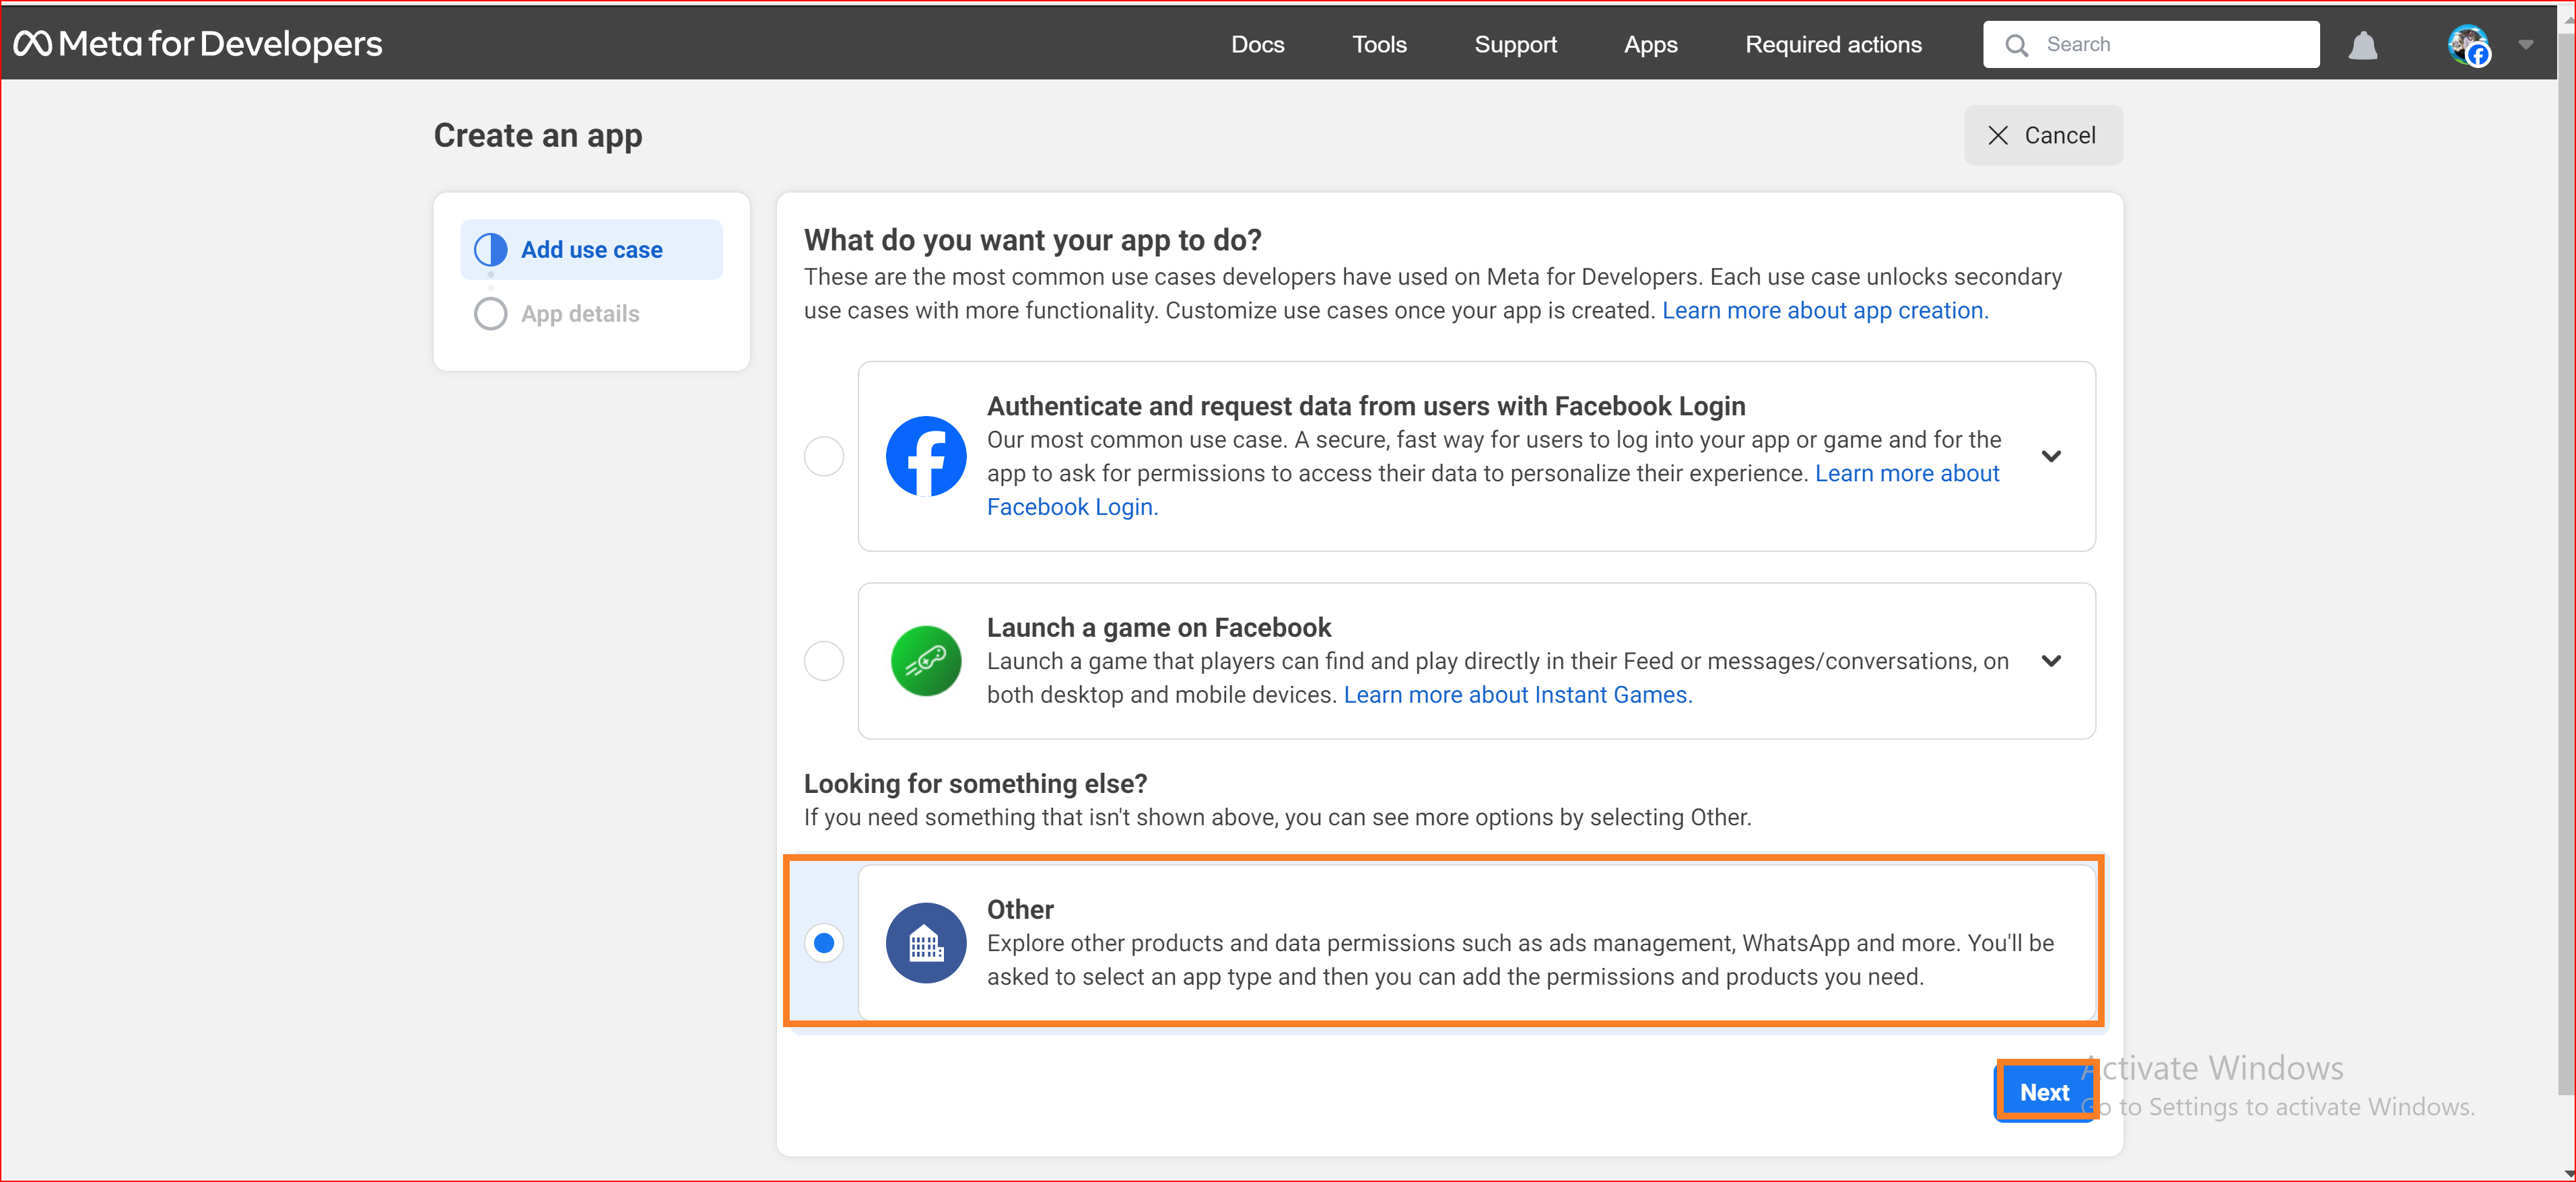
In the section for creating the app, you should choose the "Other" option and then click the "Next" button.
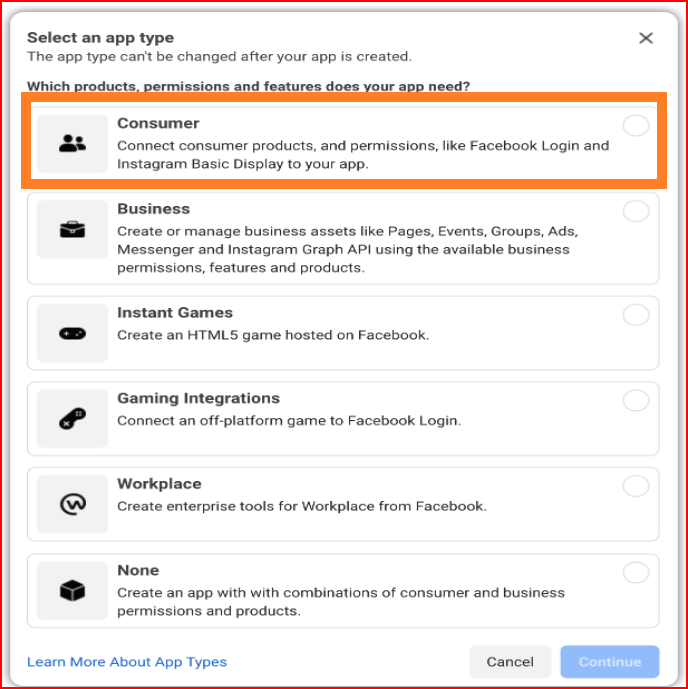
Select an app type
Your chosen app type dictates the products and APIs accessible to your app. Once your app is created, its type cannot be altered.
Consumer
The Consumer app type is designed for applications that incorporate consumer-oriented products such as Facebook Login, enhancing the app users' personalized experience.
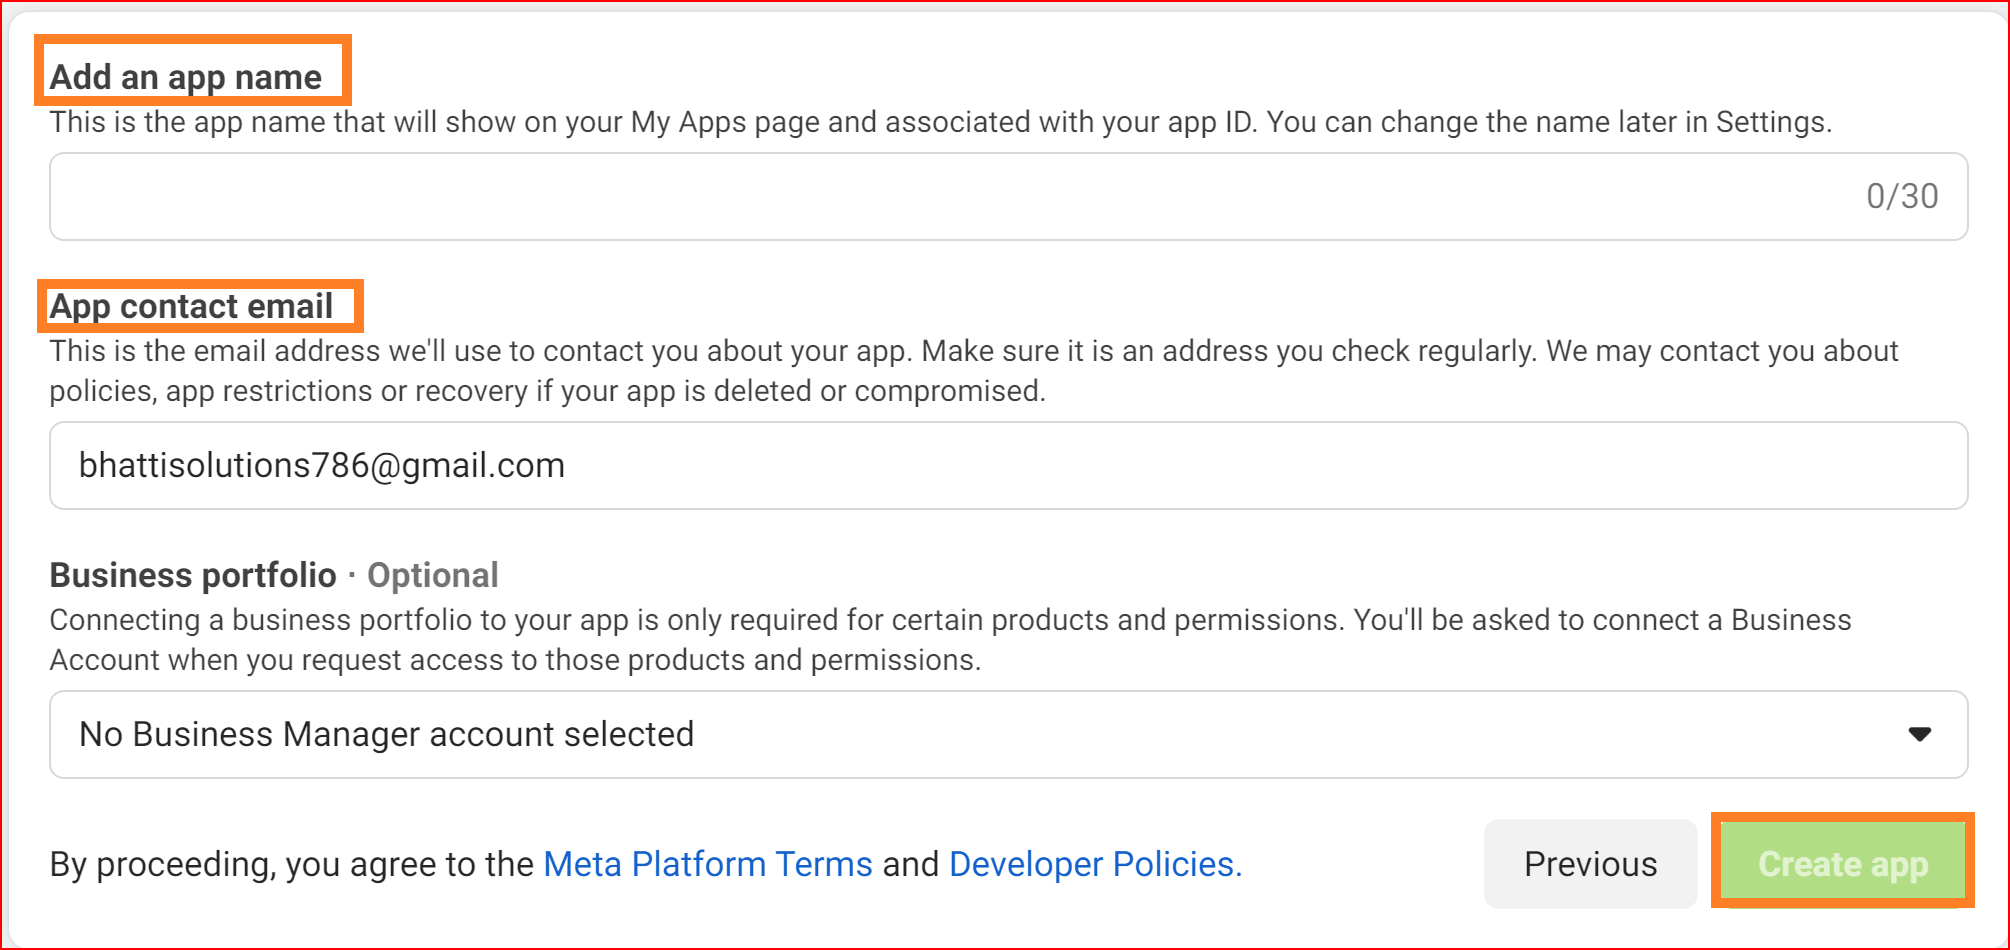
Provide your app's name and email address
Input the name of your Facebook app and a valid email address to receive crucial developer notifications. This email can differ from your Facebook account's email but ensure its legitimate and monitored for important updates.
Upon finishing the Facebook app creation process, your app will be accessible in the App Dashboard.

Facebook app setting for SSO.ID configuration
Once your Facebook app is successfully created, the next step involves setting up your Facebook app. To proceed with this process, navigate to "App settings," then click on "Basic," and configure your requirements based on your own credentials.
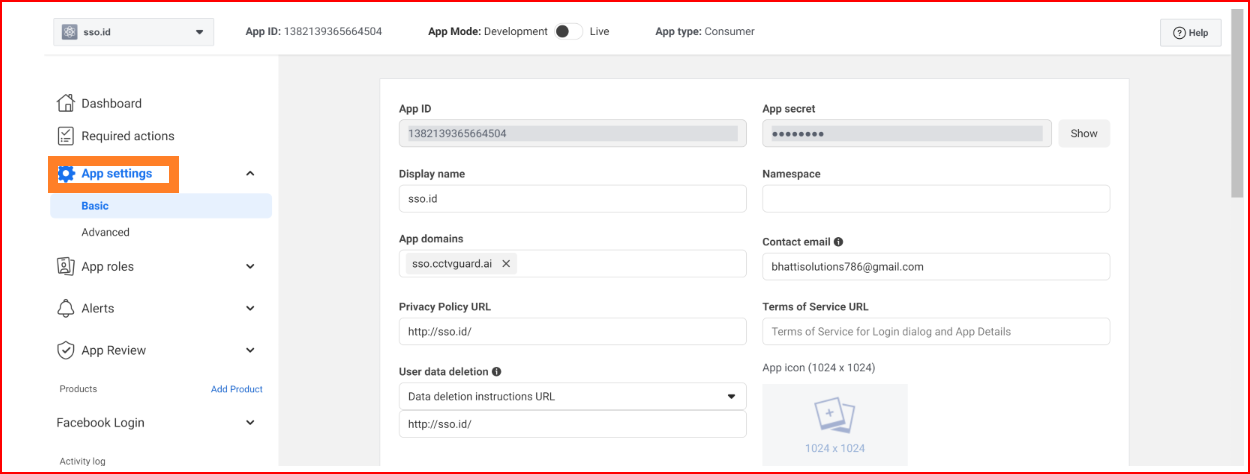
Key parameters in the basic settings
- App ID: Enter this app ID in the "SSO.ID connections" tab when you're creating a Facebook connection.
- App secret: Enter this App secret in the “SSO.ID connections” tab when you're creating a Facebook connection.
- App domains: Configure your app domain instance after setting up SSO. For instance, our app domains are "app.sso.cctvguard.ai".
- Business Verification: Business verification is a crucial step to grant essential permissions for accessing online authentication. To initiate the business verification process, click on the "Start Verification" button. You also have the option to complete the process without business verification on a local level.
- Site URL: Configure your site's full redirect URL based on your instance. The complete redirect URL for an established social connection with OAuth should be provided, https://app.sso.id/oauth/callback.
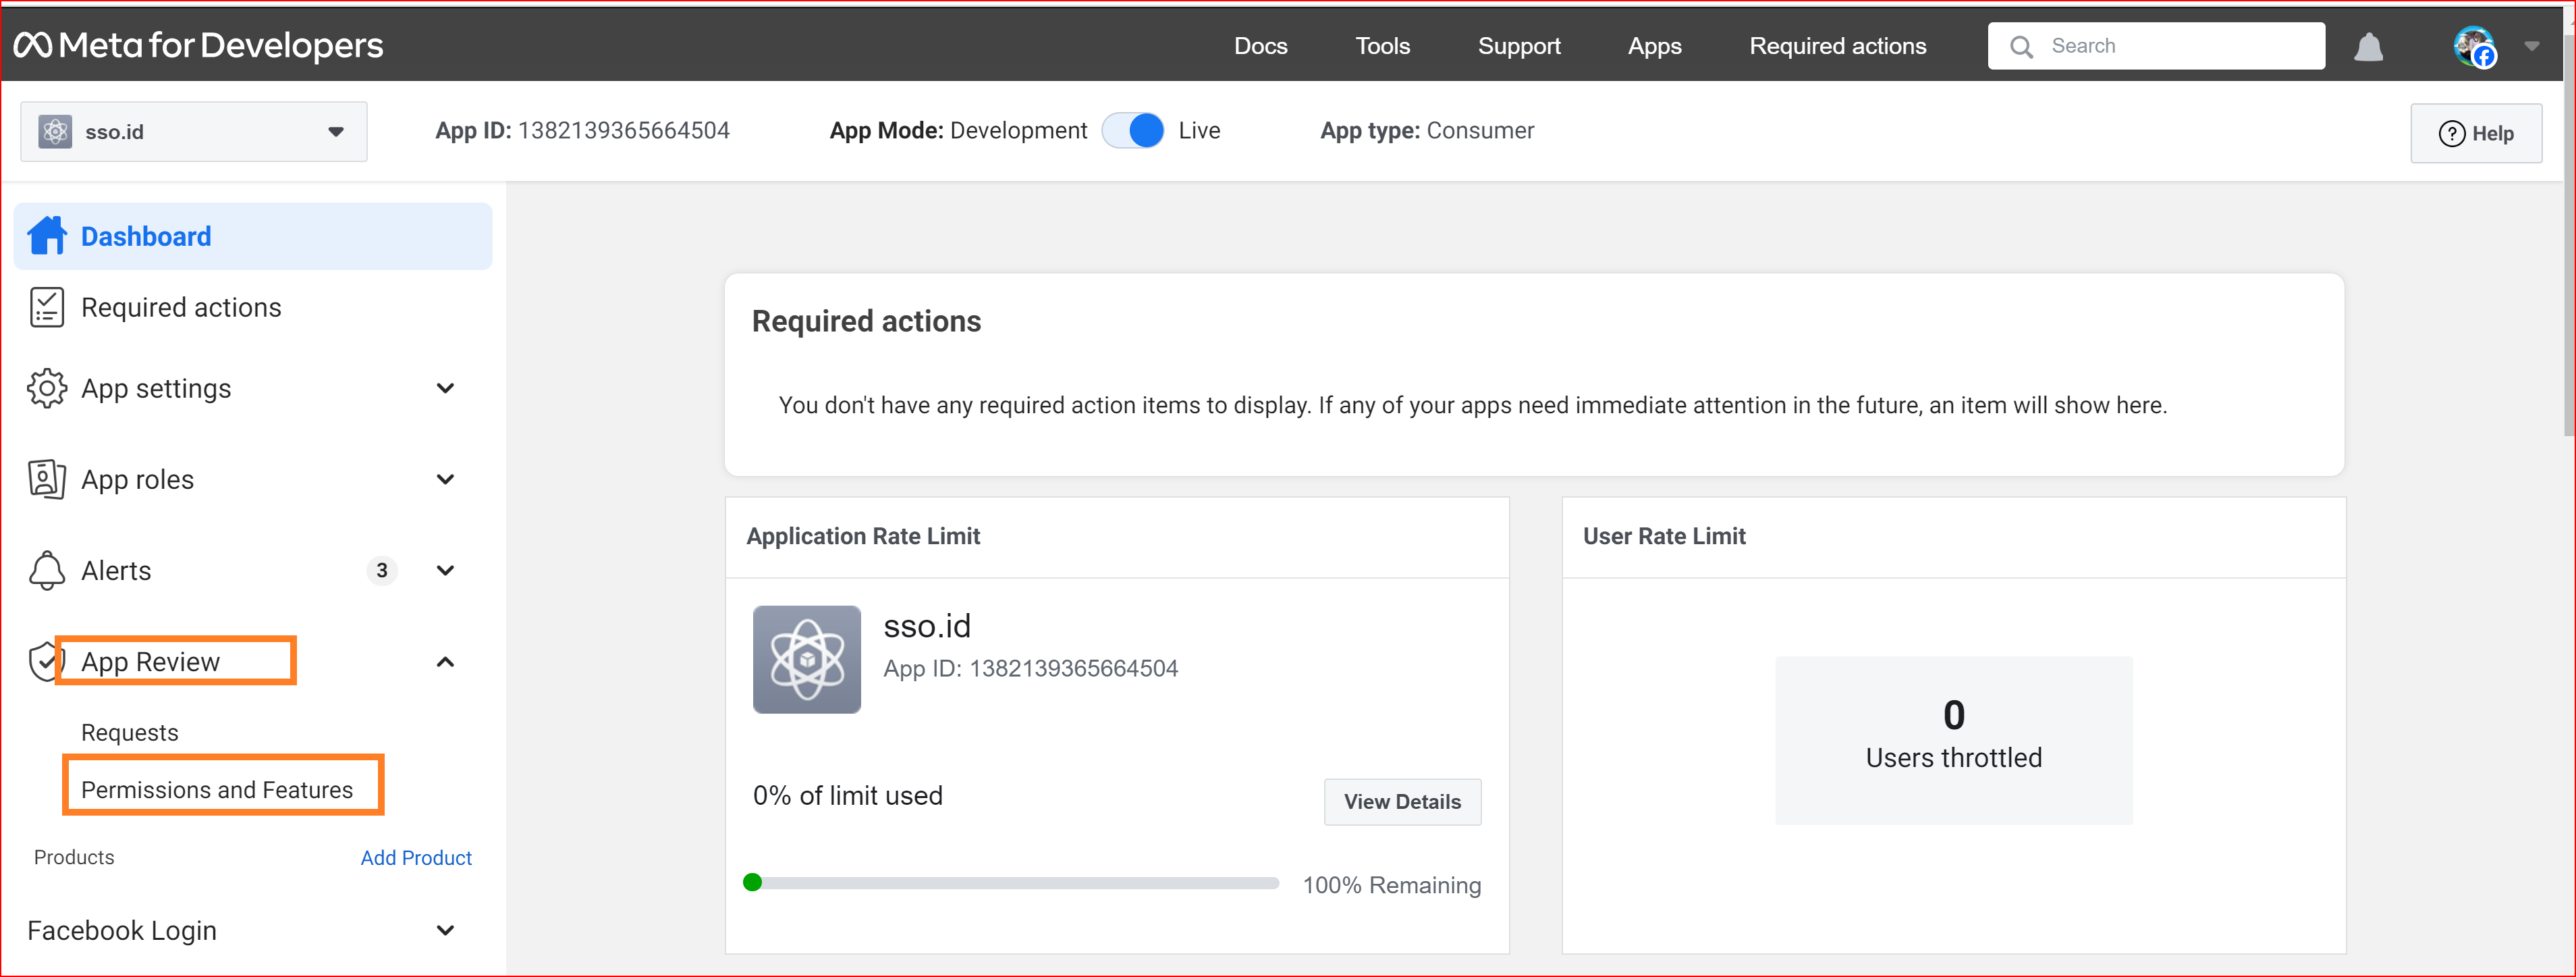
You have now finished configuring the basic settings for your Facebook app. Click the "Save Changes" button to proceed. For further setting your Facebook app click on the “App Review” button and select “Permissions and Features”.
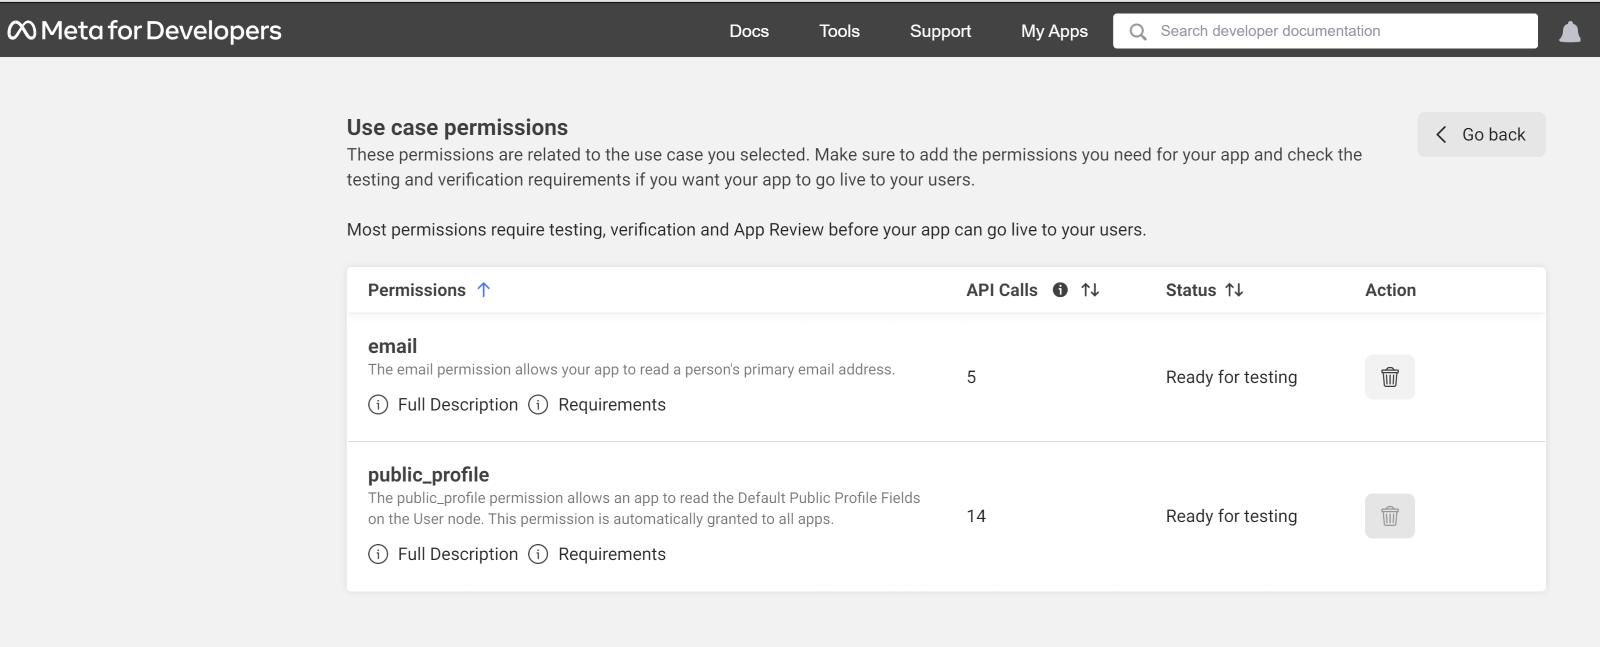
You should grant these two permissions to fulfill testing and verification requirements.
Finally, navigate to "Facebook Login Setting" and configure the client OAuth and redirect URI. Within the "Facebook Login setting" tab, the critical parameter is the "Valid OAuth Redirect URIs." Therefore, set your complete redirect URIs.
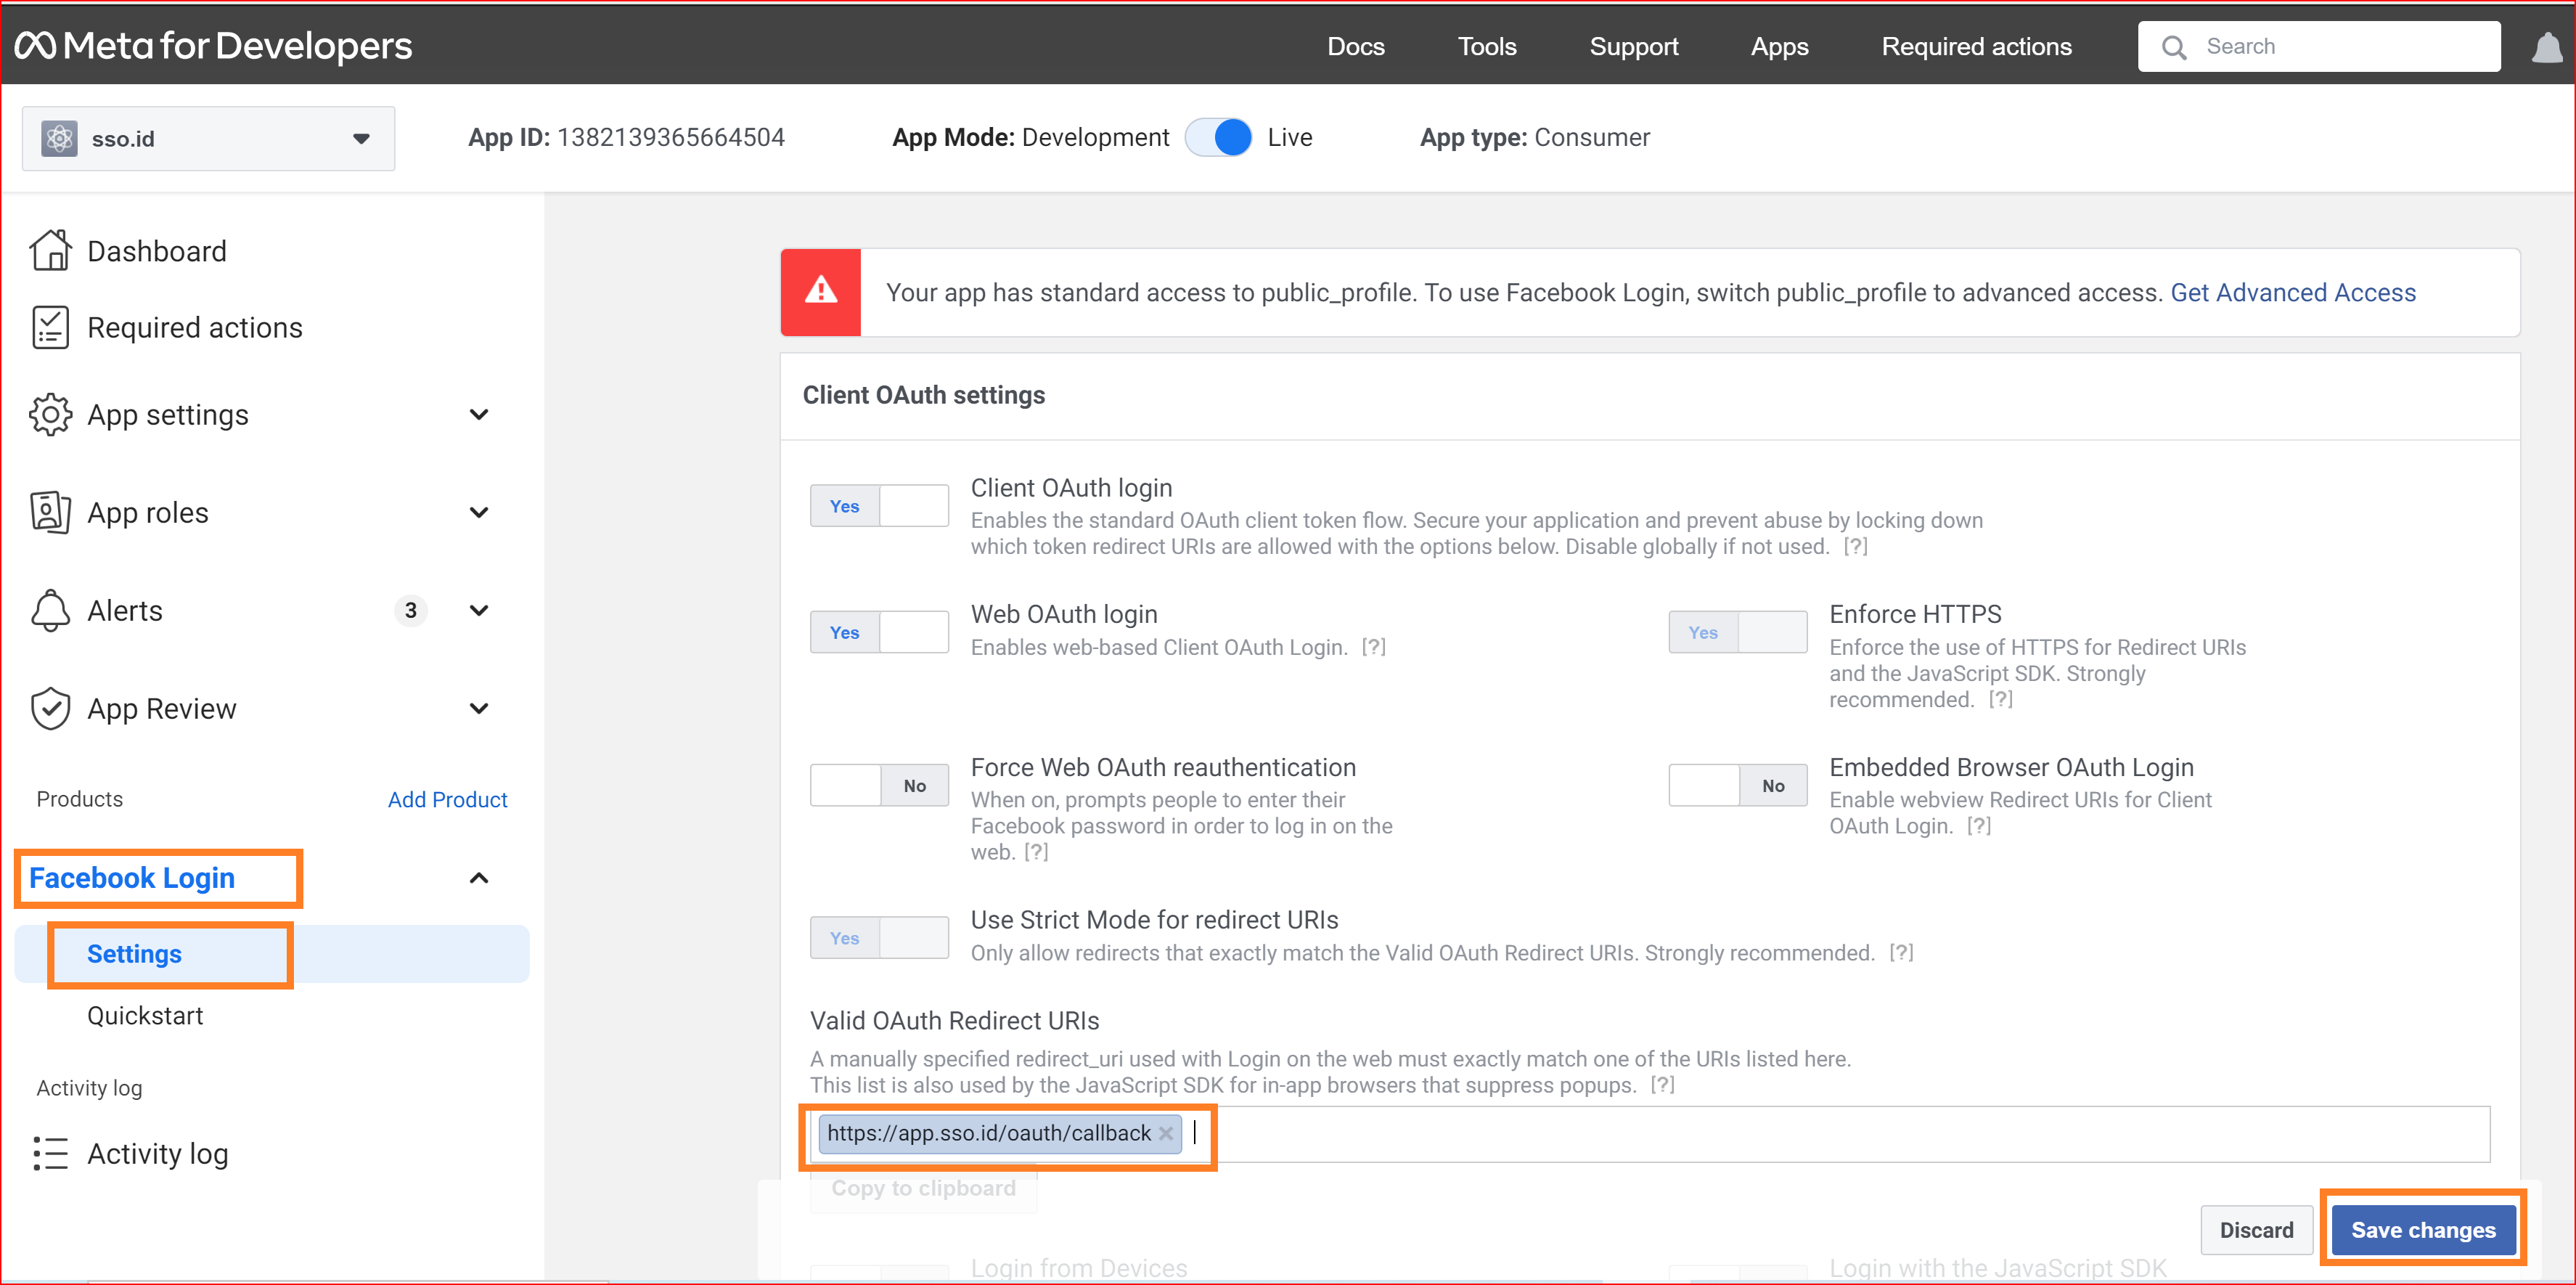
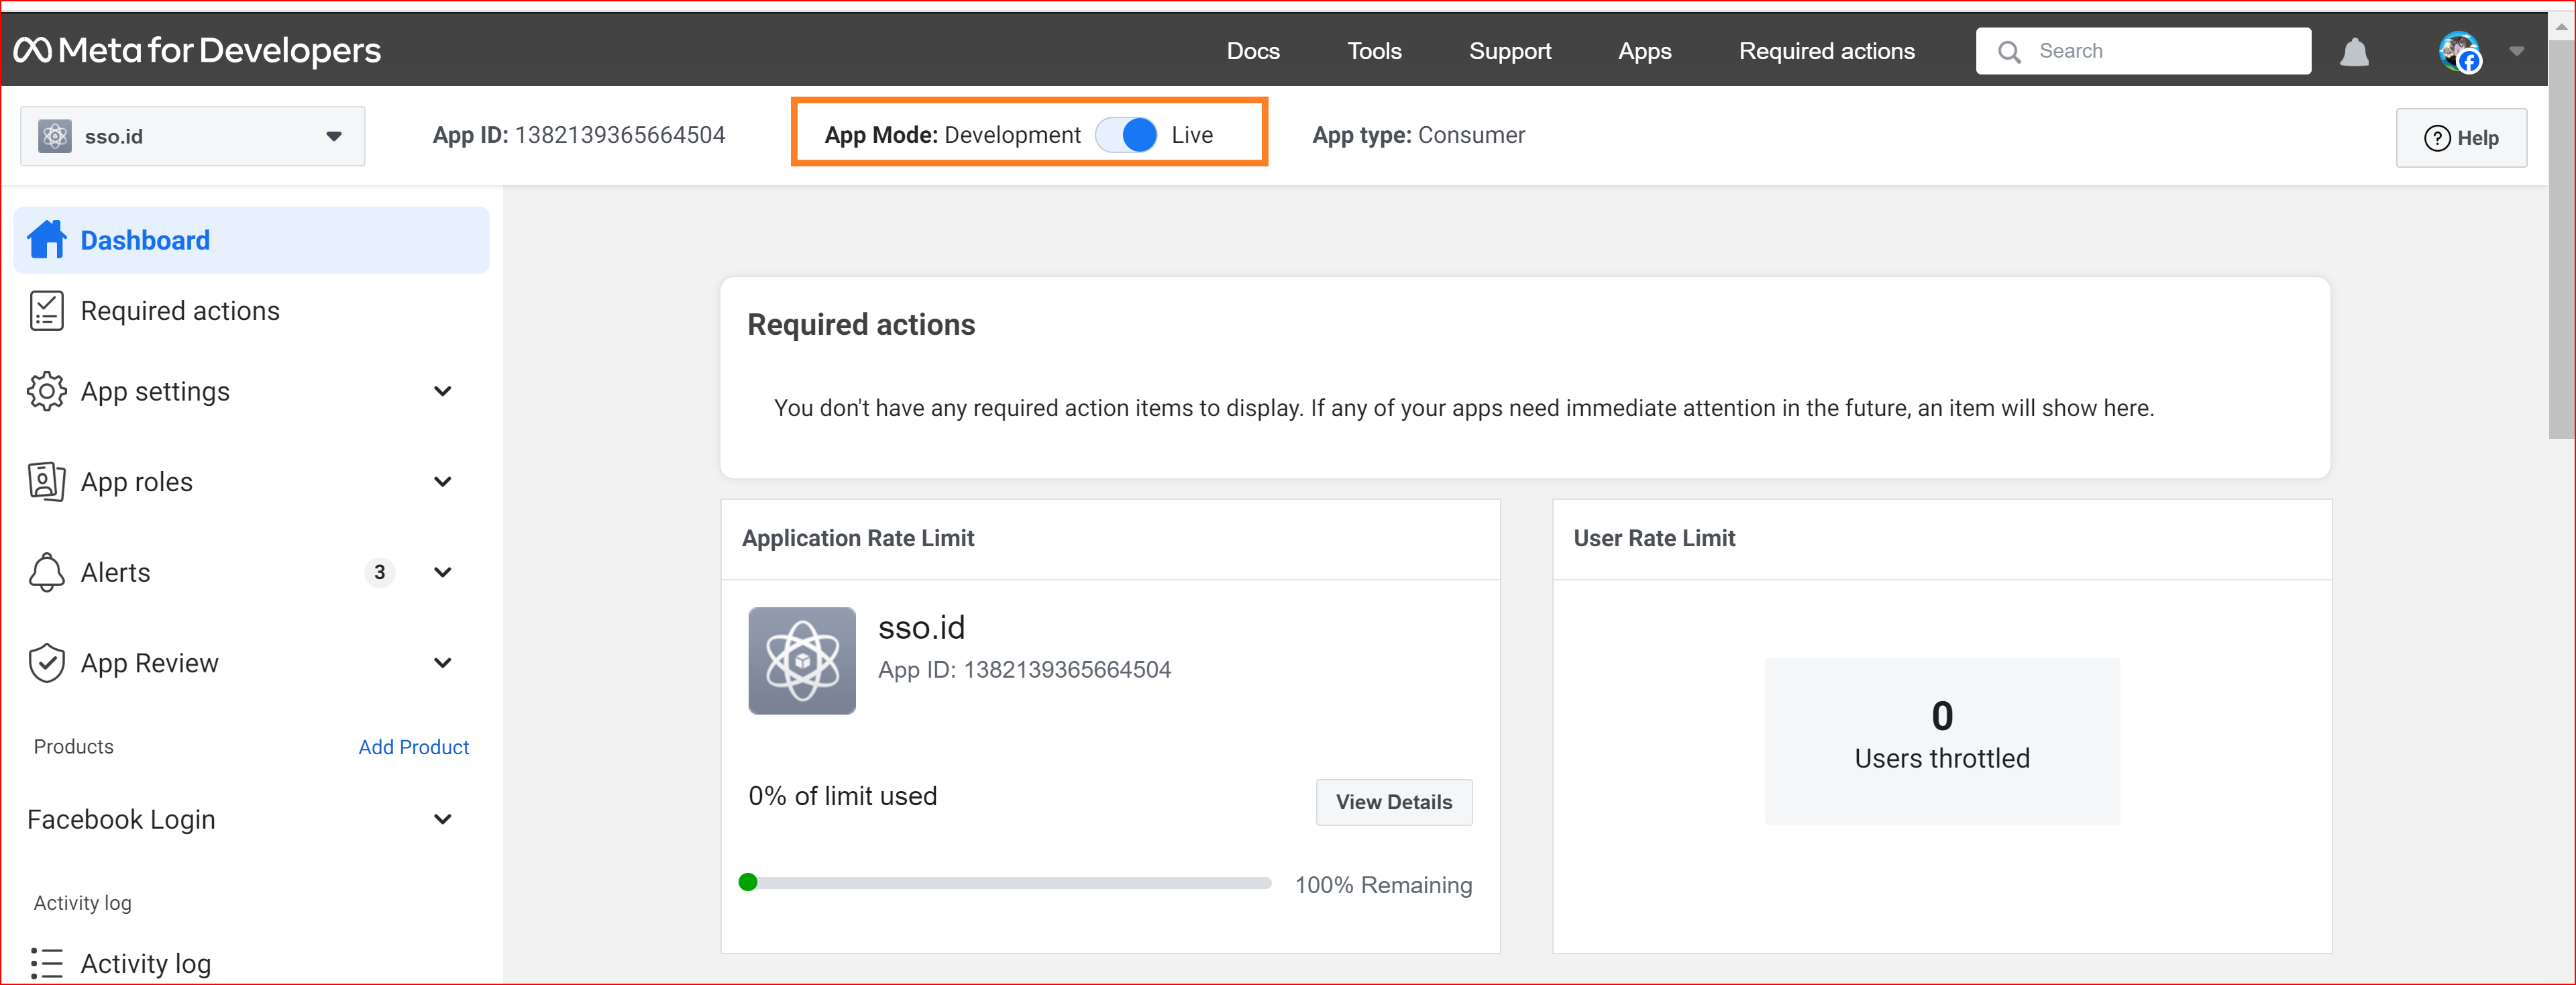
If you are conducting testing and verification in a live environment, your app mode should be set to Live Mode.
Create Connections with LinkedIn
Creating a LinkedIn connection in Single Sign-On Identity (SSO.ID) offers several benefits for both users and organizations
Streamlined User Experience: Users can access LinkedIn services using their existing credentials from the organization's system, eliminating the need to remember and manage separate login credentials for LinkedIn. This streamlines the login process and enhances user experience.
Improved Security: SSO integration allows organizations to enforce their security policies and authentication mechanisms when users access LinkedIn. This helps maintain consistent security standards across all connected systems and reduces the risk of credential-related security breaches.
SSO.ID endpoints to configure the LinkedIn app
To create a new social connection and log in to your application on the connections page, you should click on the "Create Connection" button in the connection section of the SSO.ID.

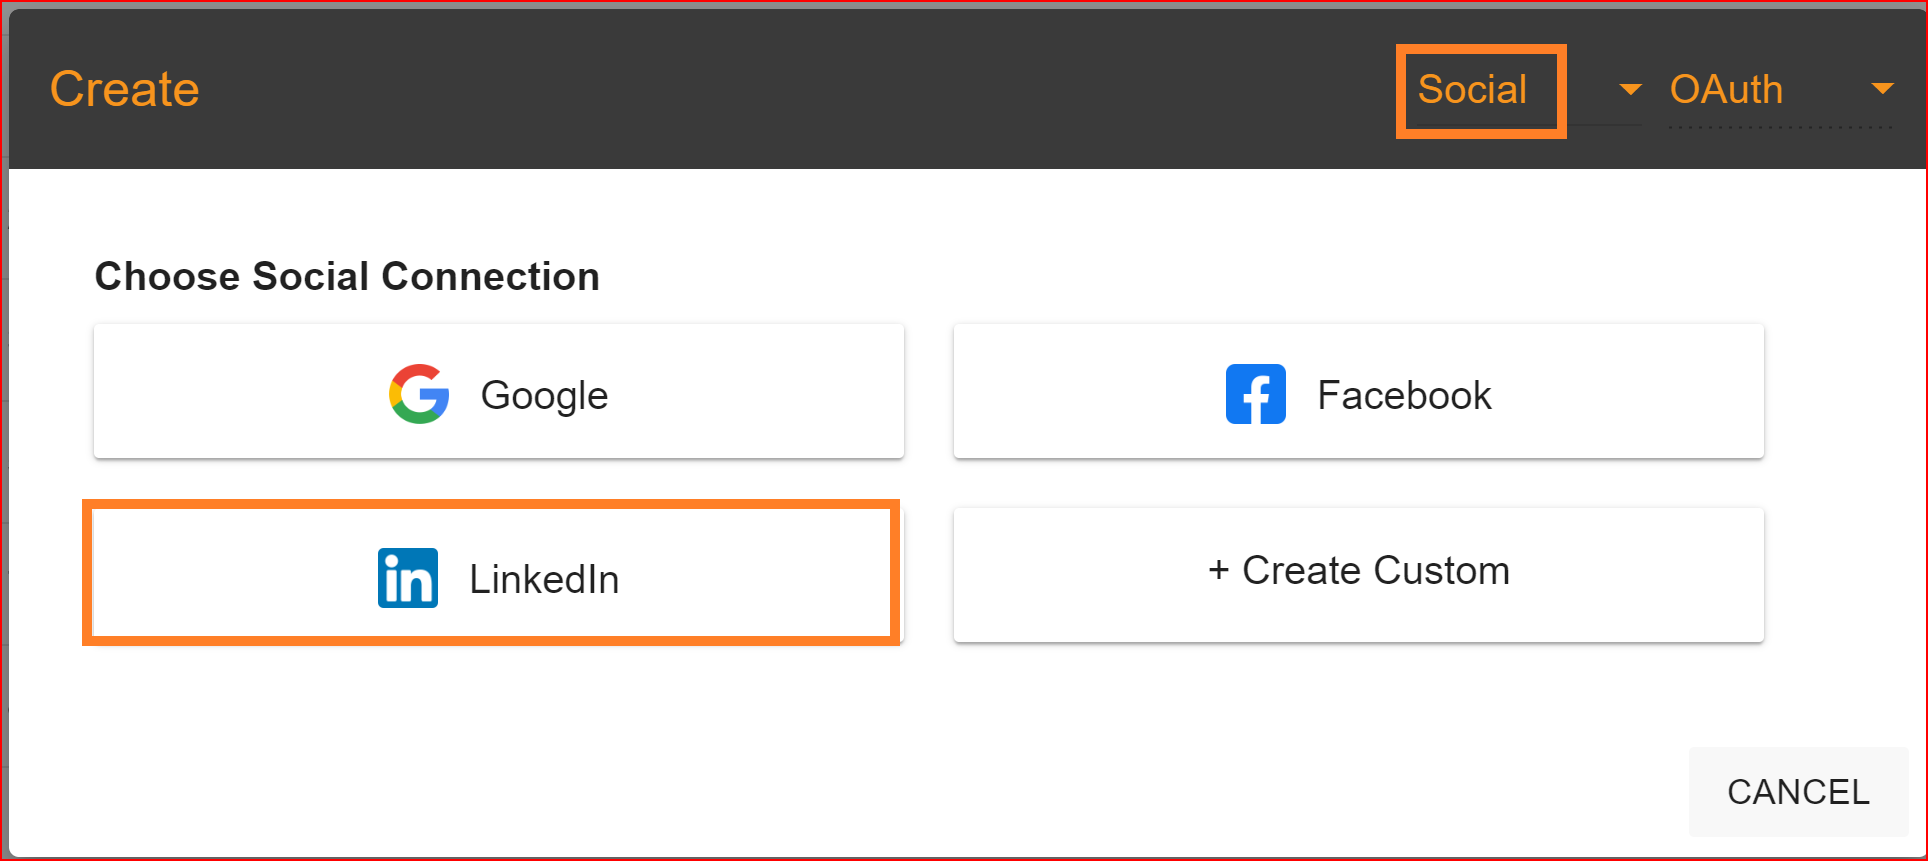
Select the LinkedIn social connection to set up LinkedIn integration for your application within the Single Sign-On Identity (SSO.ID).
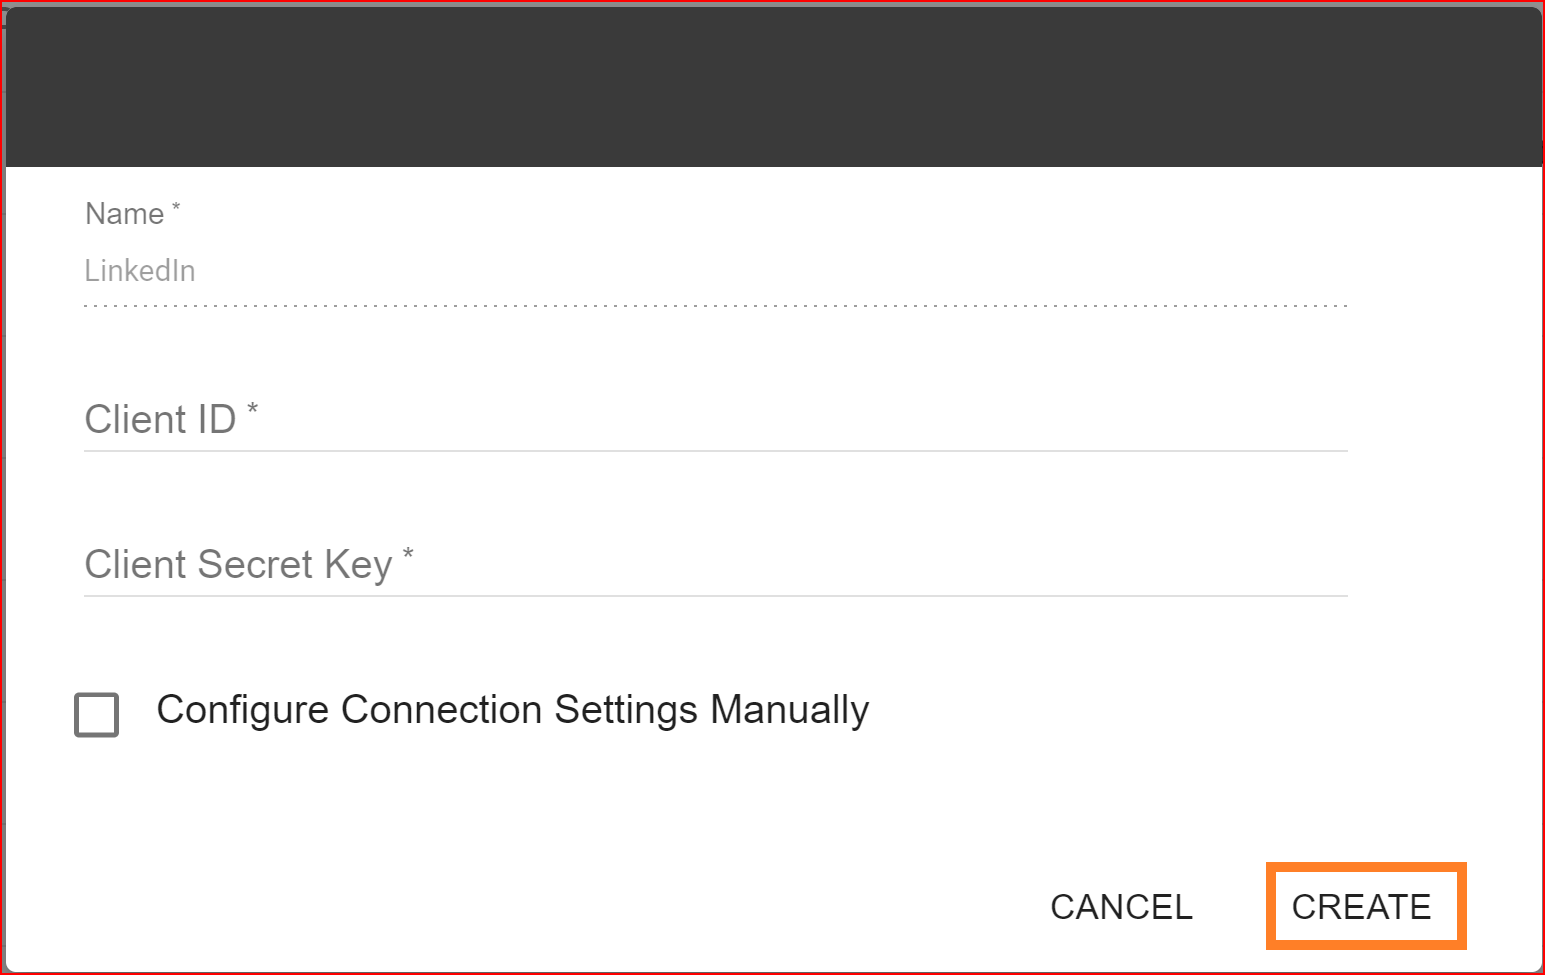
Enter the valid Client ID and Client Secret Key from your generated LinkedIn application. Once you've entered the correct Client ID and Client Secret, click the "Create" button. This will successfully establish the LinkedIn connection.
Test Connection
Once you've configured the Client ID and Client Secret, proceed by clicking the "NEXT" button to test the connection.
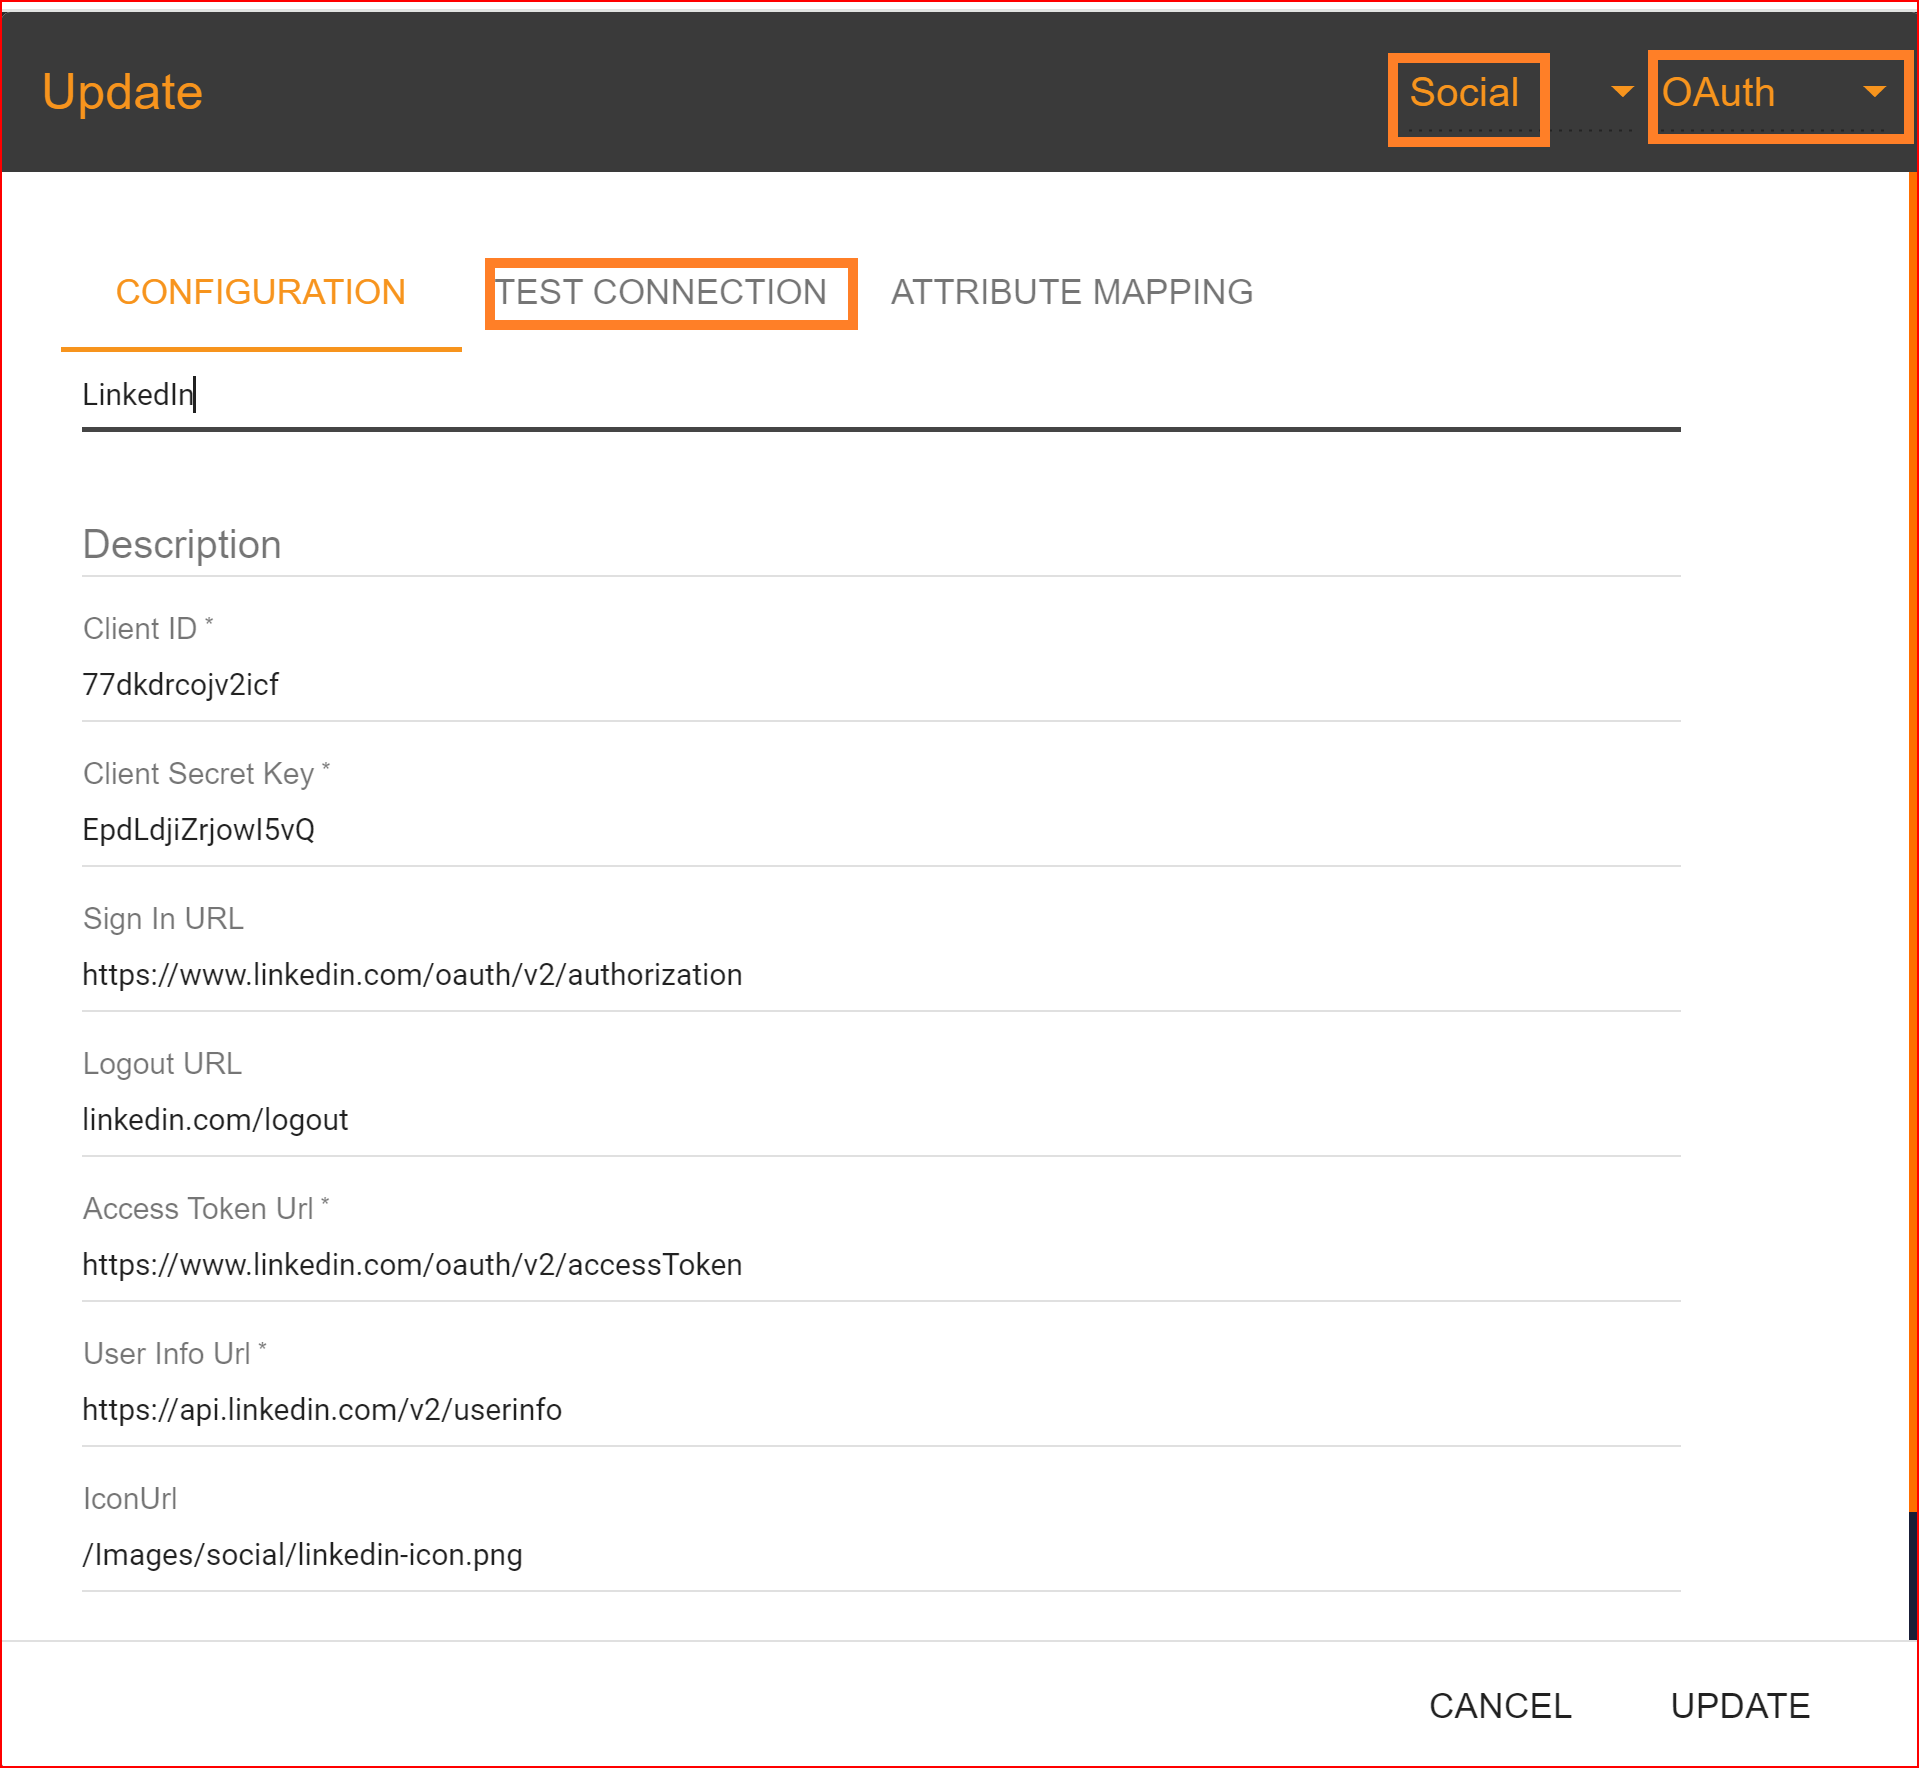
In the test connection section, SSO.ID provides a feature to verify whether your connection has been successfully established. To perform the test, click on the "TEST CONNECTION" button.
If all your configuration parameters are correct, including a valid Client ID and Client Secret, you will see a message stating, "Connection built successfully." Then, proceed by clicking on the "NEXT" button to proceed to attribute mapping.
Attribute Mapping
In Single Sign-On Identity (SSO.ID), attribute mapping involves linking attributes or user information from the identity provider (IdP) with corresponding attributes in the service provider (SP) system. This ensures that relevant user data is accurately transferred between the IdP and SP during authentication. In the attribute mapping section, the "Email Address" attribute is mandatory, while other attributes are optional. After completing the attribute mapping, click the "Update" button to finalize the connection establishment process, which is now successfully completed.
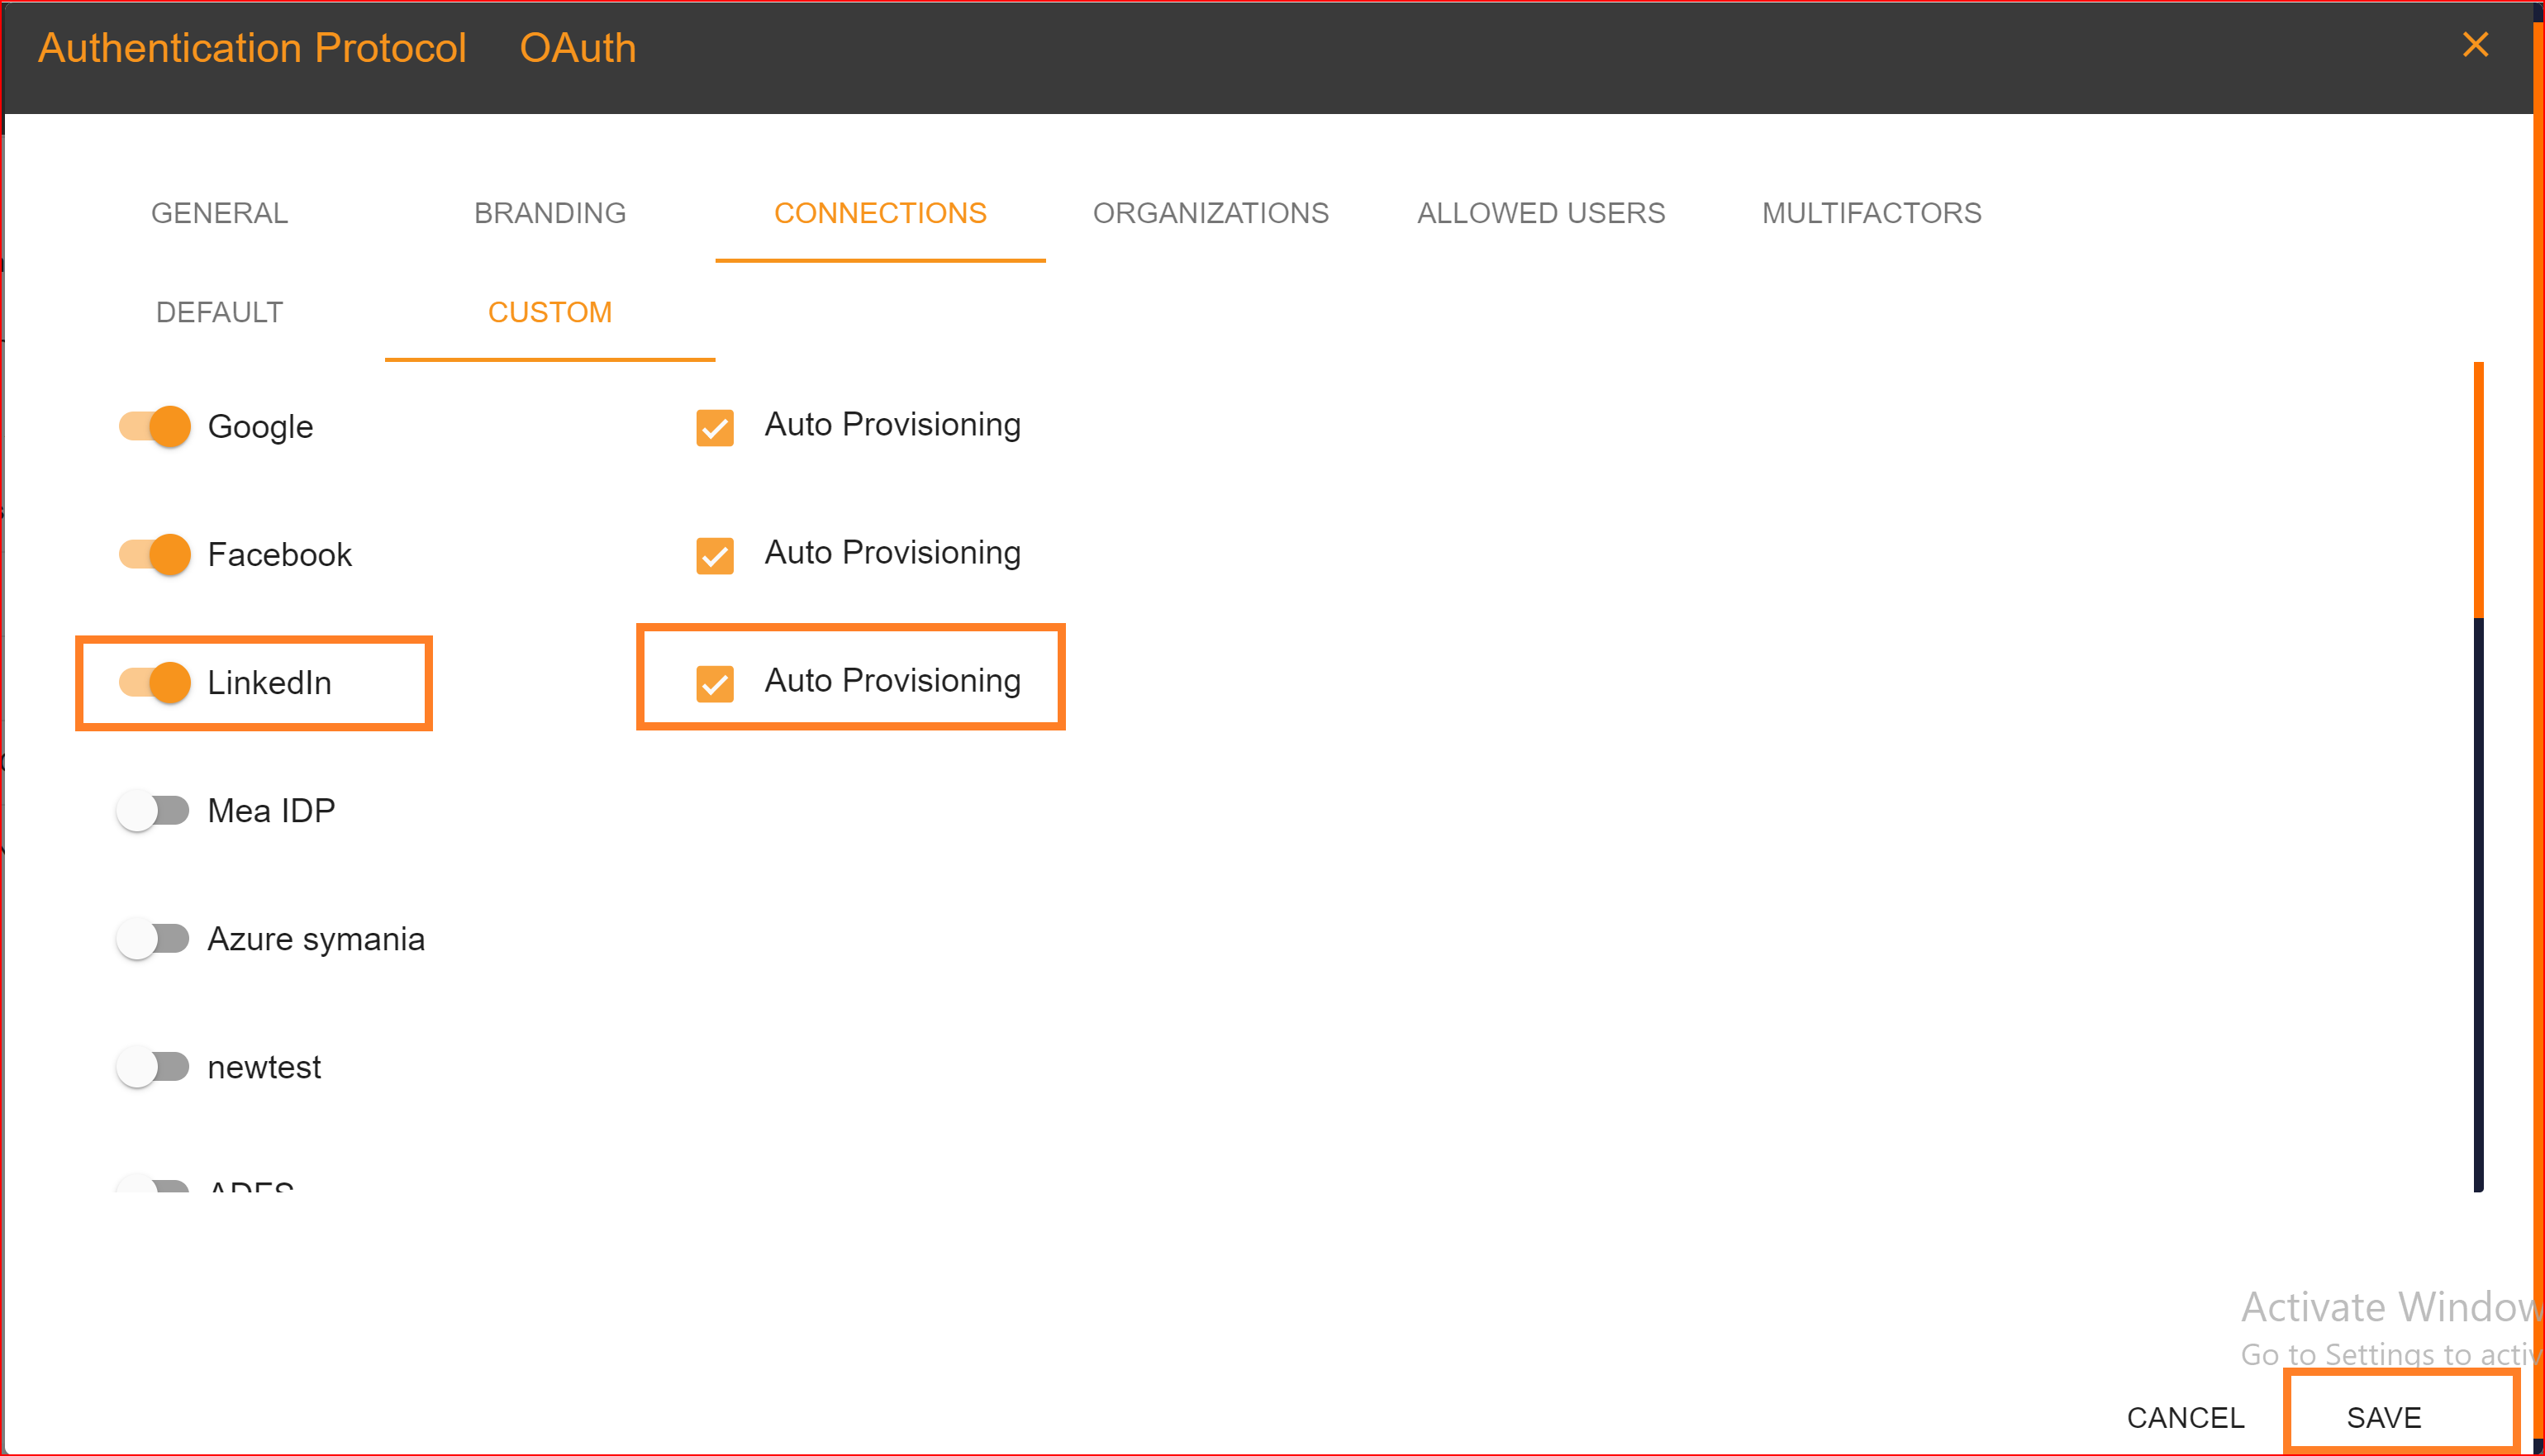
Check Attribute mapping:To check the attribute mapping process in the SSO.ID, navigate your application configuration setting.
After configuration setting, go to Connection section and enable both LinkedIn connection and auto provisioning. What is Auto Provisioning: Auto-provisioning in Single Sign-On Identity (SSO.ID) refers to the automatic creation and management of user accounts within applications or services based on the user's authentication through the SSO system. Note: To verify the attribute mapping process, please ensure that when Auto Provisioning is enabled, the user has not already registered in the SSO system. After enabling it, you'll see the LinkedIn connection details in the redirect Uniform Resource Identifier (URI) of your application.
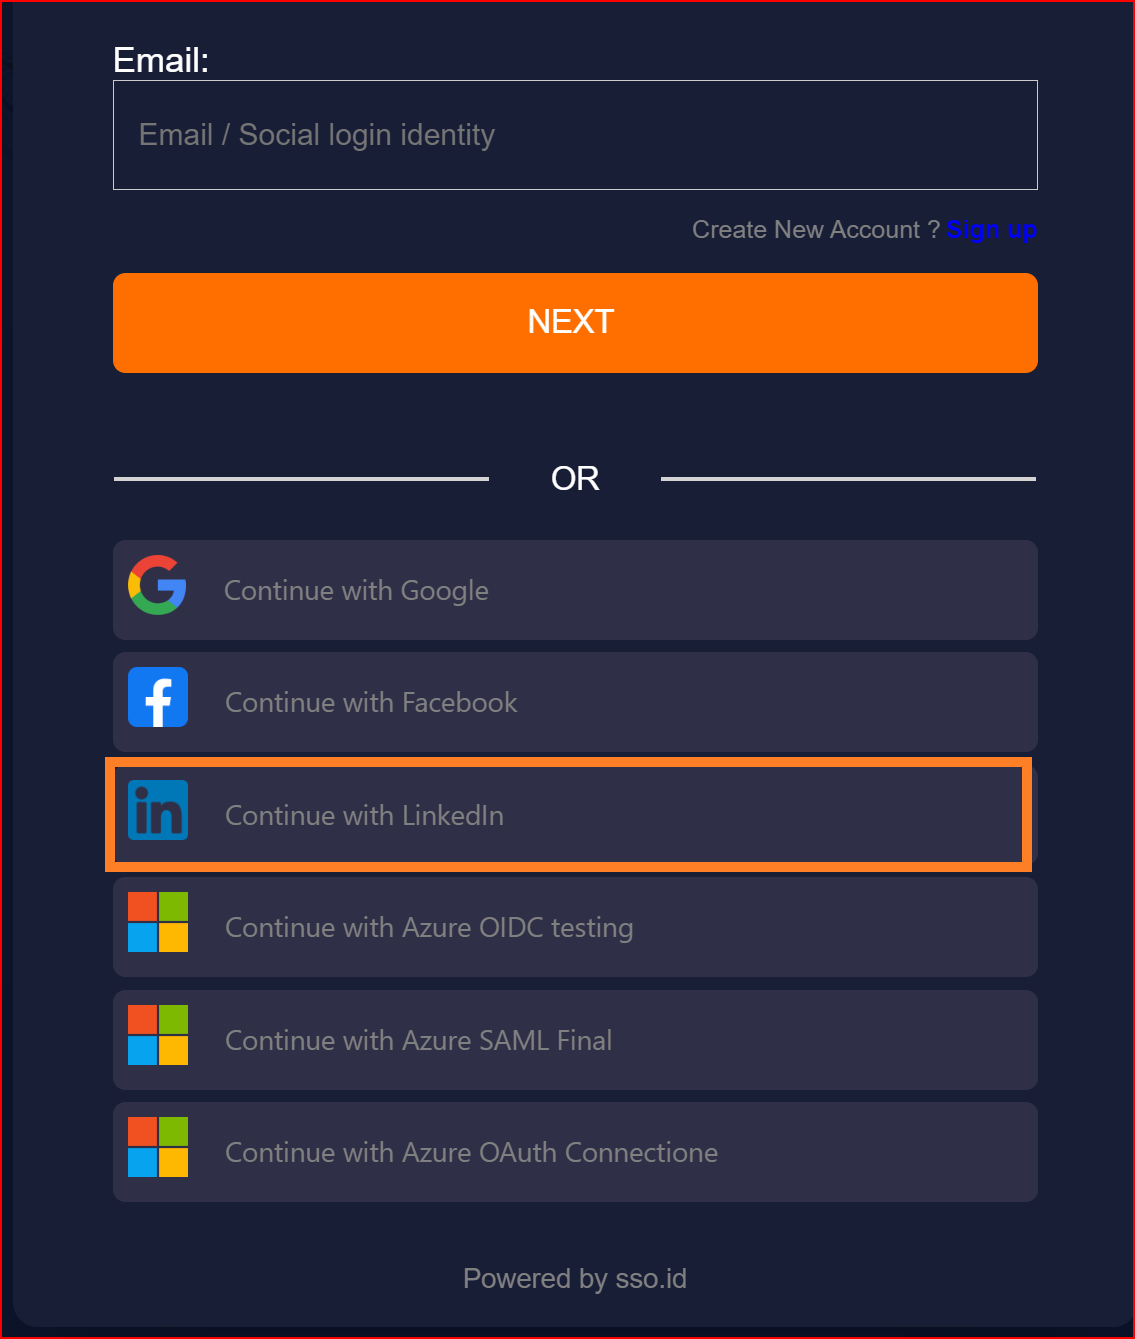
To confirm that the connection is properly set up, look for the "Sign in with SSO" button on the redirect URI of your application.
Make sure your established connection displays on OAuth redirect URL and clicks on your LinkedIn connection.
Once the connection is successfully established, this screen will appear on your system. Click on the Sign in button.
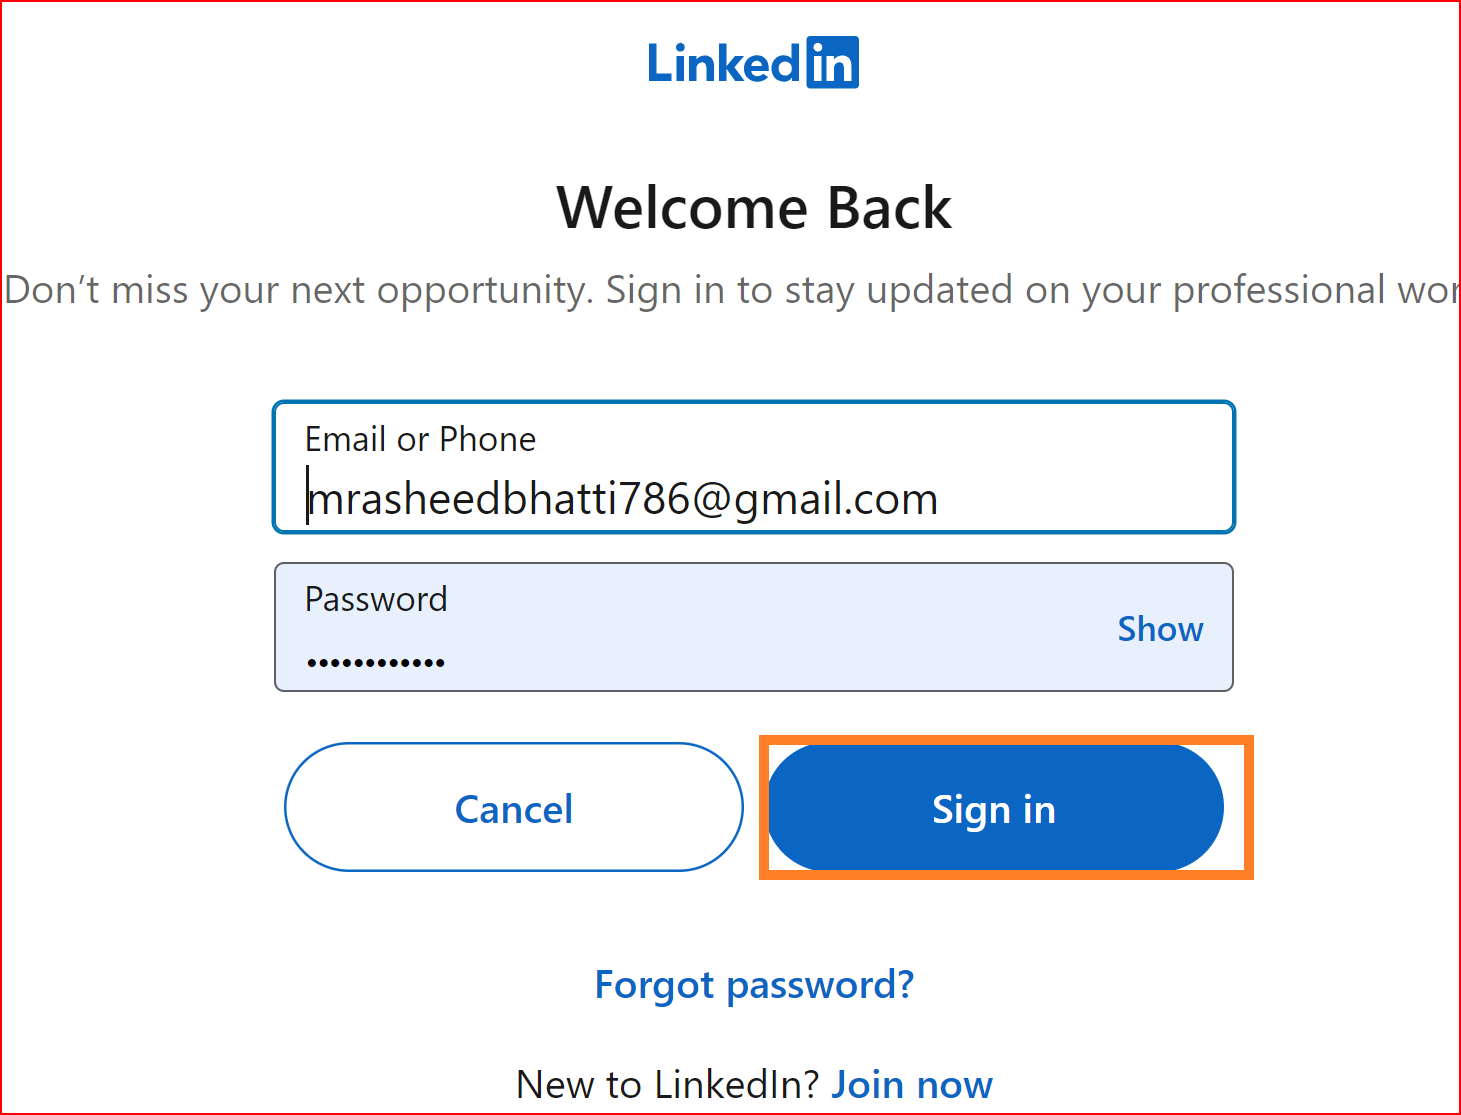
You will be able to log in to your application using LinkedIn through SSO.ID.
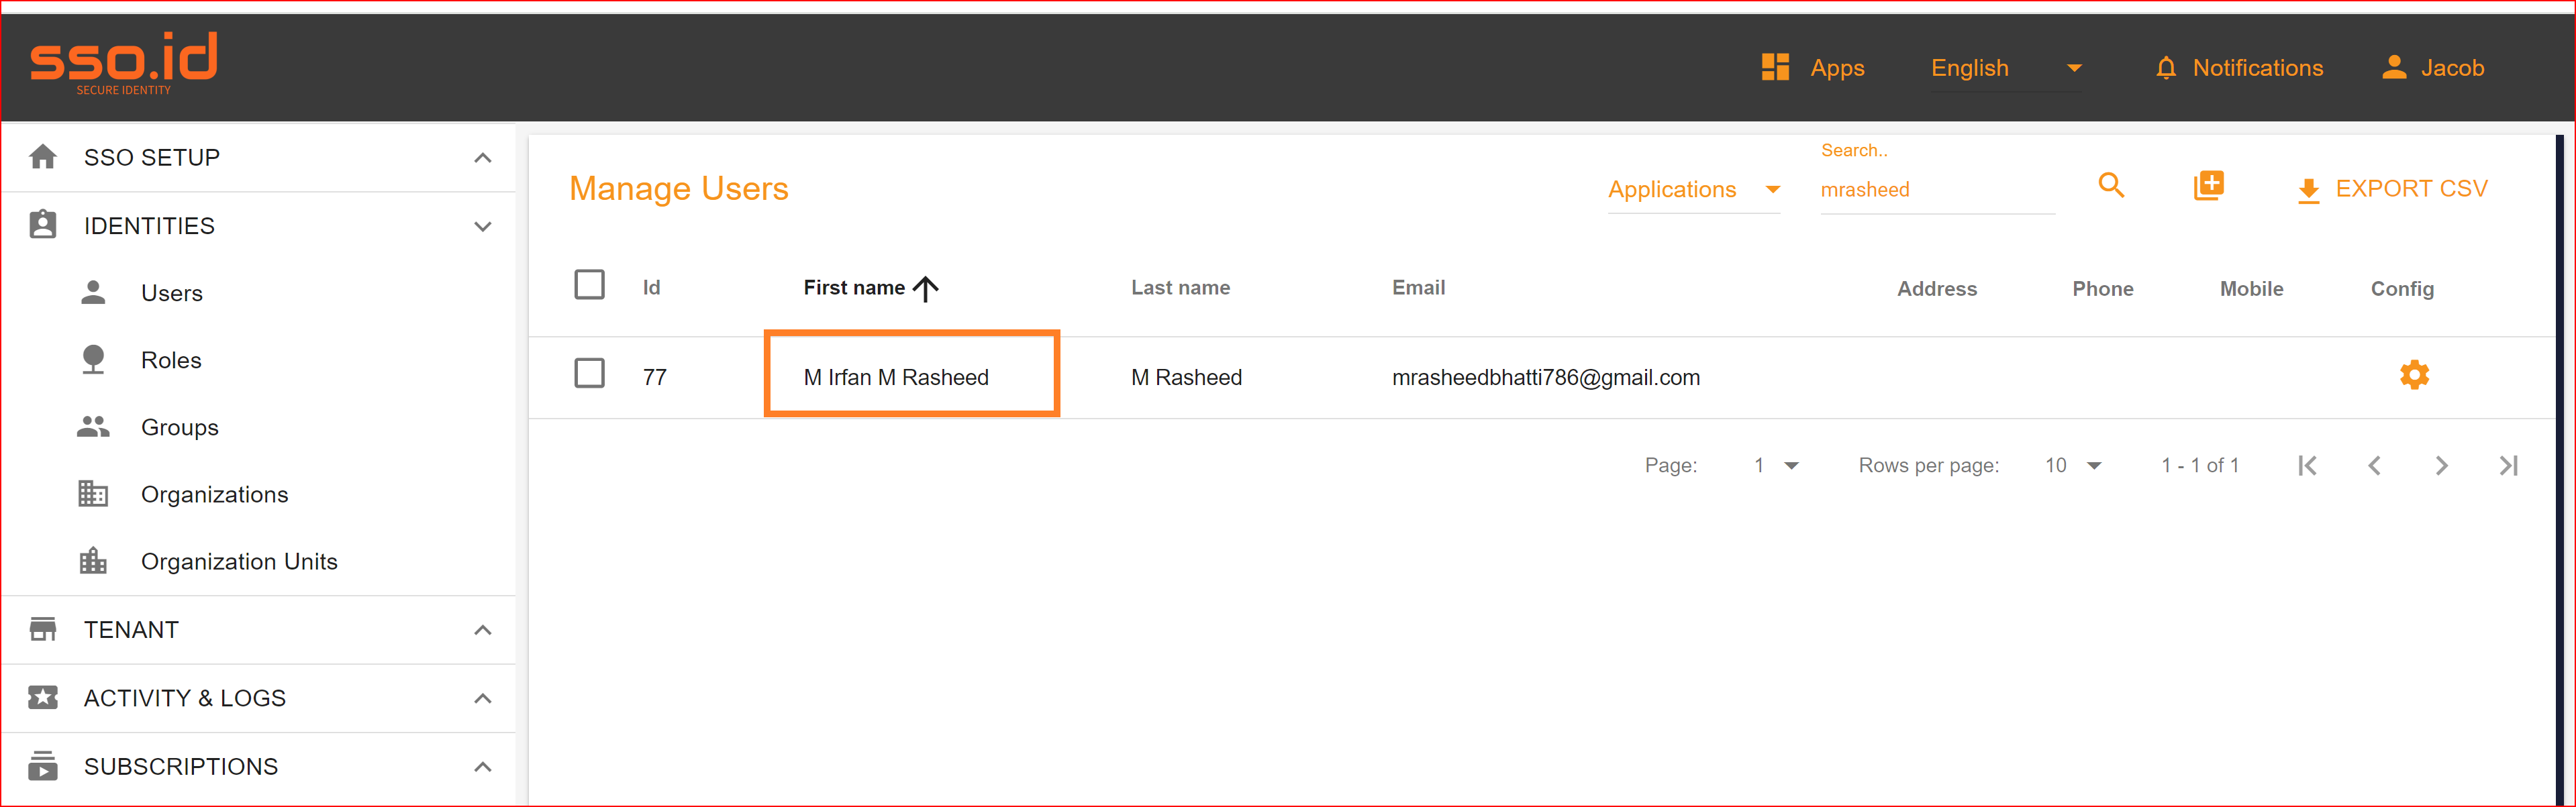
To check the auto-provisioning and attribute mapping process, you should navigate to the user management section of your SSO.ID provider's dashboard. Ensure that the user is successfully created through the LinkedIn connection with the attributes you have specified in the attribute mapping settings.
Create Linkedin App
Visit https://developer.linkedin.com/ and click the "Create app" button.
After clicking the Create App. the next step is as follows. Please choose all the required fields.
- App Name: Input your app name. This is a required and mandatory field.
- LinkedIn Page: This field holds significant importance. Enter your company's name or the URL of your https://www.linkedin.com/company. The chosen LinkedIn Company Page will be linked to your app. Verification can be conducted by a Page Admin.
- Privacy Policy URL: This field is optional and not mandatory. If you have a privacy policy URL, you can provide it in this field.
- App logo: This logo will be shown to users during the app authorization process. This field is also optional.
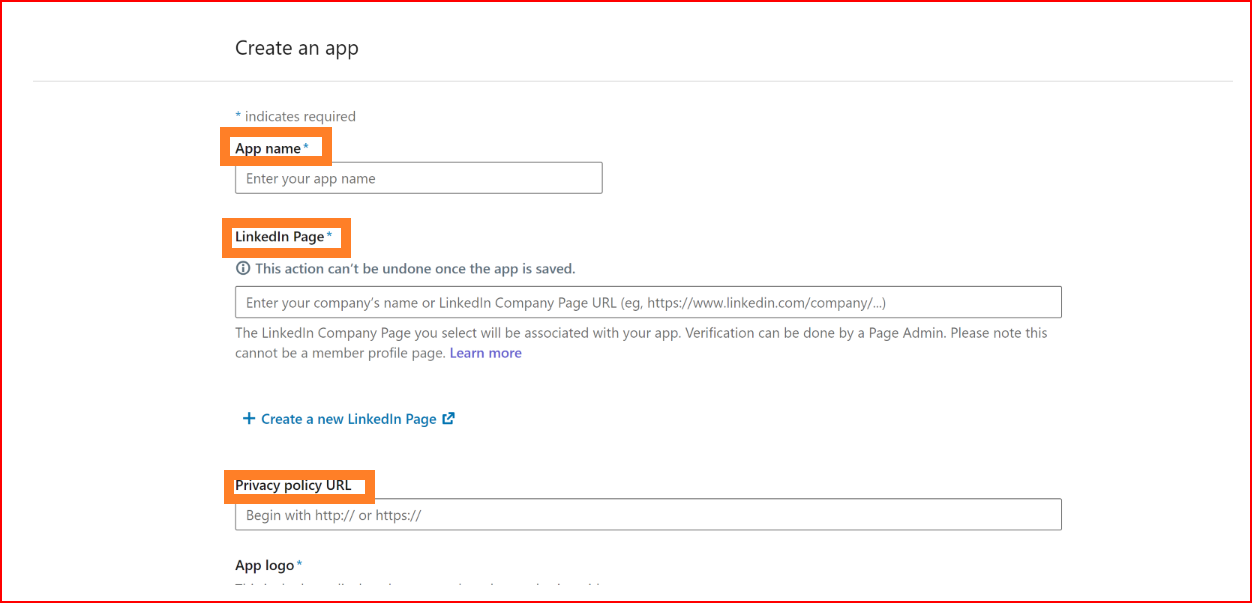
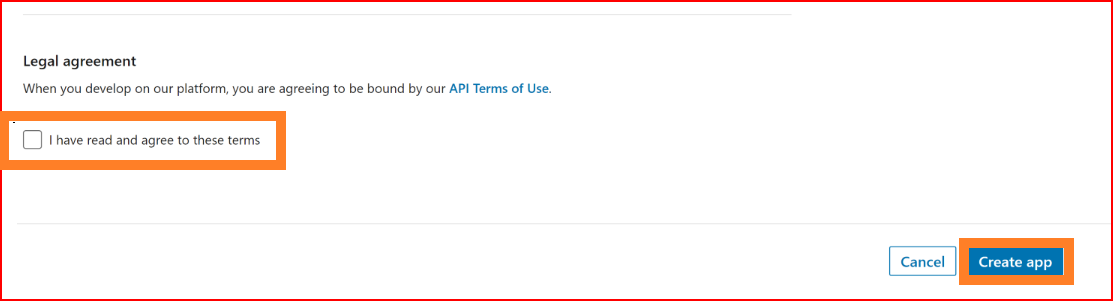
Check the checkbox and click on the "Create app" button.
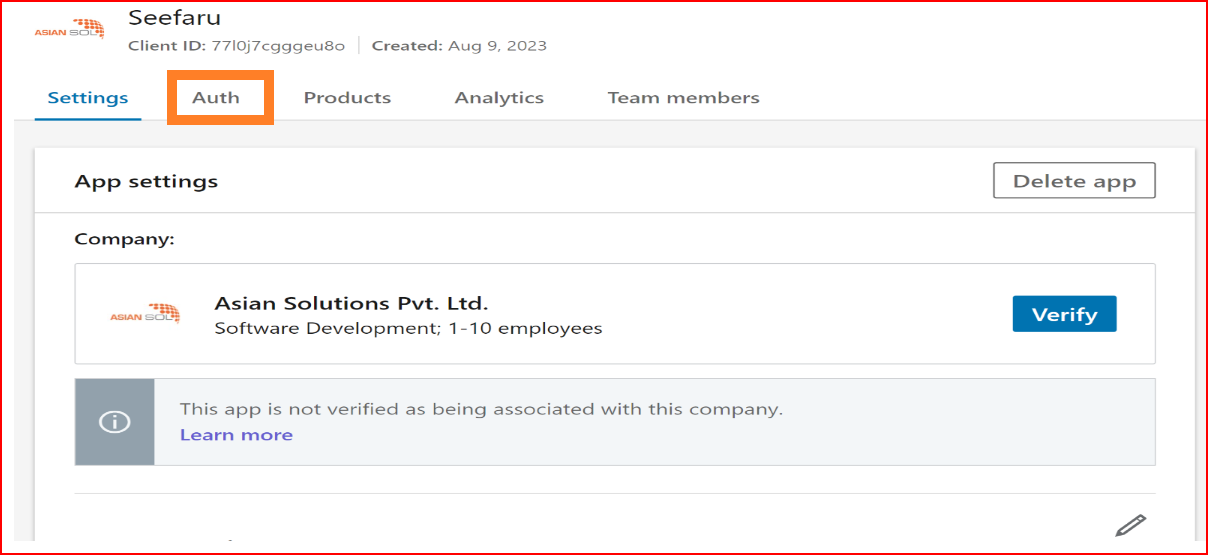
Your app has been created successfully, and the next step involves configuring your app settings in SSO.ID. Be cautious and proceed with the following steps.
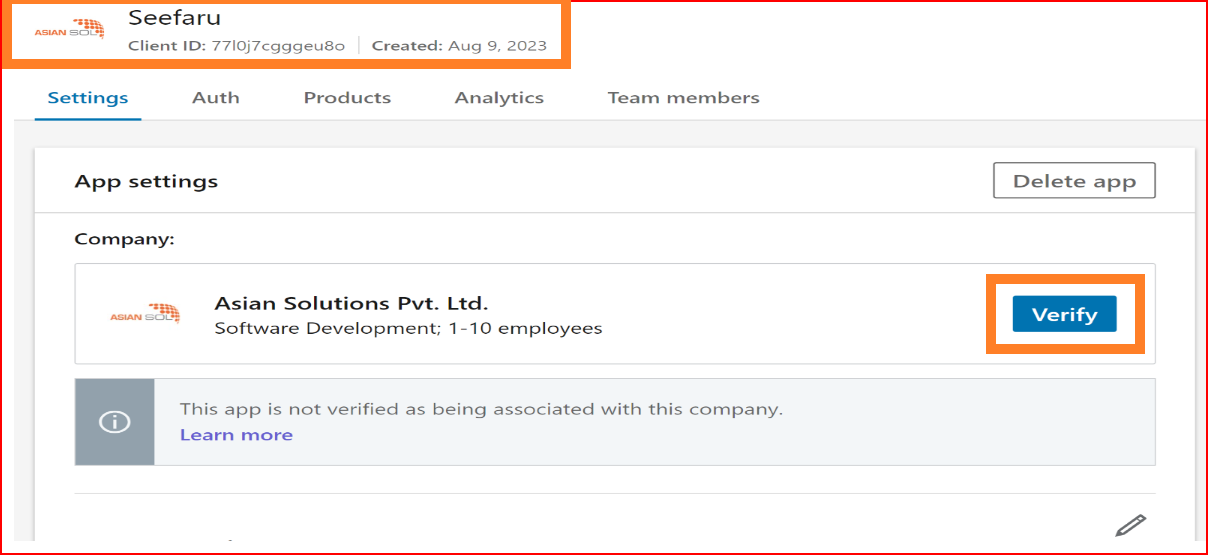
App Setting
Please verify your app first: Please click the "Verify" button to generate the verification URL. Send this URL to the company admin and then click the "I'm done" button. Your app will be verified by the admin.
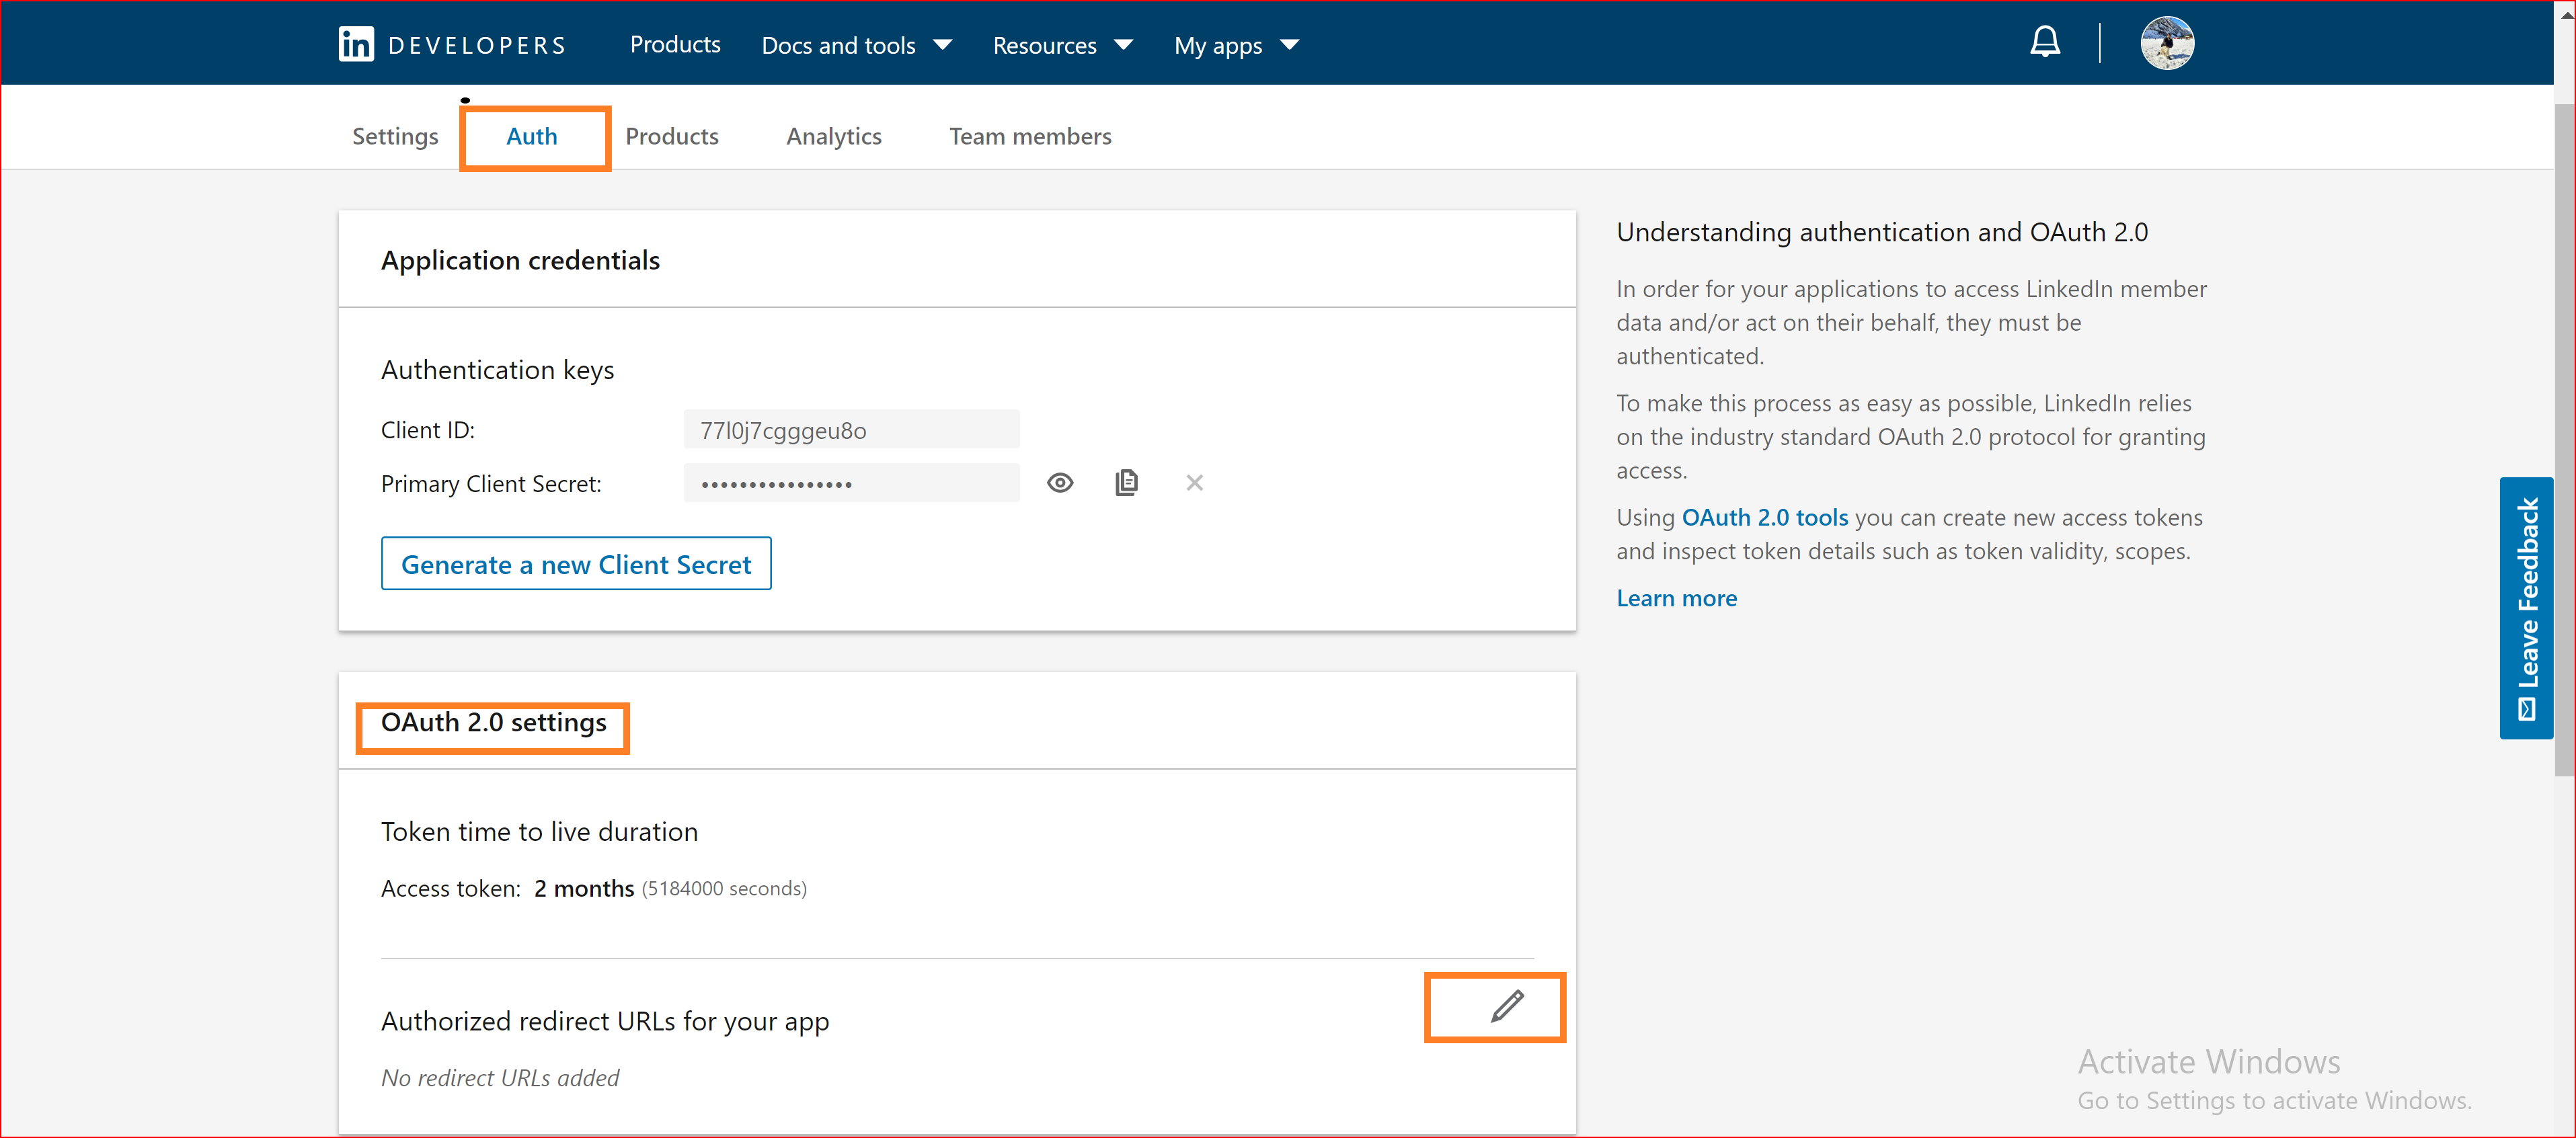
OAuth 2.0 setting
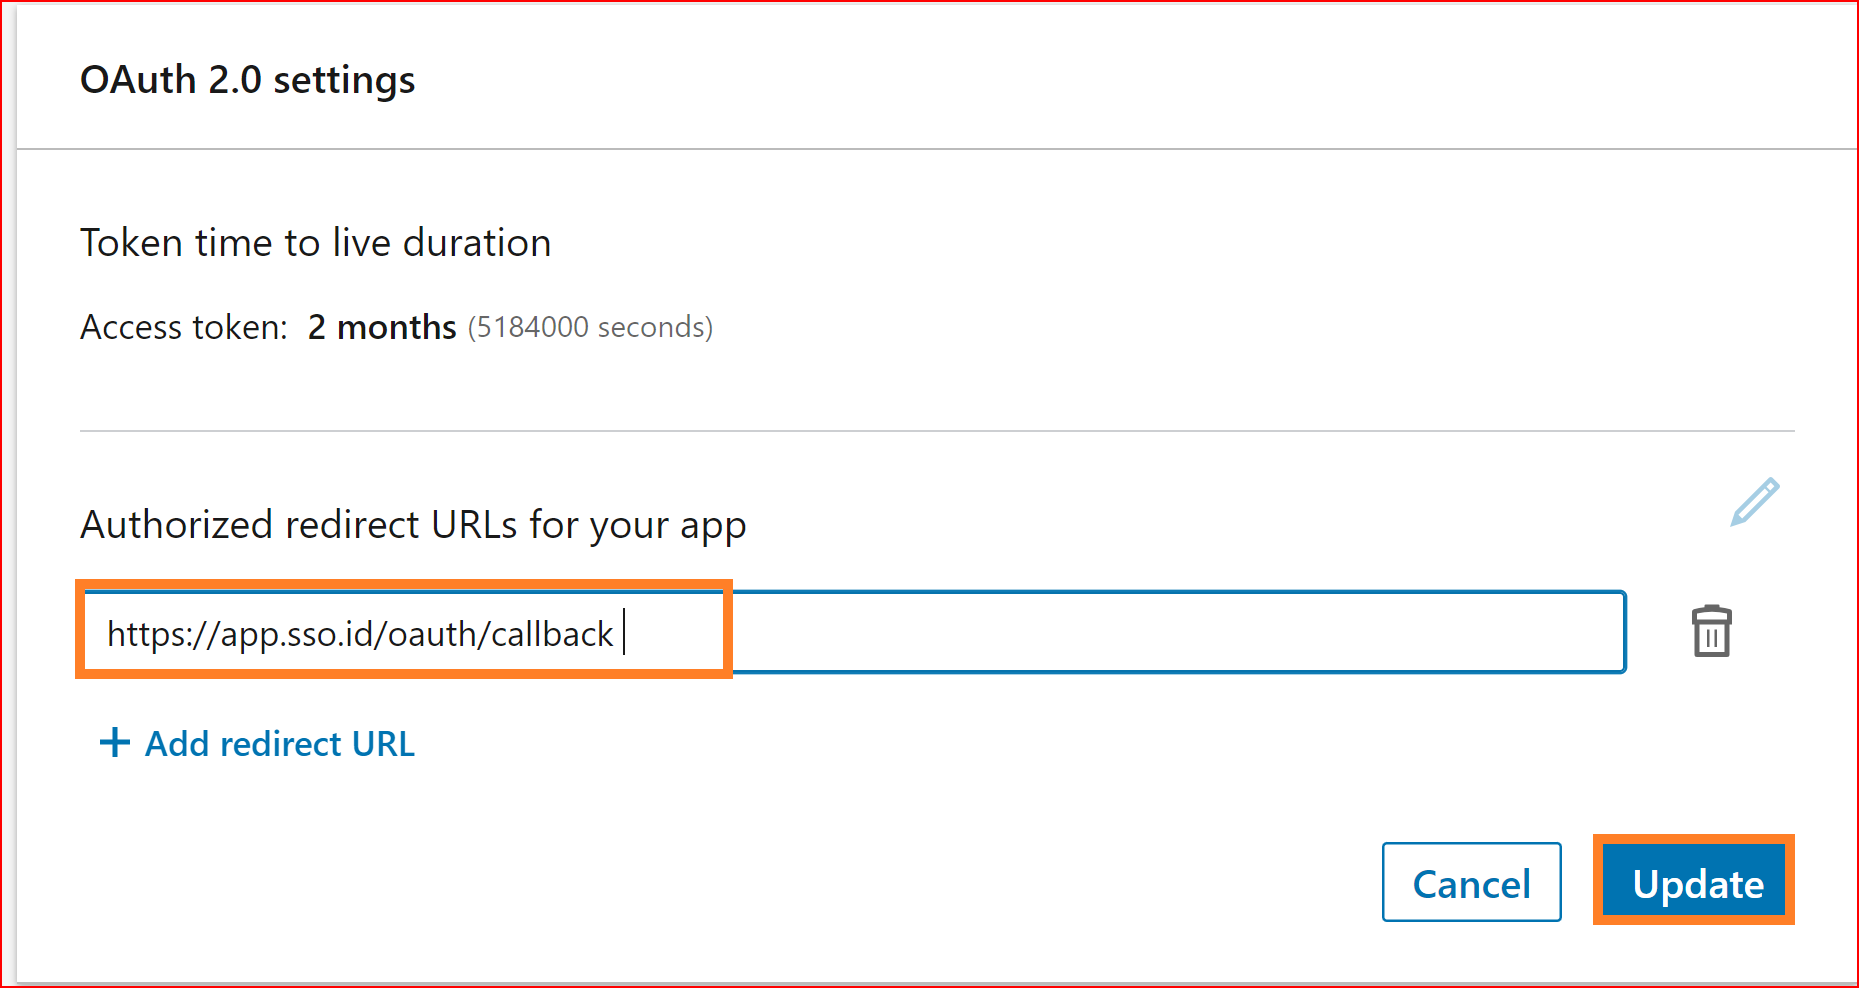
In the OAuth 2.0 settings, set up the Authorized URLs for your application. Click the "Edit" button and provide the authorized redirect URLs specific to your app. Certainly! The instruction suggests configuring the URL to
https://app.sso.id/oauth/callback.
for the OAuth base connection. This URL likely serves as the callback or redirect URL for the OAuth authentication process within the context of an application or system integrated with SSO.ID (Single Sign-On Identity). Then, click the "Update" button.
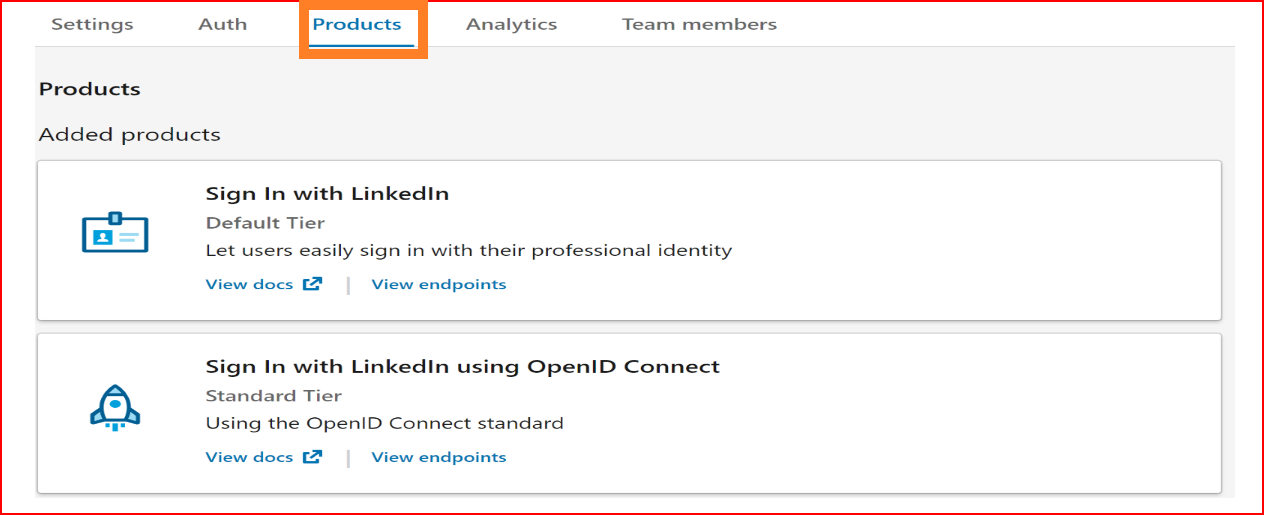
Products
In the product settings, add these two products to your application. With this, most of your app's configuration is for integration with SSO.ID is now complete.
Create Connections with Azure
OAuth (Open Authorization) is a protocol that primarily handles authorization, enabling users to grant third-party applications access to their resources without disclosing their credentials. Although it's not inherently a Single Sign-On (SSO) protocol, it can be part of an SSO solution. When combined with OpenID Connect (OIDC), which builds an authentication layer on top of OAuth 2.0, it can facilitate Single Sign-On.
SSO.ID endpoints to configure the Azure app
Name Enter the valid and complete name of your newly generated connection.
Description Write a short description of your connection.
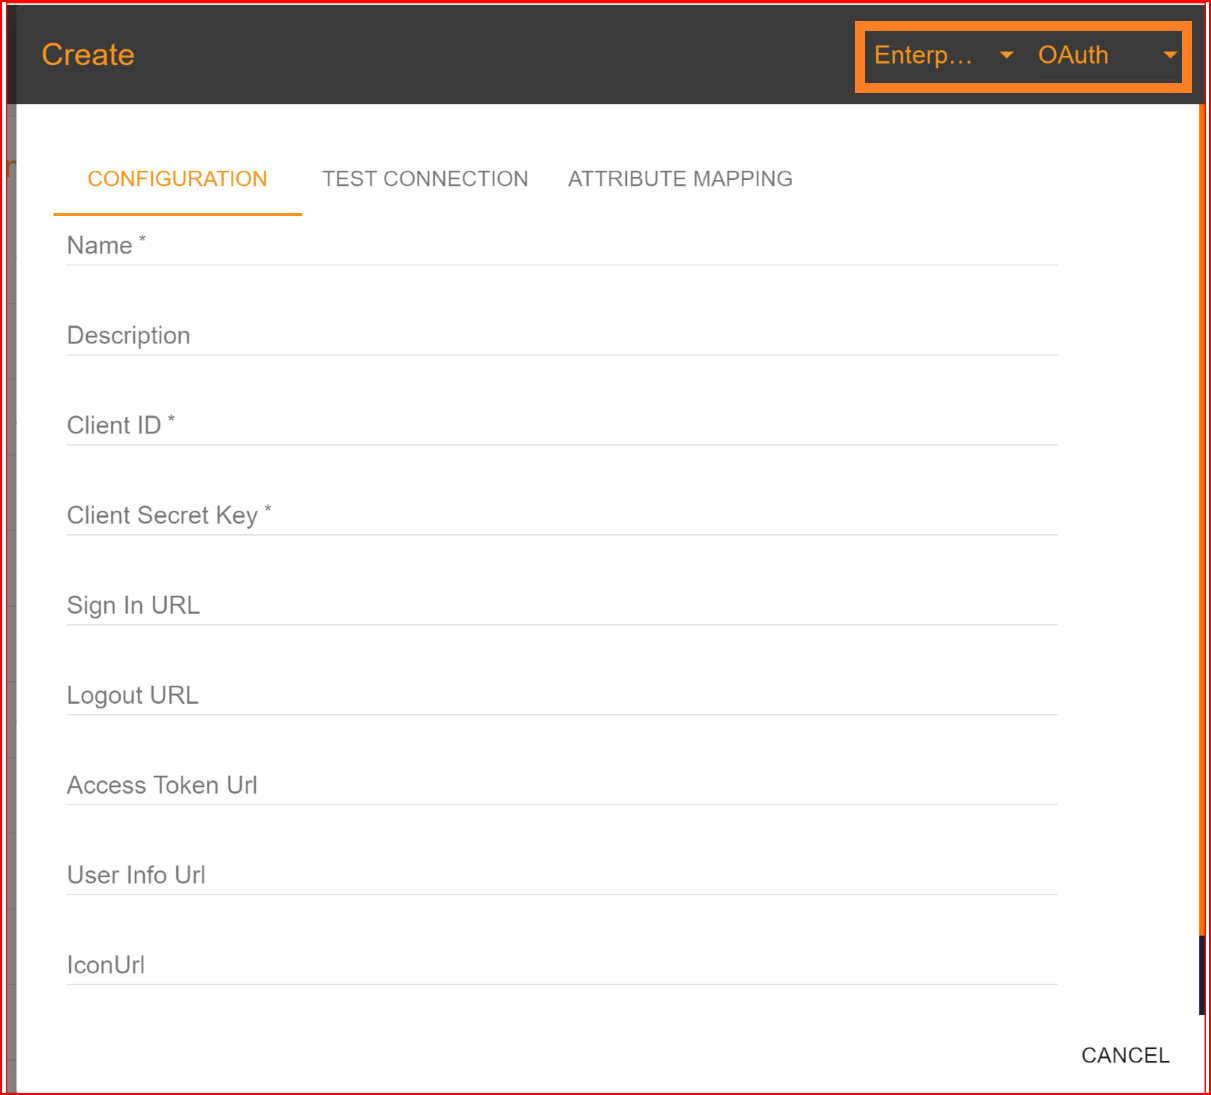
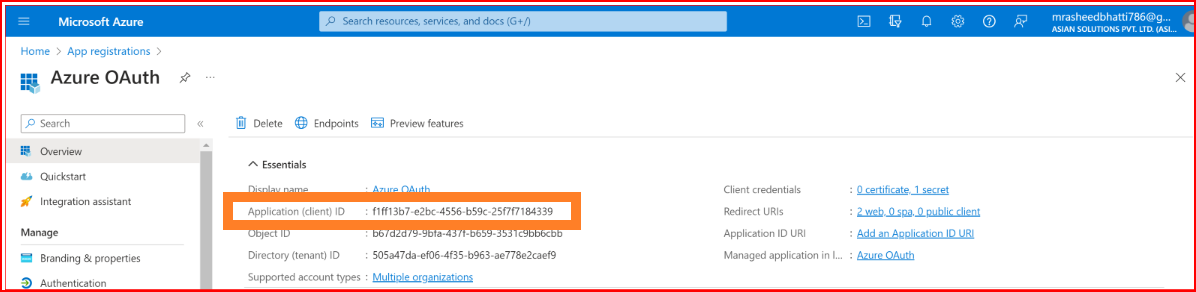
Client ID The Client ID holds significant importance during the configuration procedure. Please provide the Client ID of your Azure application.
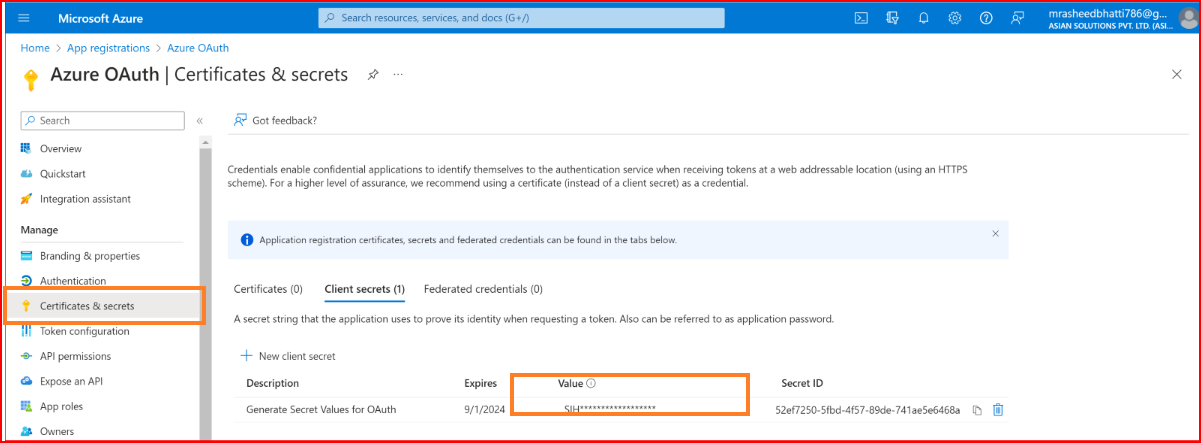
Client Secret Key Kindly input the valid client secret value generated by your Azure application's new configuration.
SignIn URL In Microsoft Azure, to initiate OAuth sign-in, you typically construct a URL that redirects users to the Azure AD (Active Directory) sign-in page. The URL contains parameters specifying details such as the client ID, redirect URI, requested permissions, and response type. Here's a basic example of how you can construct such a URL

Tenant This is the tenant ID or tenant domain associated with your Azure AD directory. It can be the directory ID (a GUID) or a domain name (e.g., yourorganization.com). If you're working with a single tenant, you can use Common to allow users from any Azure AD tenant to sign in. If you're working with a specific tenant, replace {tenant} with the appropriate tenant ID or domain.
Logout URL In Microsoft Azure OAuth protocol, logging out typically involves redirecting the user to a specific logout endpoint provided by Azure Active Directory (Azure AD). After logging out, users may also be redirected to a URL specified by the application for further actions, such as returning to the home page.

Access Token URL In Microsoft Azure OAuth protocol, the access token URL depends on the Azure AD authentication endpoint you are using. If you are using the v2.0 endpoint, the access token URL typically follows this format

User Info URL In Azure Active Directory (Azure AD), to retrieve user information such as profile data, you typically utilize the Microsoft Graph API. The User Info URL is not explicitly provided in Azure AD as it is in some OAuth 2.0 implementations. Instead, you would typically call the Microsoft Graph API to retrieve user information. Here's how you can retrieve user information from Azure AD using the Microsoft Graph API

Icon URL To access Azure icons, you can visit the official Azure Architecture Icons page on the Microsoft website. Here you can see Icon URL
https://aadcdn.msauth.net/shared/1.0/content/images/microsoft_logo_564db913a7fa0ca42727161c6d031bef.svg
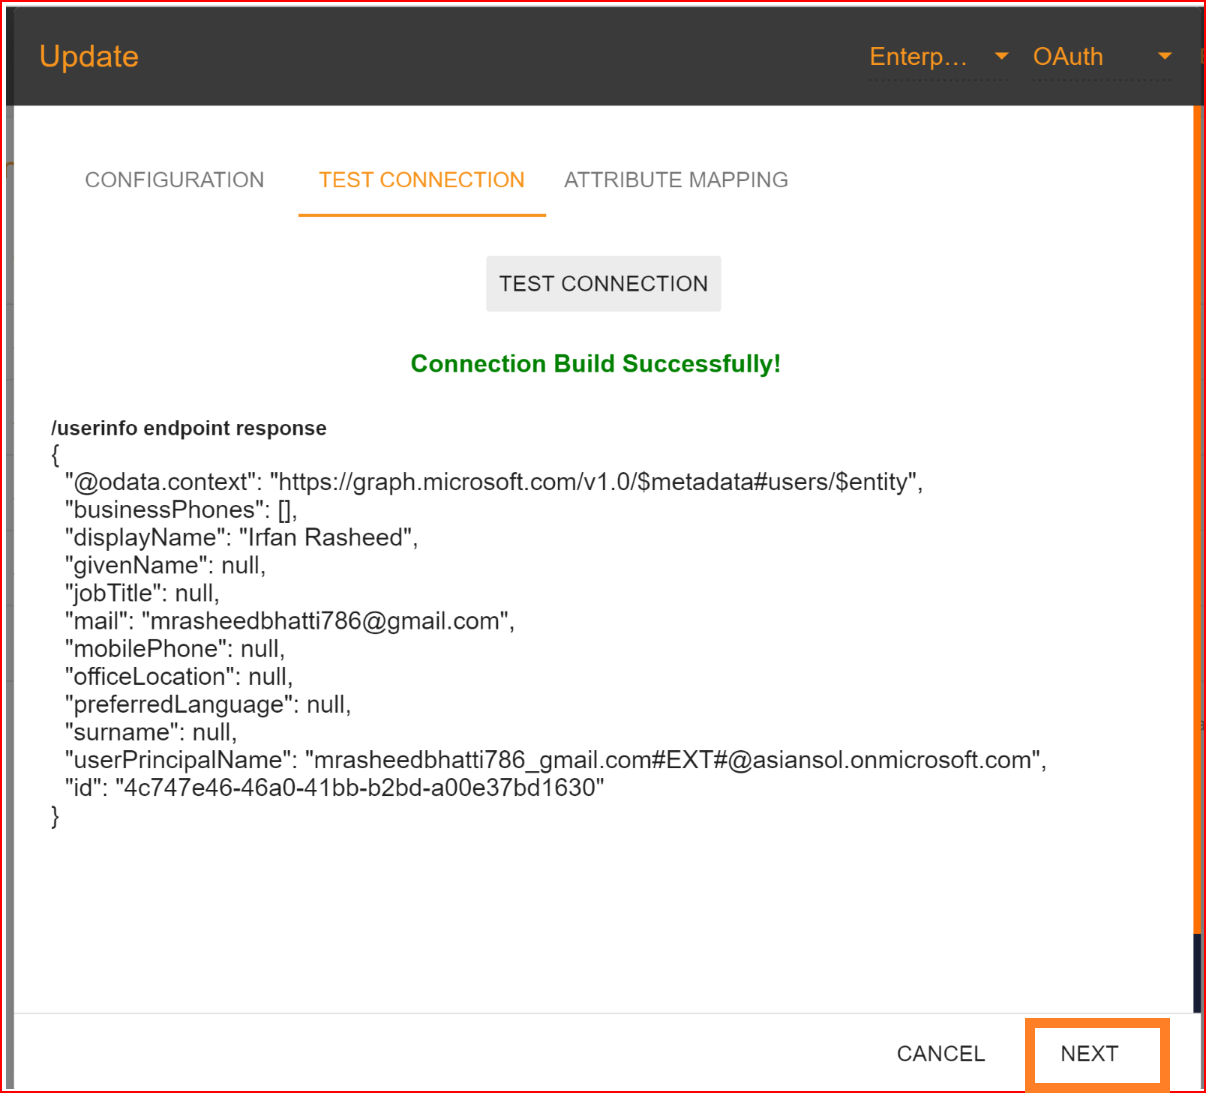
Test Connection
After setting up the Client ID, Client Secret, and Configuration URL, click the "NEXT" button to proceed to test the connection. In the testing section provided by SSO.ID, you can verify whether the connection has been successfully established. To perform the test, click the "TEST CONNECTION" button.
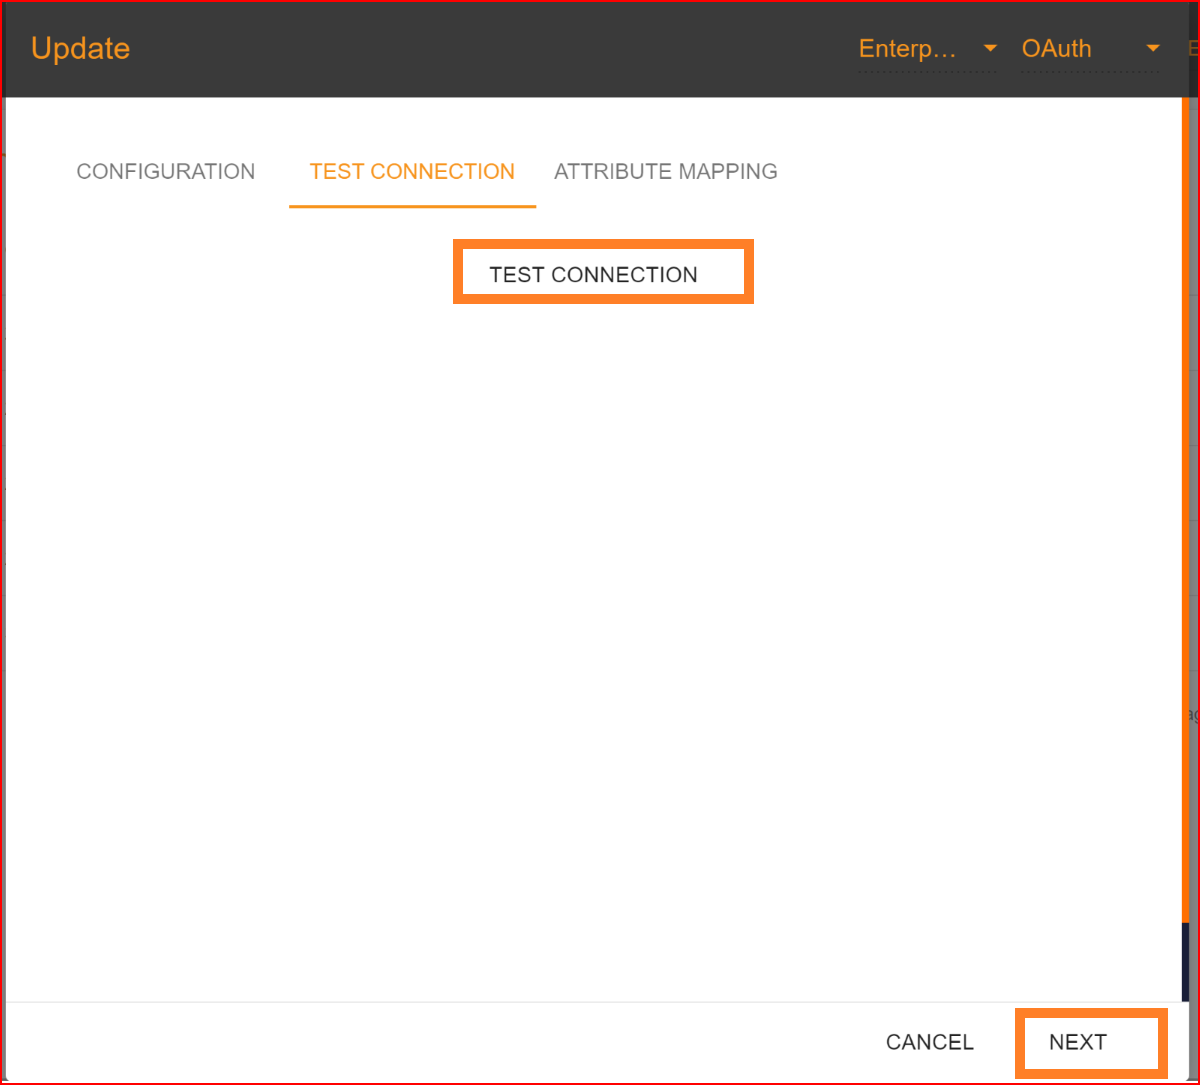
If all your configuration parameters are correct, including a valid Client ID, Client Secret, and other configuration URLs, you will see a message stating, "Connection built successfully," along with the user info endpoint response. Then, proceed by clicking the "NEXT" button to move on to attribute mapping.
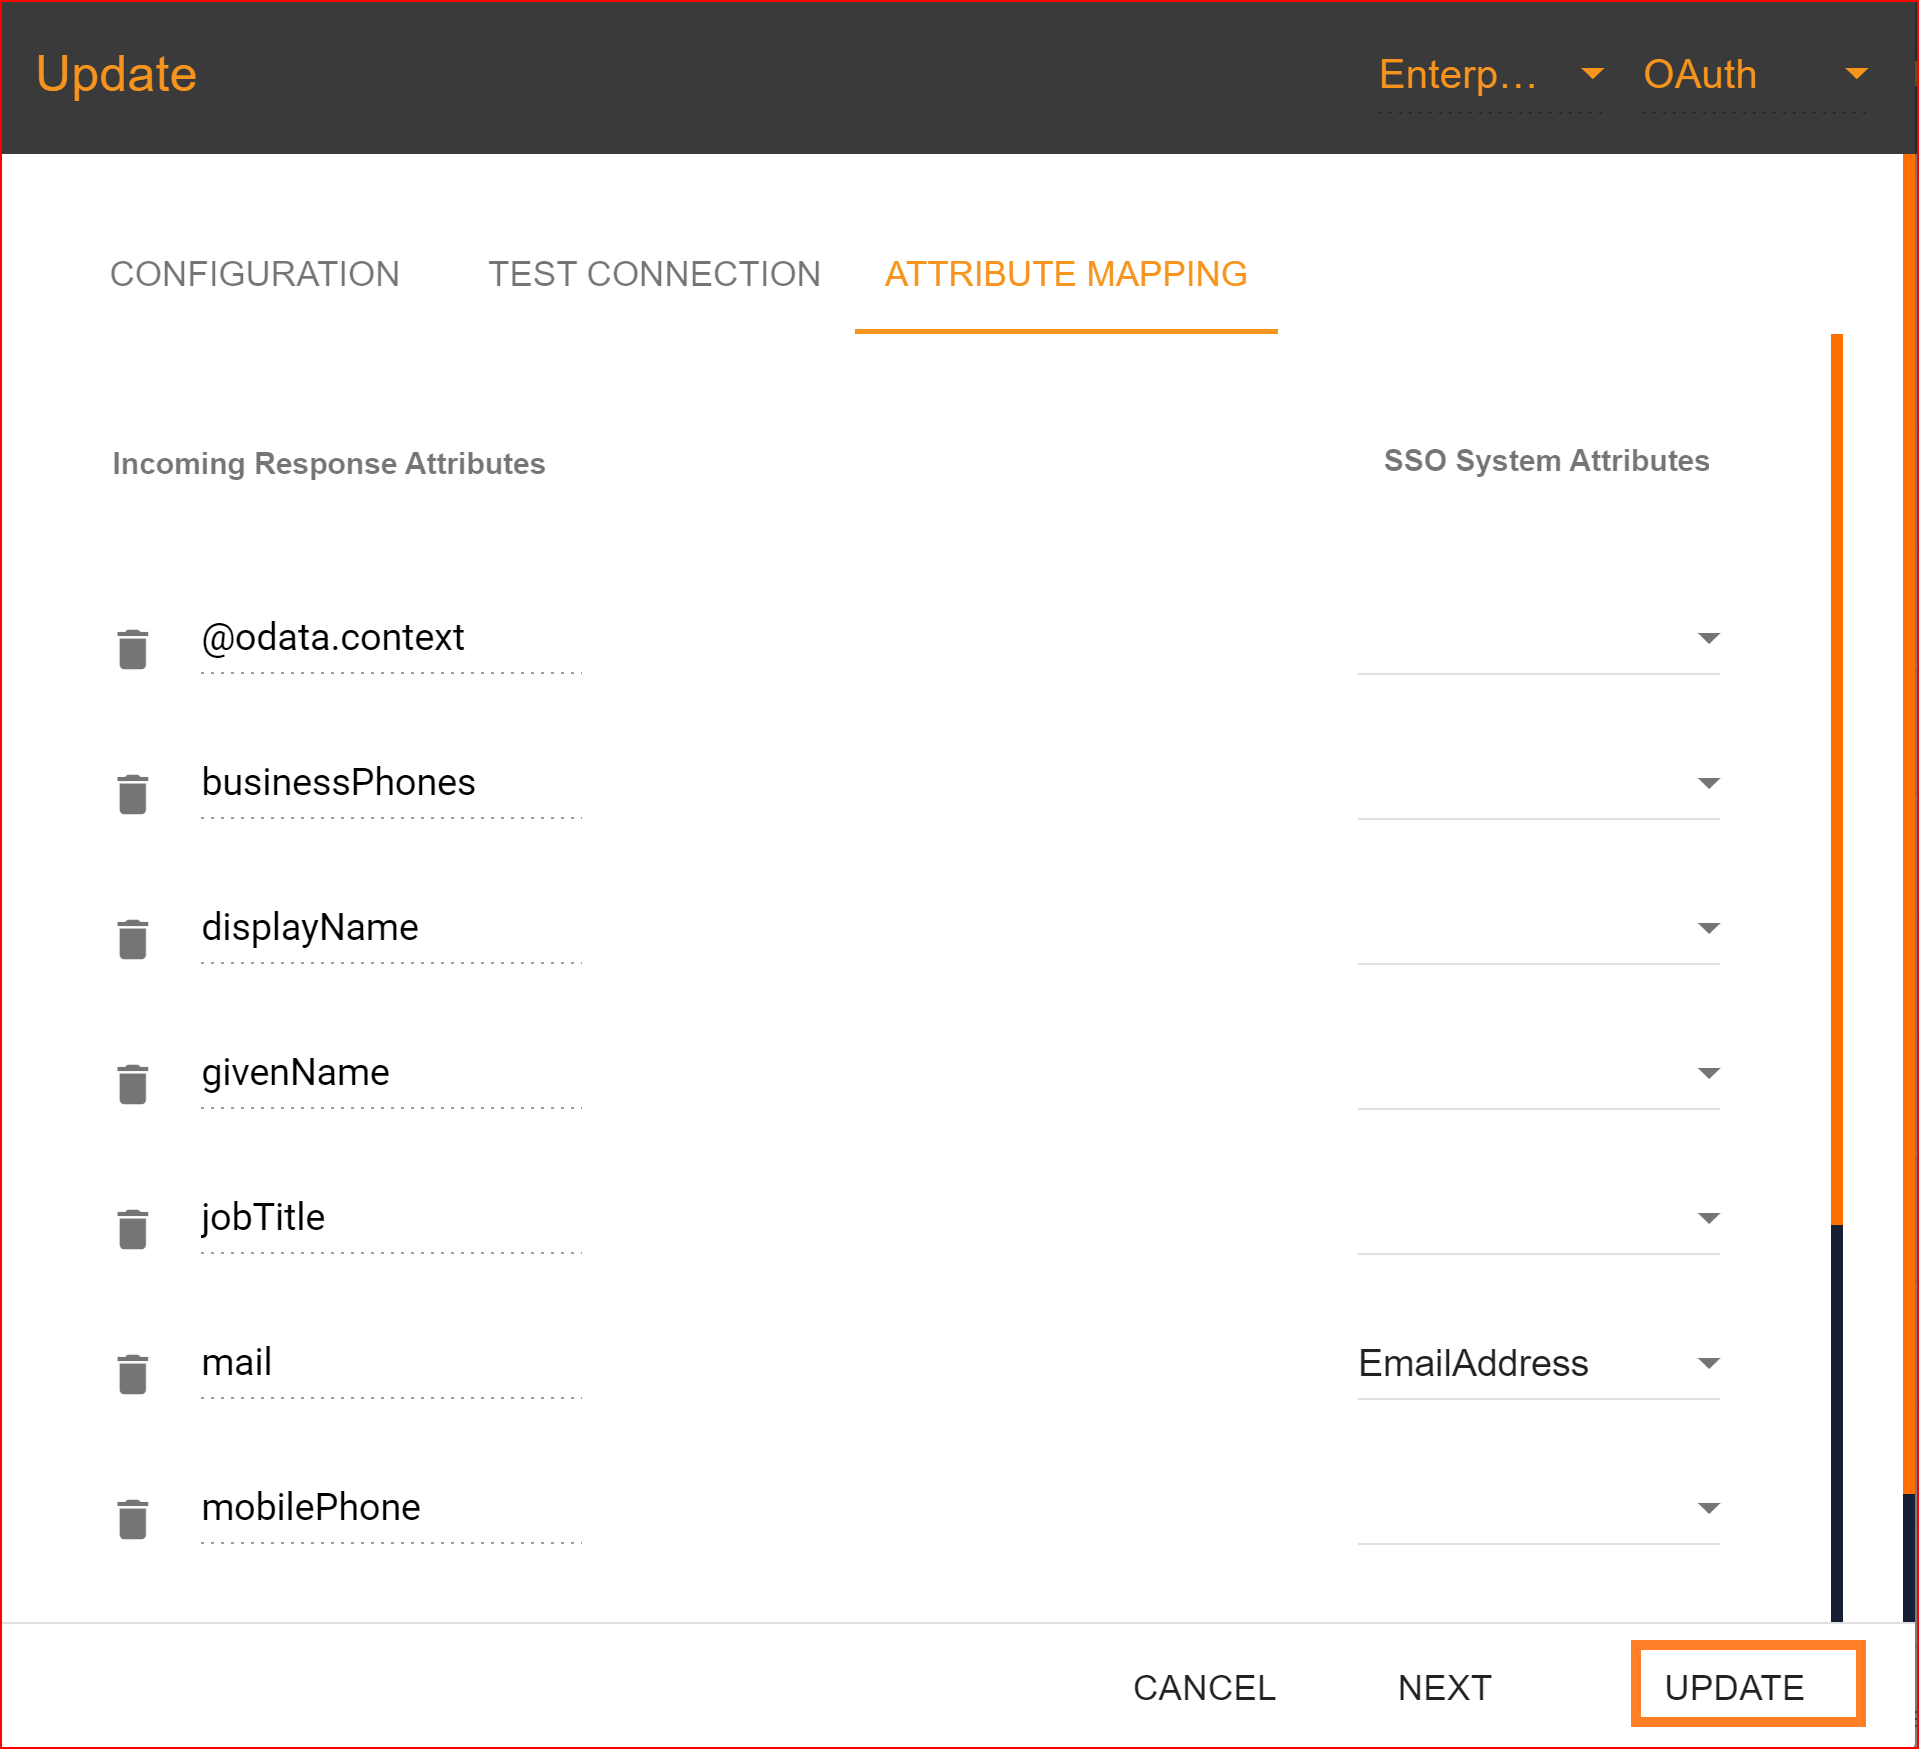
Attribute Mapping
The "Email Address" attribute is mandatory in the attribute mapping section, while other attributes are optional. After completing the attribute mapping, click the "Update" button to finalize the connection establishment process, which is now completed.
Check attribute mapping
To check the attribute mapping process in the SSO.ID, navigate your application configuration setting.

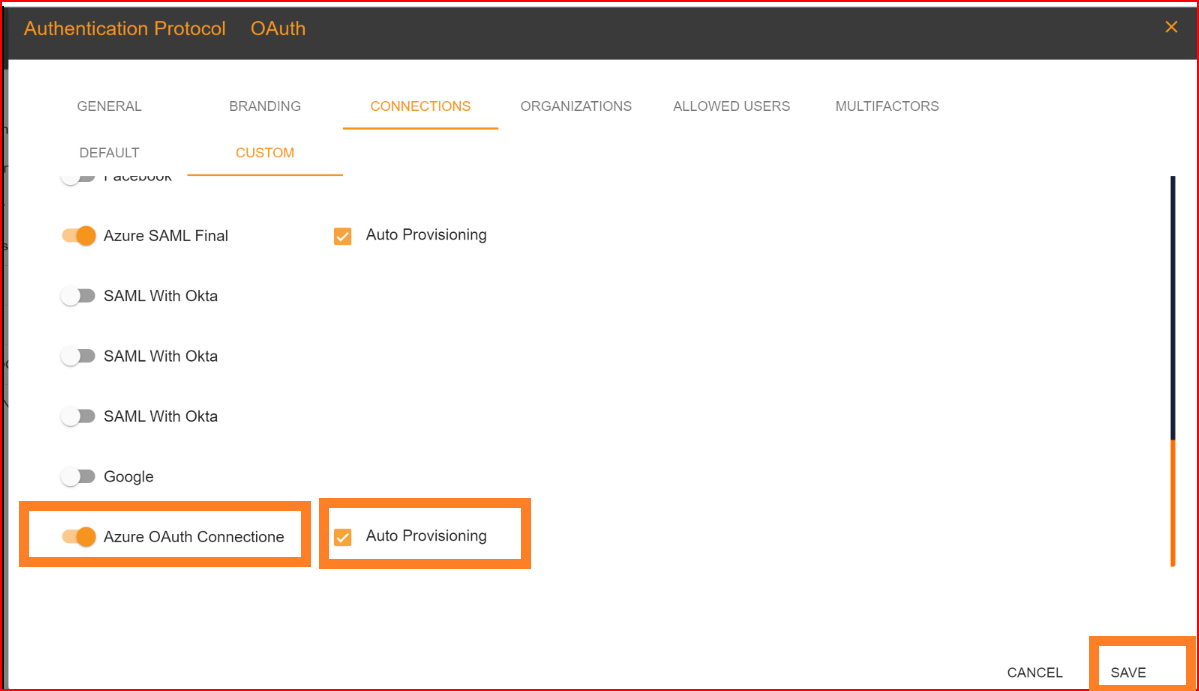
After configuration setting, go to Connection section and enable both Azure OAuth connection and auto provisioning. What is Auto Provisioning: Auto-provisioning in Single Sign-On Identity (SSO.ID) refers to the automatic creation and management of user accounts within applications or services based on the user's authentication through the SSO system. Note: To verify the attribute mapping process, please ensure that when Auto Provisioning is enabled, the user has not already registered in the SSO system. After enabling it, you'll see the Azure OAuth connection details in the redirect Uniform Resource Identifier (URI) of your application.
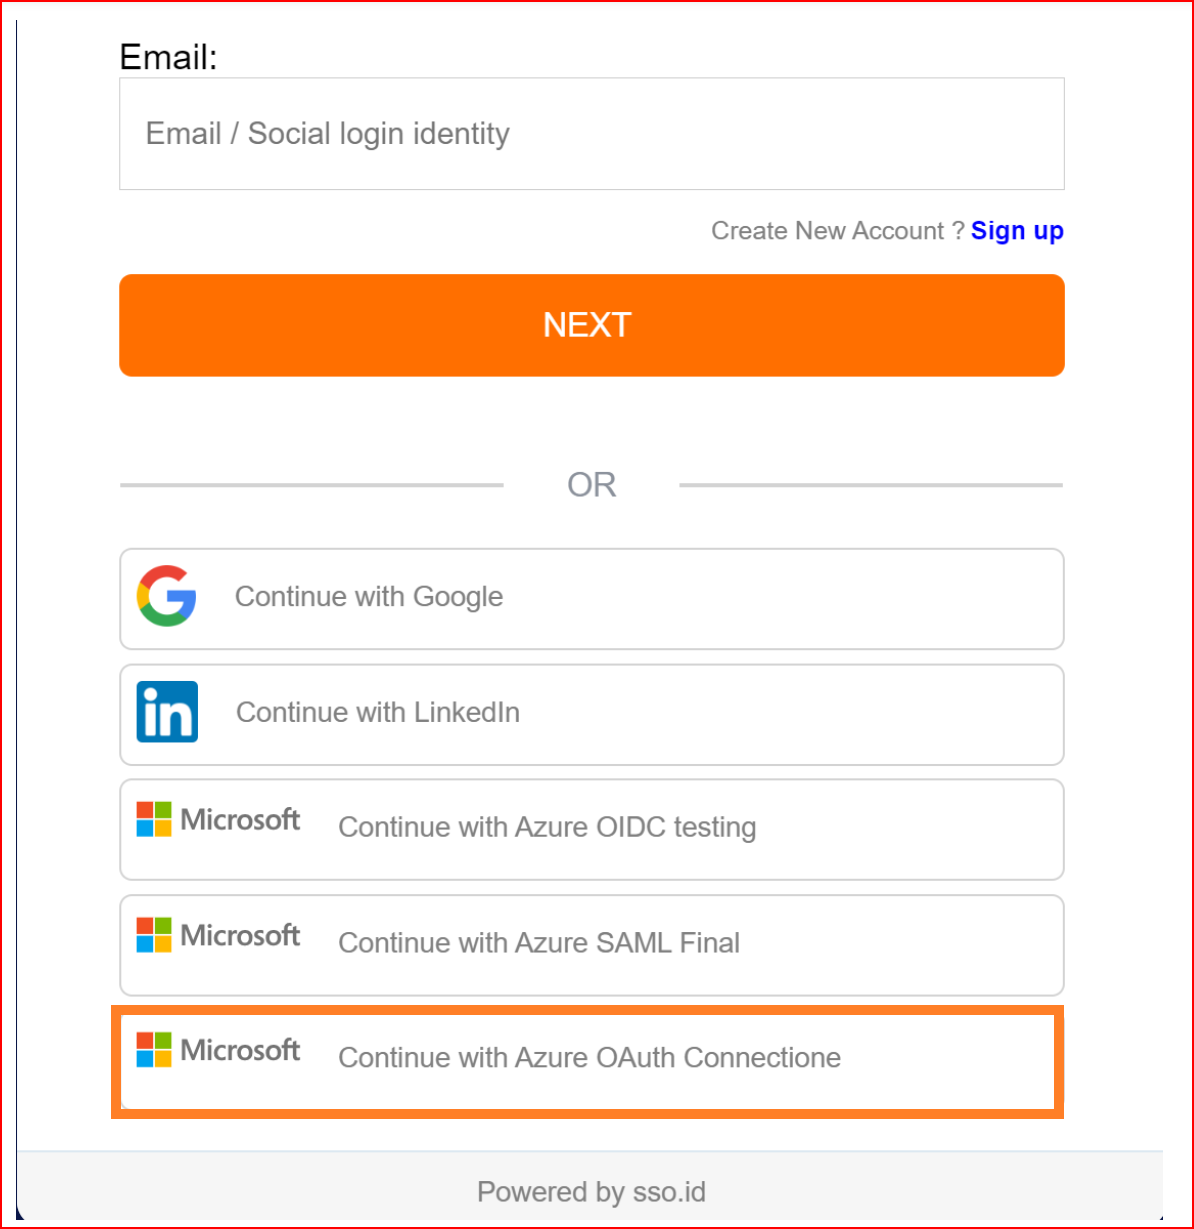
To confirm that the connection is properly set up, look for the "Sign in with SSO" button on the redirect URI of your application.
Here, you will find all the established connections that you allowed within the application. Now, you should click on the "Continue with Azure OAuth Connection" connection, which represents our newly established connection.
Finally, we have successfully logged into our application using the OAuth protocol with the Azure application.
To check the auto-provisioning and attribute mapping process, you should navigate to the user management section of your SSO.ID provider's dashboard. Ensure that the user is successfully created through the Azure OAuth connection with the attributes you have specified in the attribute mapping settings

Pre-requisites
To proceed, you'll require an SSO.ID account with administrative privileges, along with an active Azure account that includes Azure Active Directory (Azure AD). Furthermore, ensure you possess the requisite permissions to create an App Registration within your Azure AD.
Azure Active Directory
Go to your Azure Account and access the Azure Active Directory where you want to establish the OAuth integration.

In Azure AD, make an App Registration
When you're in your Active Directory settings, go to App registrations in the navigation, and then choose new registration.
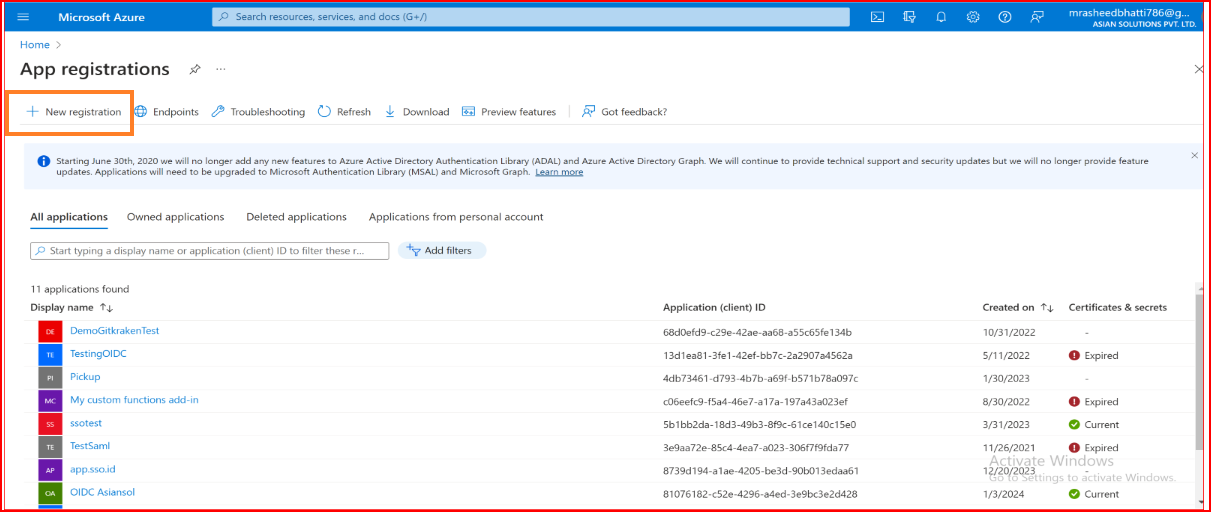
App Registration Configuration
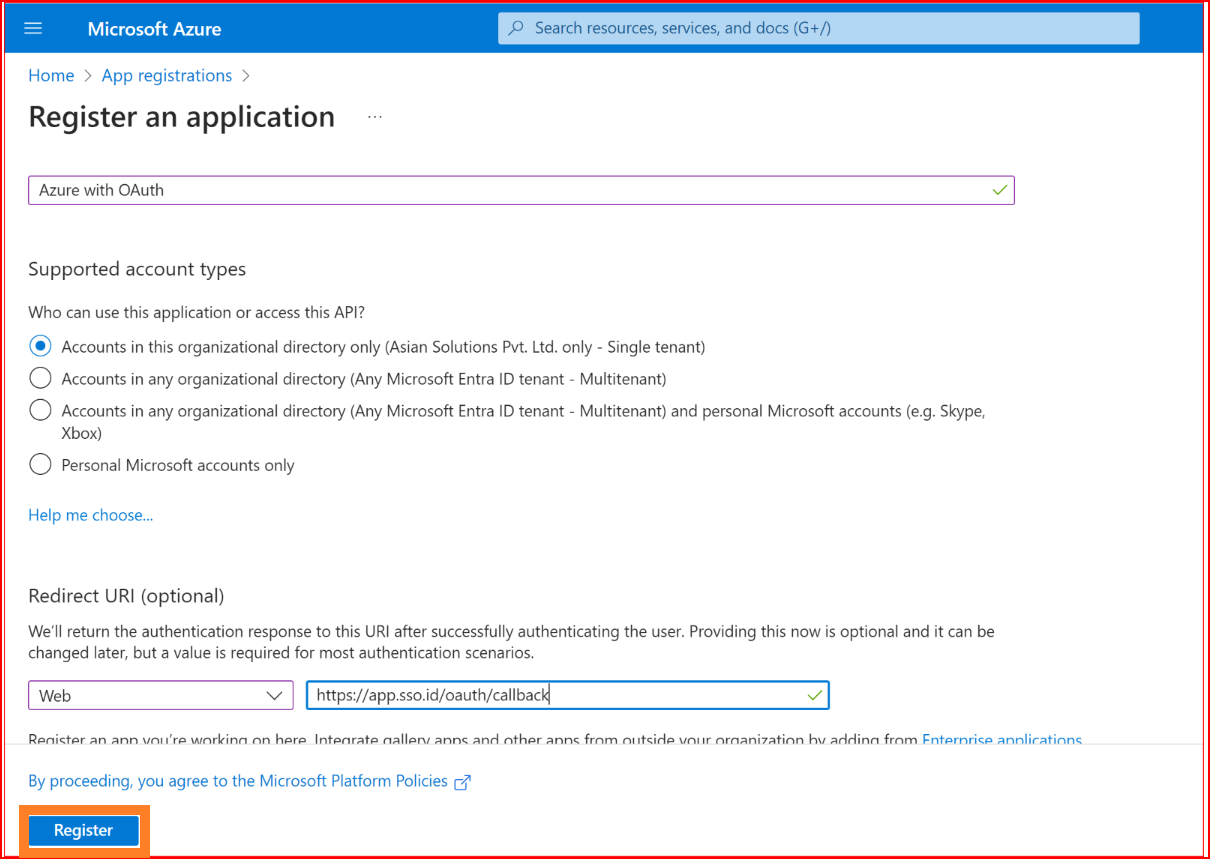
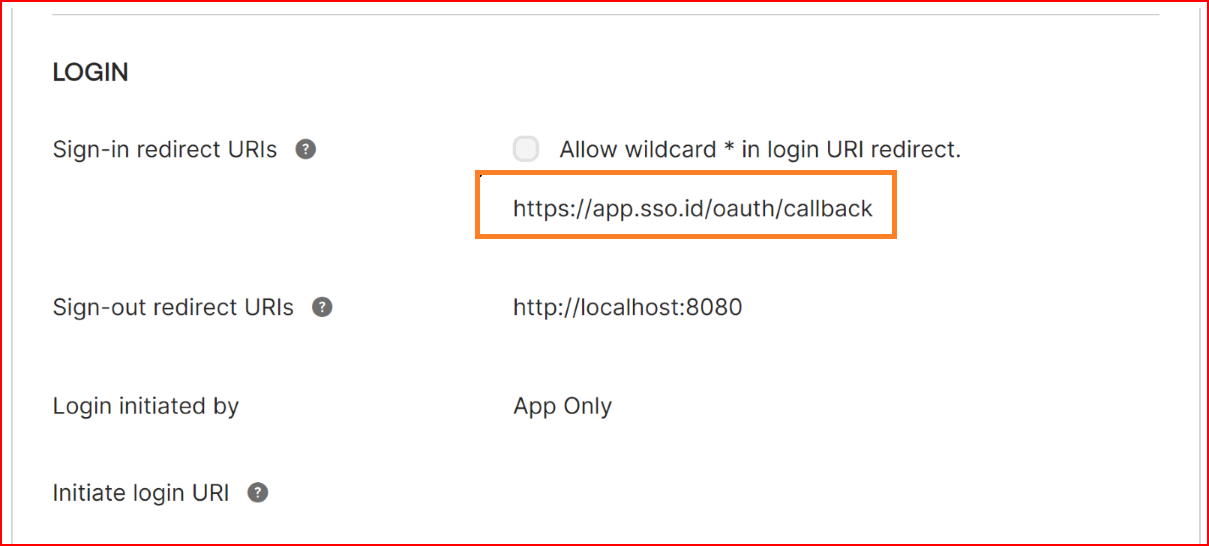
Configure your application name. Choose supported account types based on your login requirements. For instance, in this example, we are permitting accounts in this organizational directory to access newly created applications. Remember to set the authorized redirect URL as https://app.sso.id/oauth/callback Paste this URL into the Redirect URI input field, ensuring you select "Web" as the type. Click on "Register" to complete the process.
Configure App Credentials
Go to the "Certificates & Secrets" section of your application.
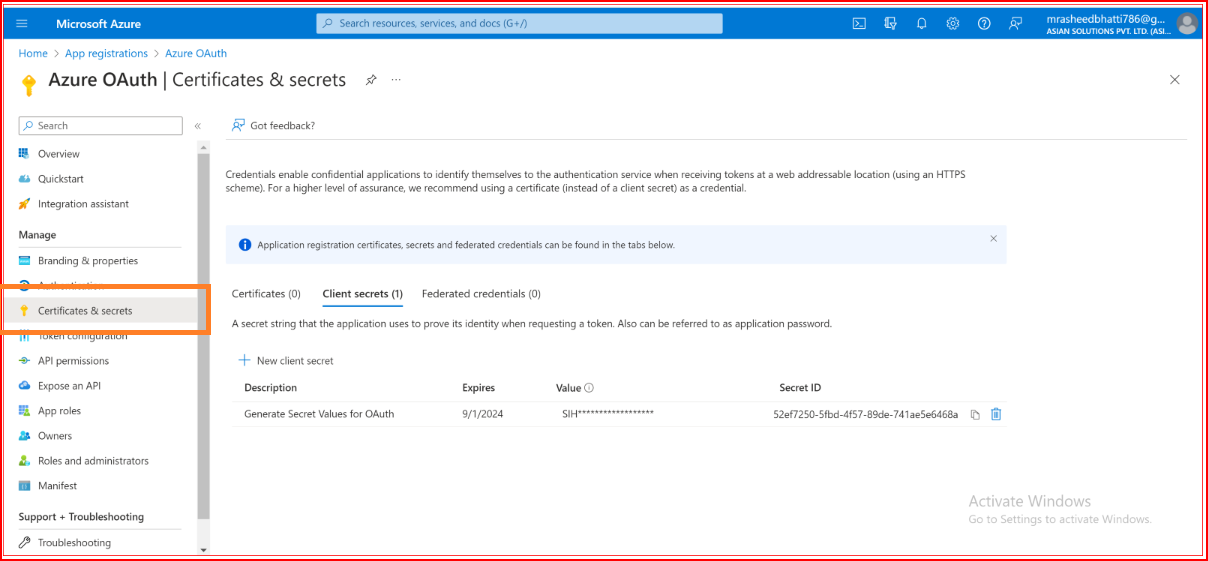
Click the New client secret button.
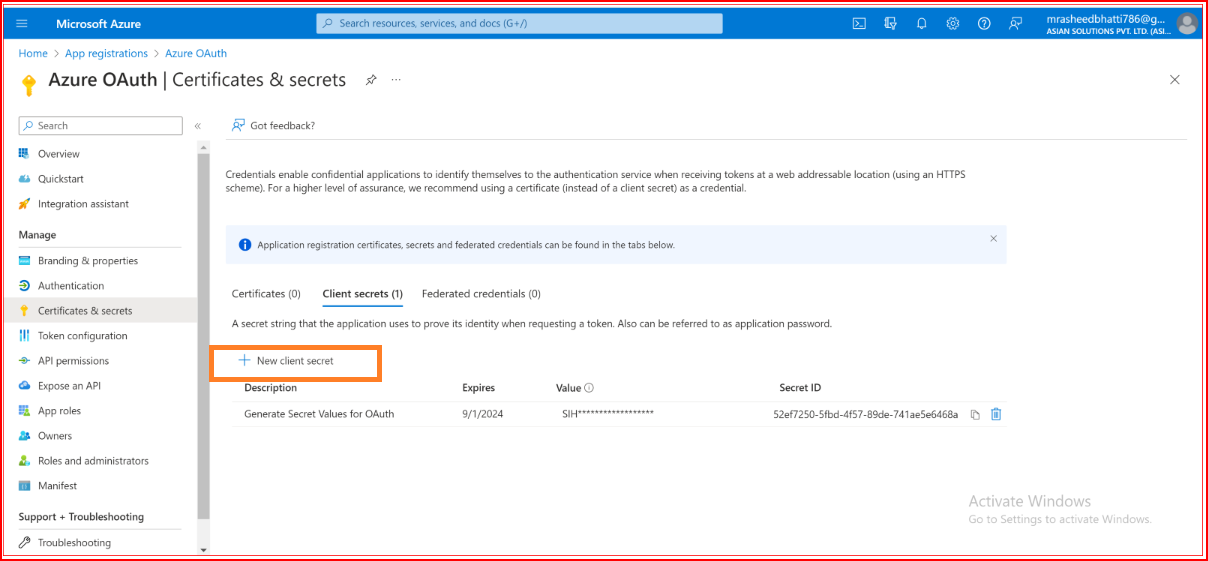
Provide a description and set an expiration for your secret.
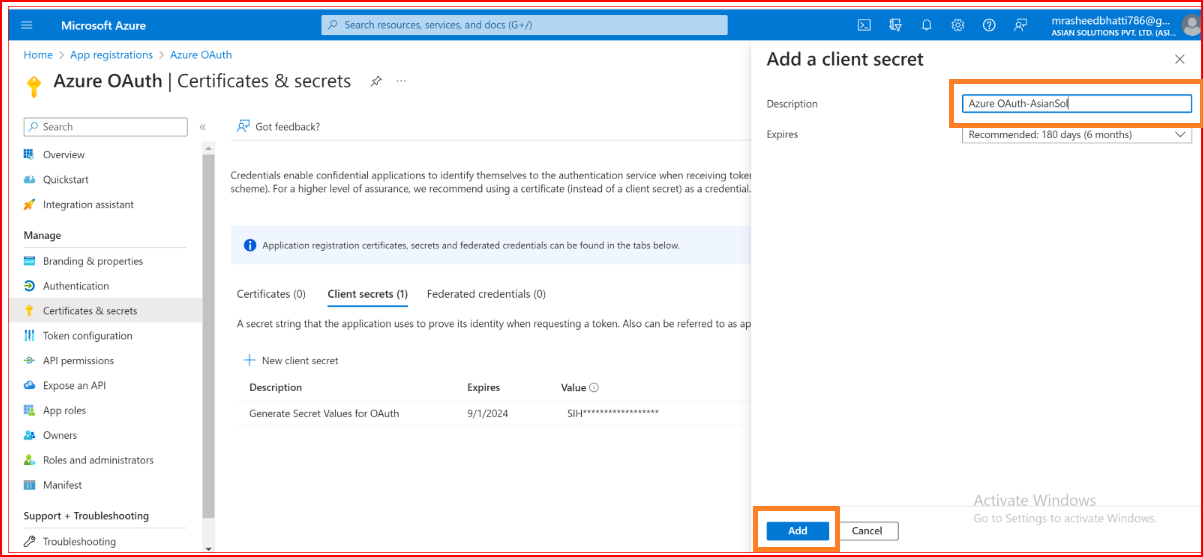
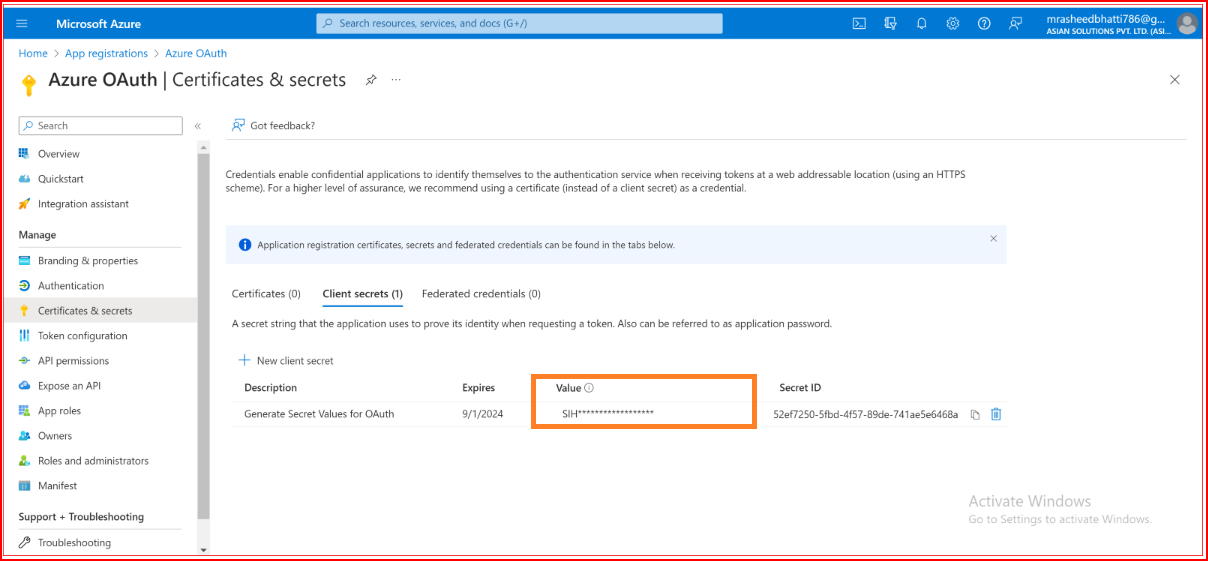
Press the "Add" button. Once your secret is generated, copy its value.
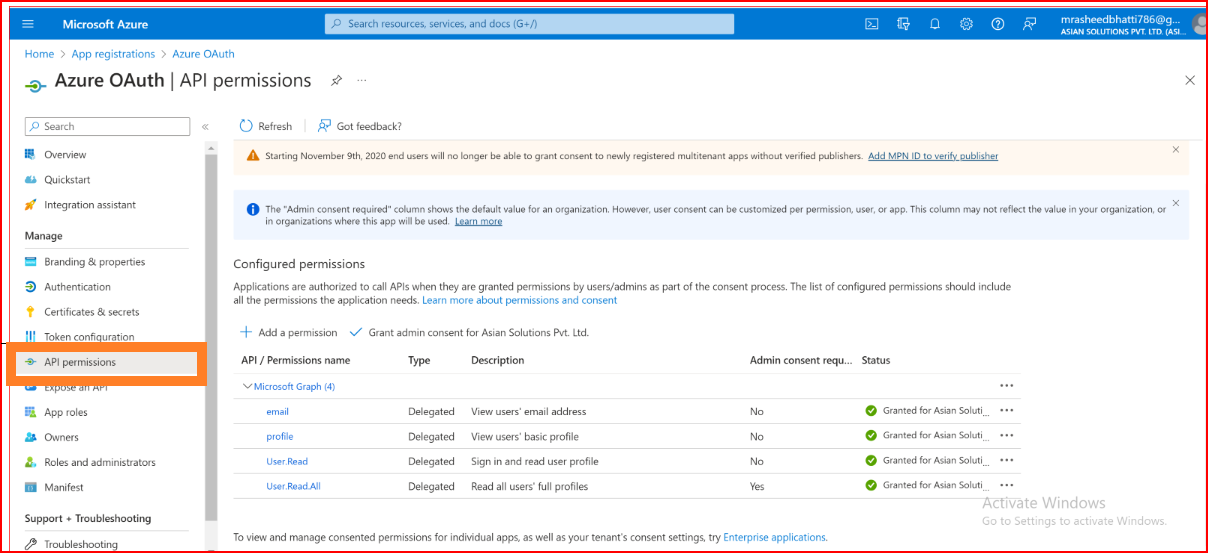
Configured permissions
In Azure, API permissions determine what operations an application can perform on resources. When configuring OAuth for Azure, you typically grant API permissions to your application. These permissions specify what resources the application can access and what operations it can perform on those resources. Here are some common API permissions used with OAuth in Azure
- User.Read Allows the app to read the signed-in user's profile
- User.Read.All Allows the app to read all users' full profiles
- Mail.Read Allows the app to read mail in all mailboxes
- Profile View users‘s basic profile
- Grant Admin Consent If your application requires admin consent for the permissions it requests, you need to obtain consent from a tenant administrator. Admin consent is required for application permissions and some delegated permissions. You can request admin consent by either using the Azure portal or programmatically using the admin consent endpoint
Create an OAuth Connection with Okta
OAuth (Open Authorization) is a widely used open standard for access delegation, commonly used as a framework for enabling Single Sign-On (SSO) in various applications and systems. While OAuth itself is not an SSO protocol, it can be utilized to enable SSO by allowing users to authenticate once and access multiple services without the need to log in repeatedly.
SSO.ID endpoint for Okta configuration with OAuth
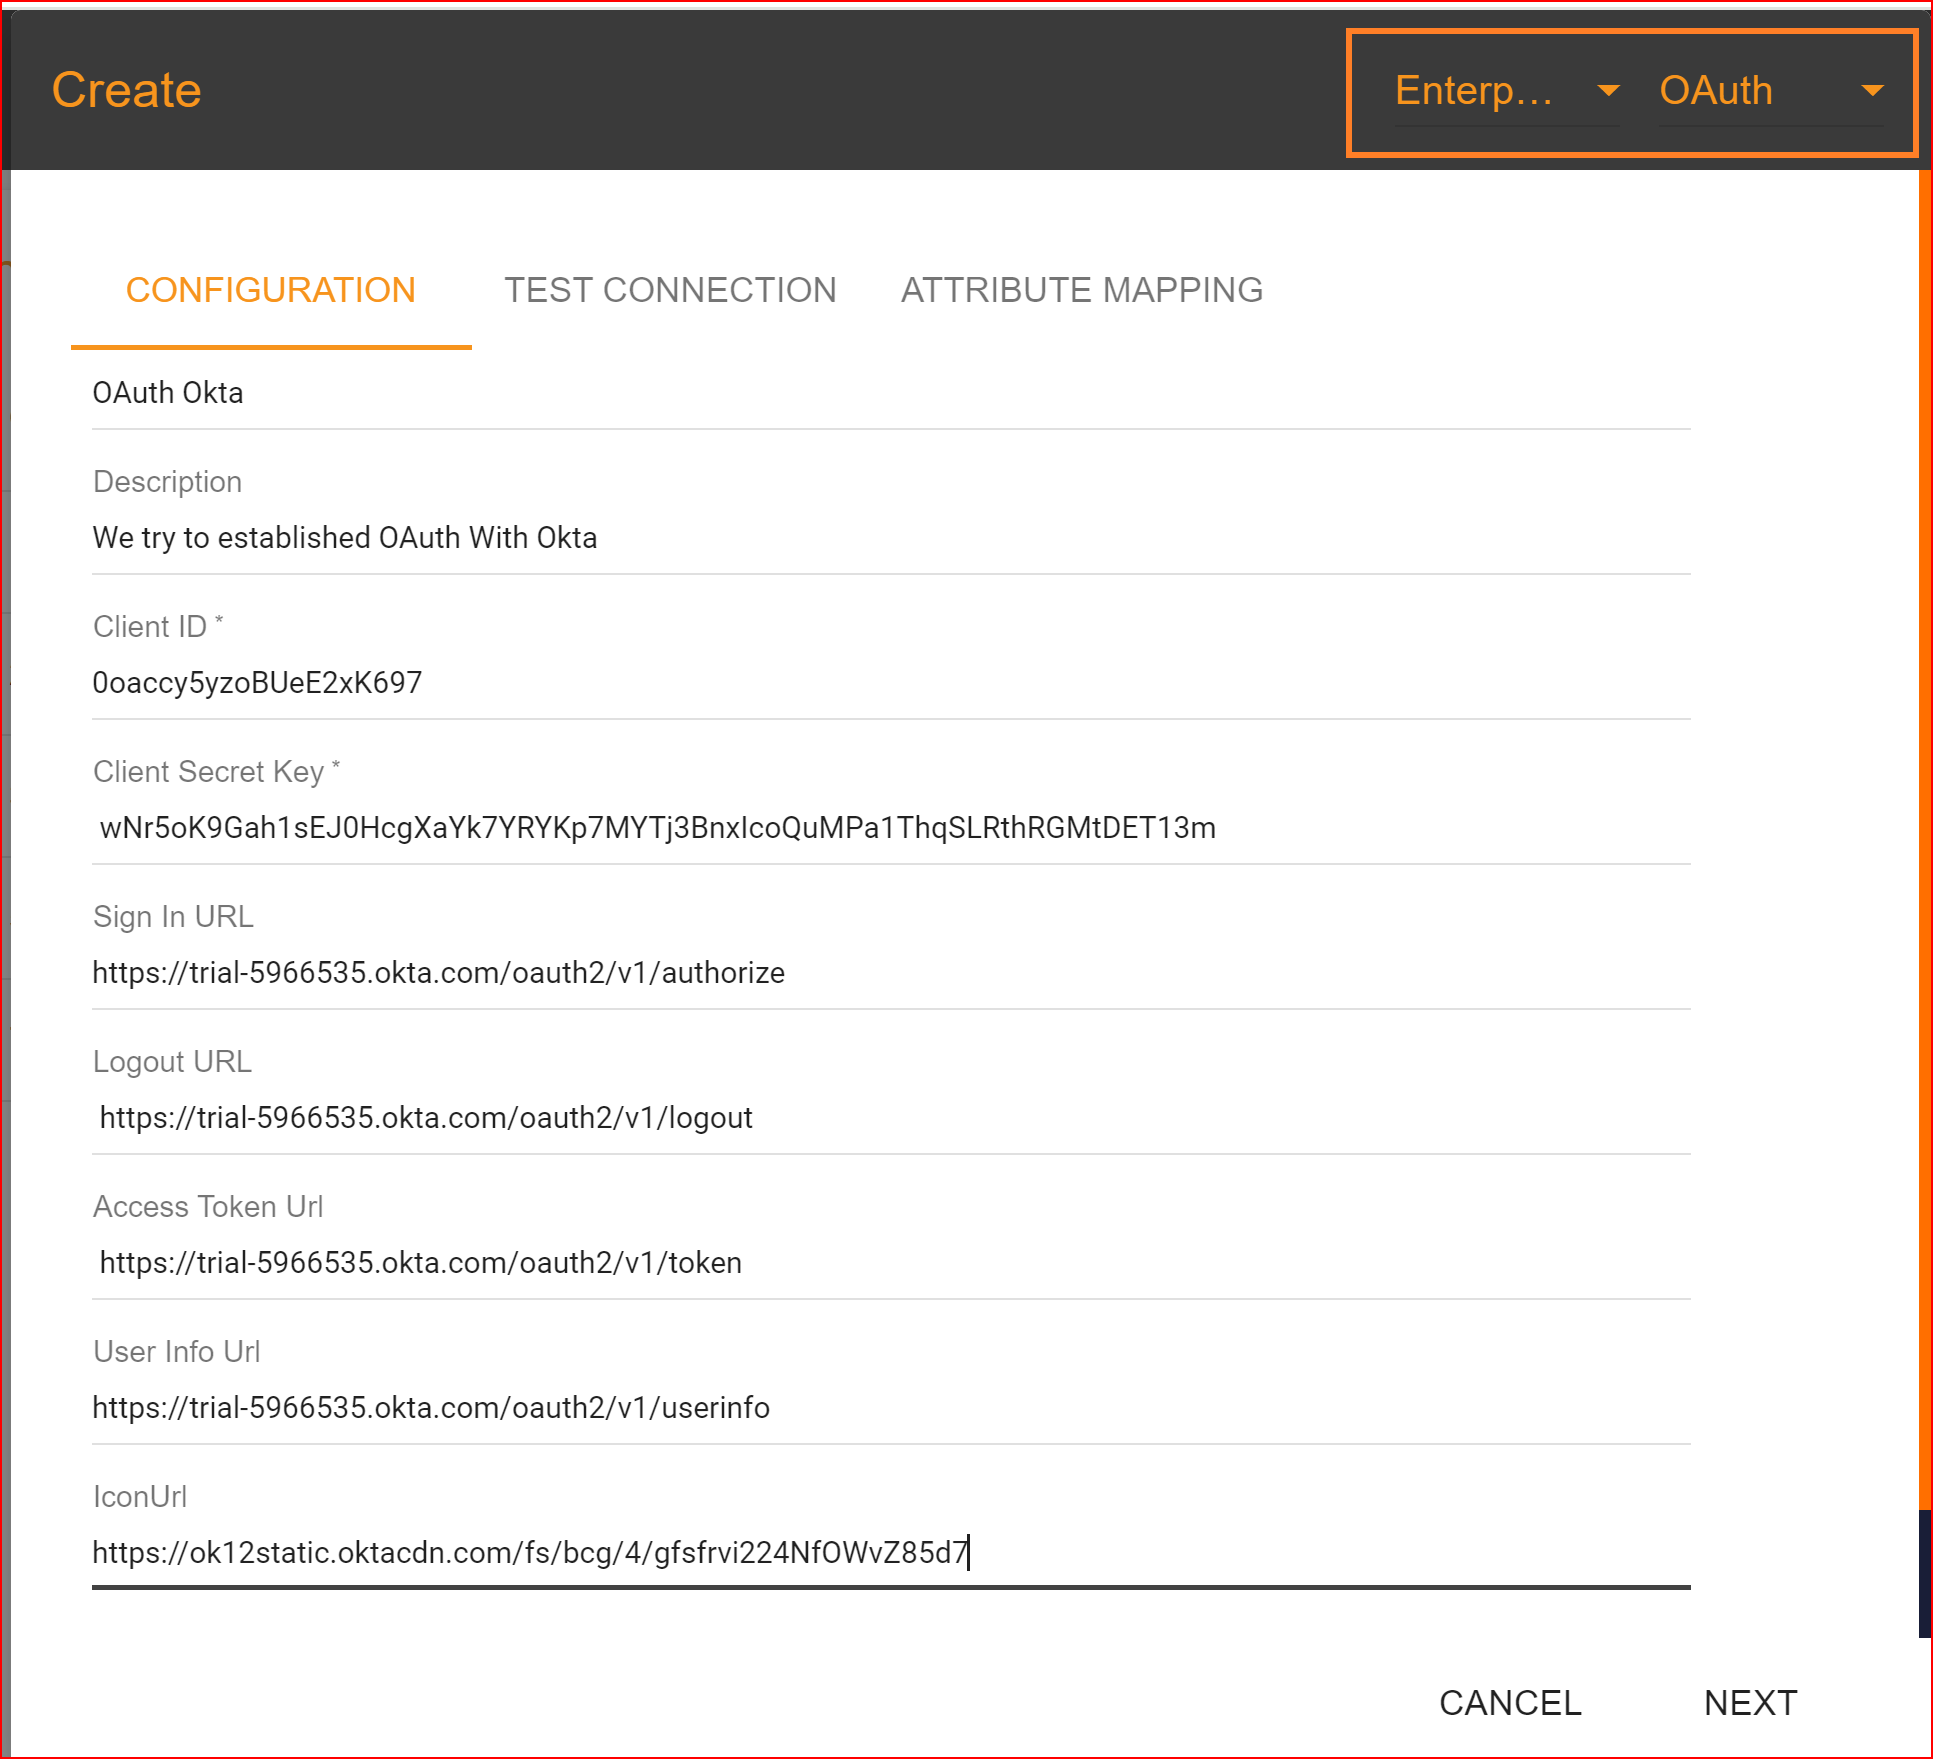
- Name Enter the valid and complete name of your newly generated connection.
- Description Write a short description of your connection.
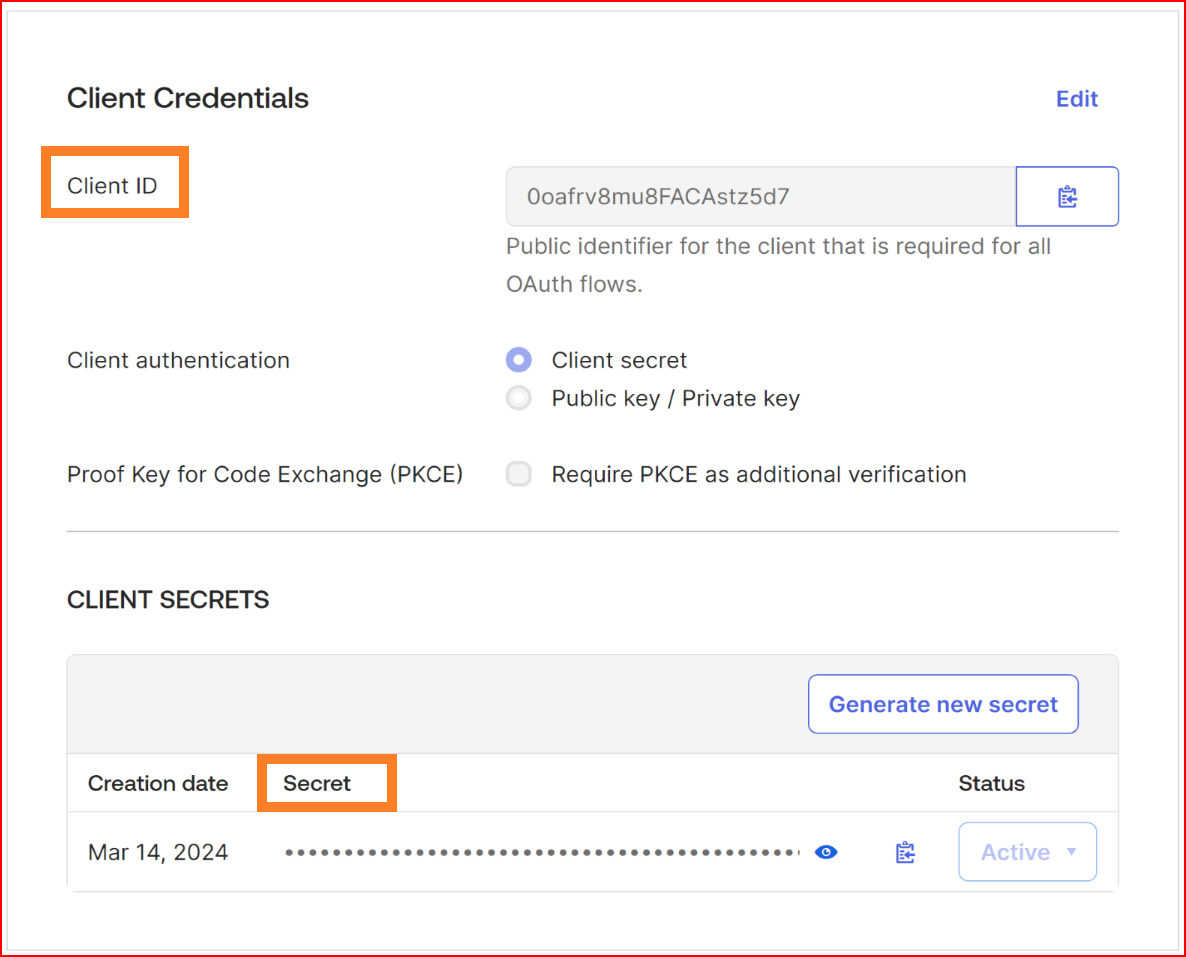
- Client ID The Client ID holds significant importance during the configuration procedure. Please provide the Client ID of your Okta application.
- Client Secret Key Kindly input the valid client secret key generated by your Okta application's new configuration.
- Sign in URL In Okta, the Sign-in URL with the OAuth protocol typically refers to the URL where users are redirected to authenticate themselves using OAuth. https://${yourOktaDomain}/oauth2/v1/authorize
- Logout URL In Okta, the Logout URL with the OAuth protocol typically refers to the URL where users are redirected after successfully logging out from their session. This URL is important for terminating the user's session and providing a smooth logout experience. https://${yourOktaDomain}/oauth2/v1/logout
- Access Token URL Please provide the URL for the token endpoint of your organization's authorization server. https://${yourOktaDomain}/oauth2/v1/token.
- User Info URL In Okta, the User Info URL with the OAuth protocol typically refers to the endpoint where user information is retrieved after successful authentication. This URL is crucial for obtaining additional details about the authenticated user, such as their profile information.<https://${yourOktaDomain}/v1/userinfo/li>
- Icon URL https://ok12static.oktacdn.com/fs/bcg/4/gfsfrvi224NfOWvZ85d7.
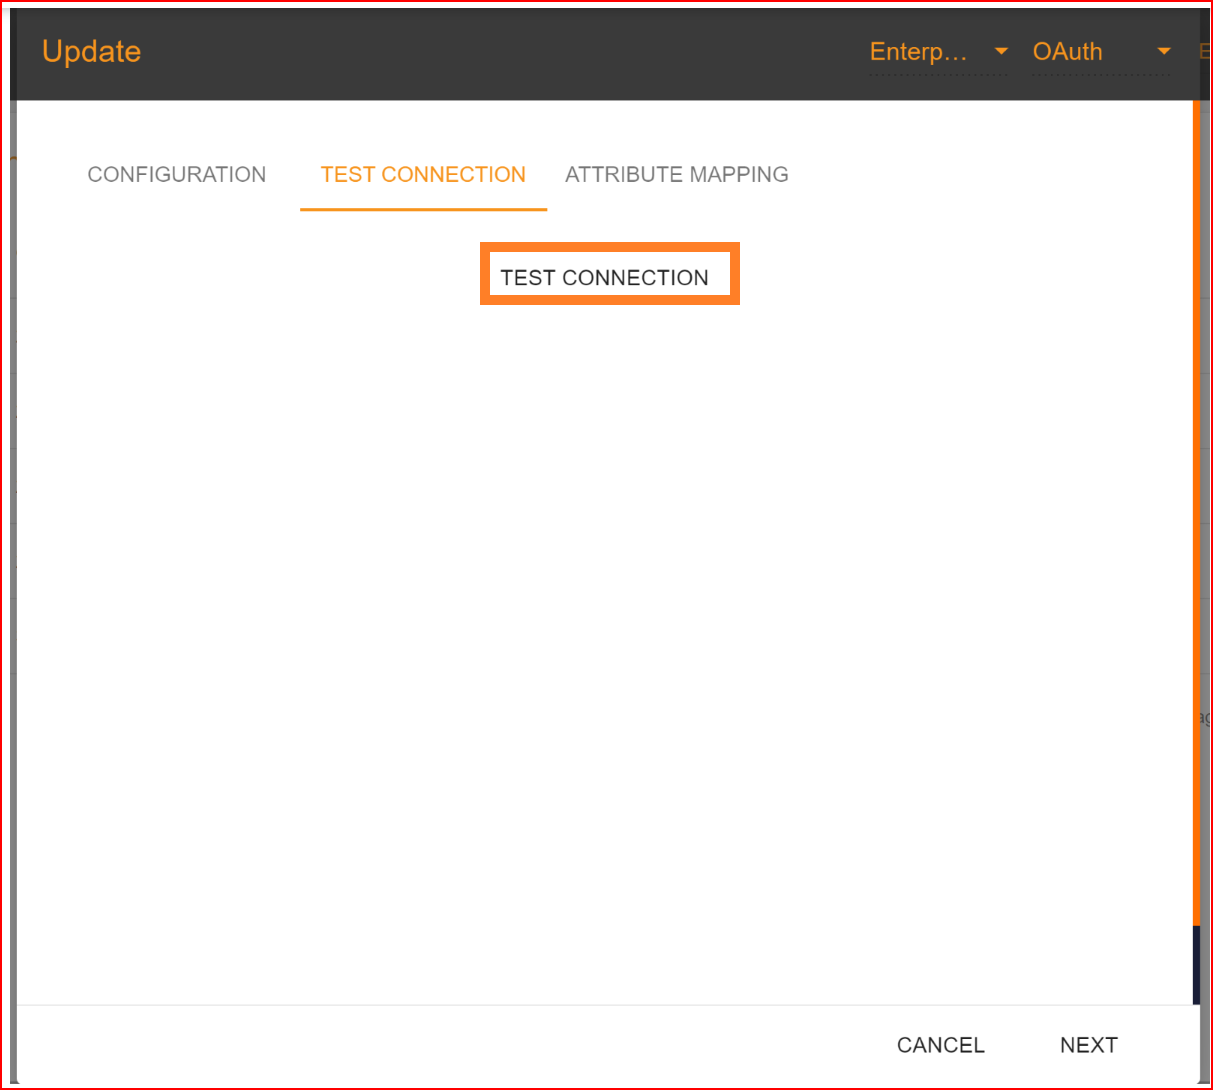
Test Connection
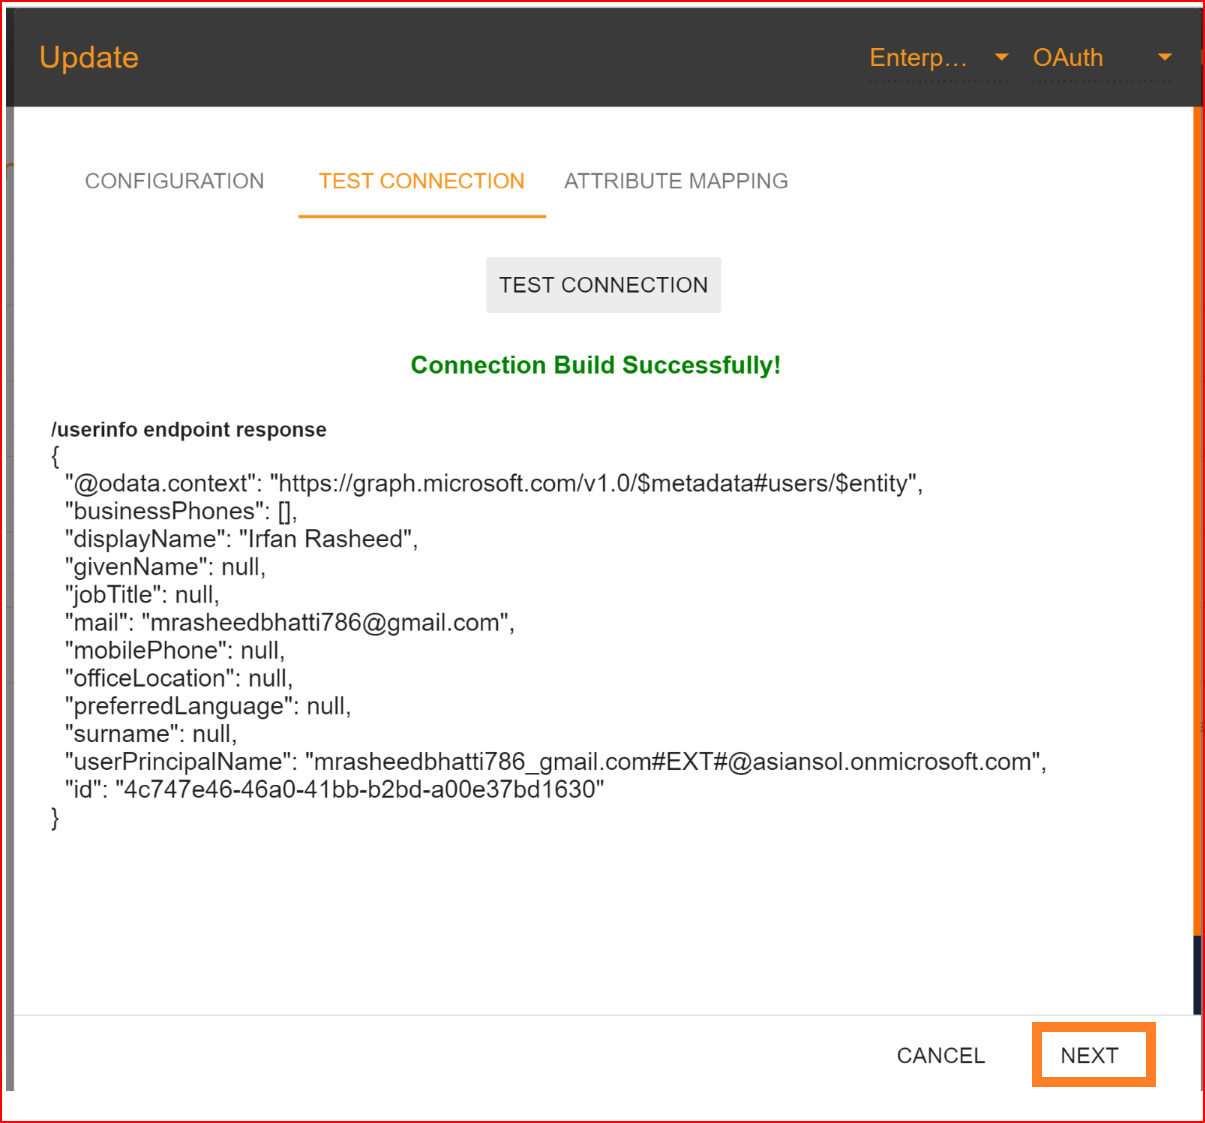
After setting up the Client ID, Client Secret, and Configuration URL, click the "NEXT" button to proceed to test the connection. In the testing section provided by SSO.ID, you can verify whether the connection has been successfully established. To perform the test, click the "TEST CONNECTION" button.
If all your configuration parameters are correct, including a valid Client ID, Client Secret, and other configuration URLs, you will see a message stating, "Connection built successfully," along with the user info endpoint response. Then, proceed by clicking the "NEXT" button to move on to attribute mapping.
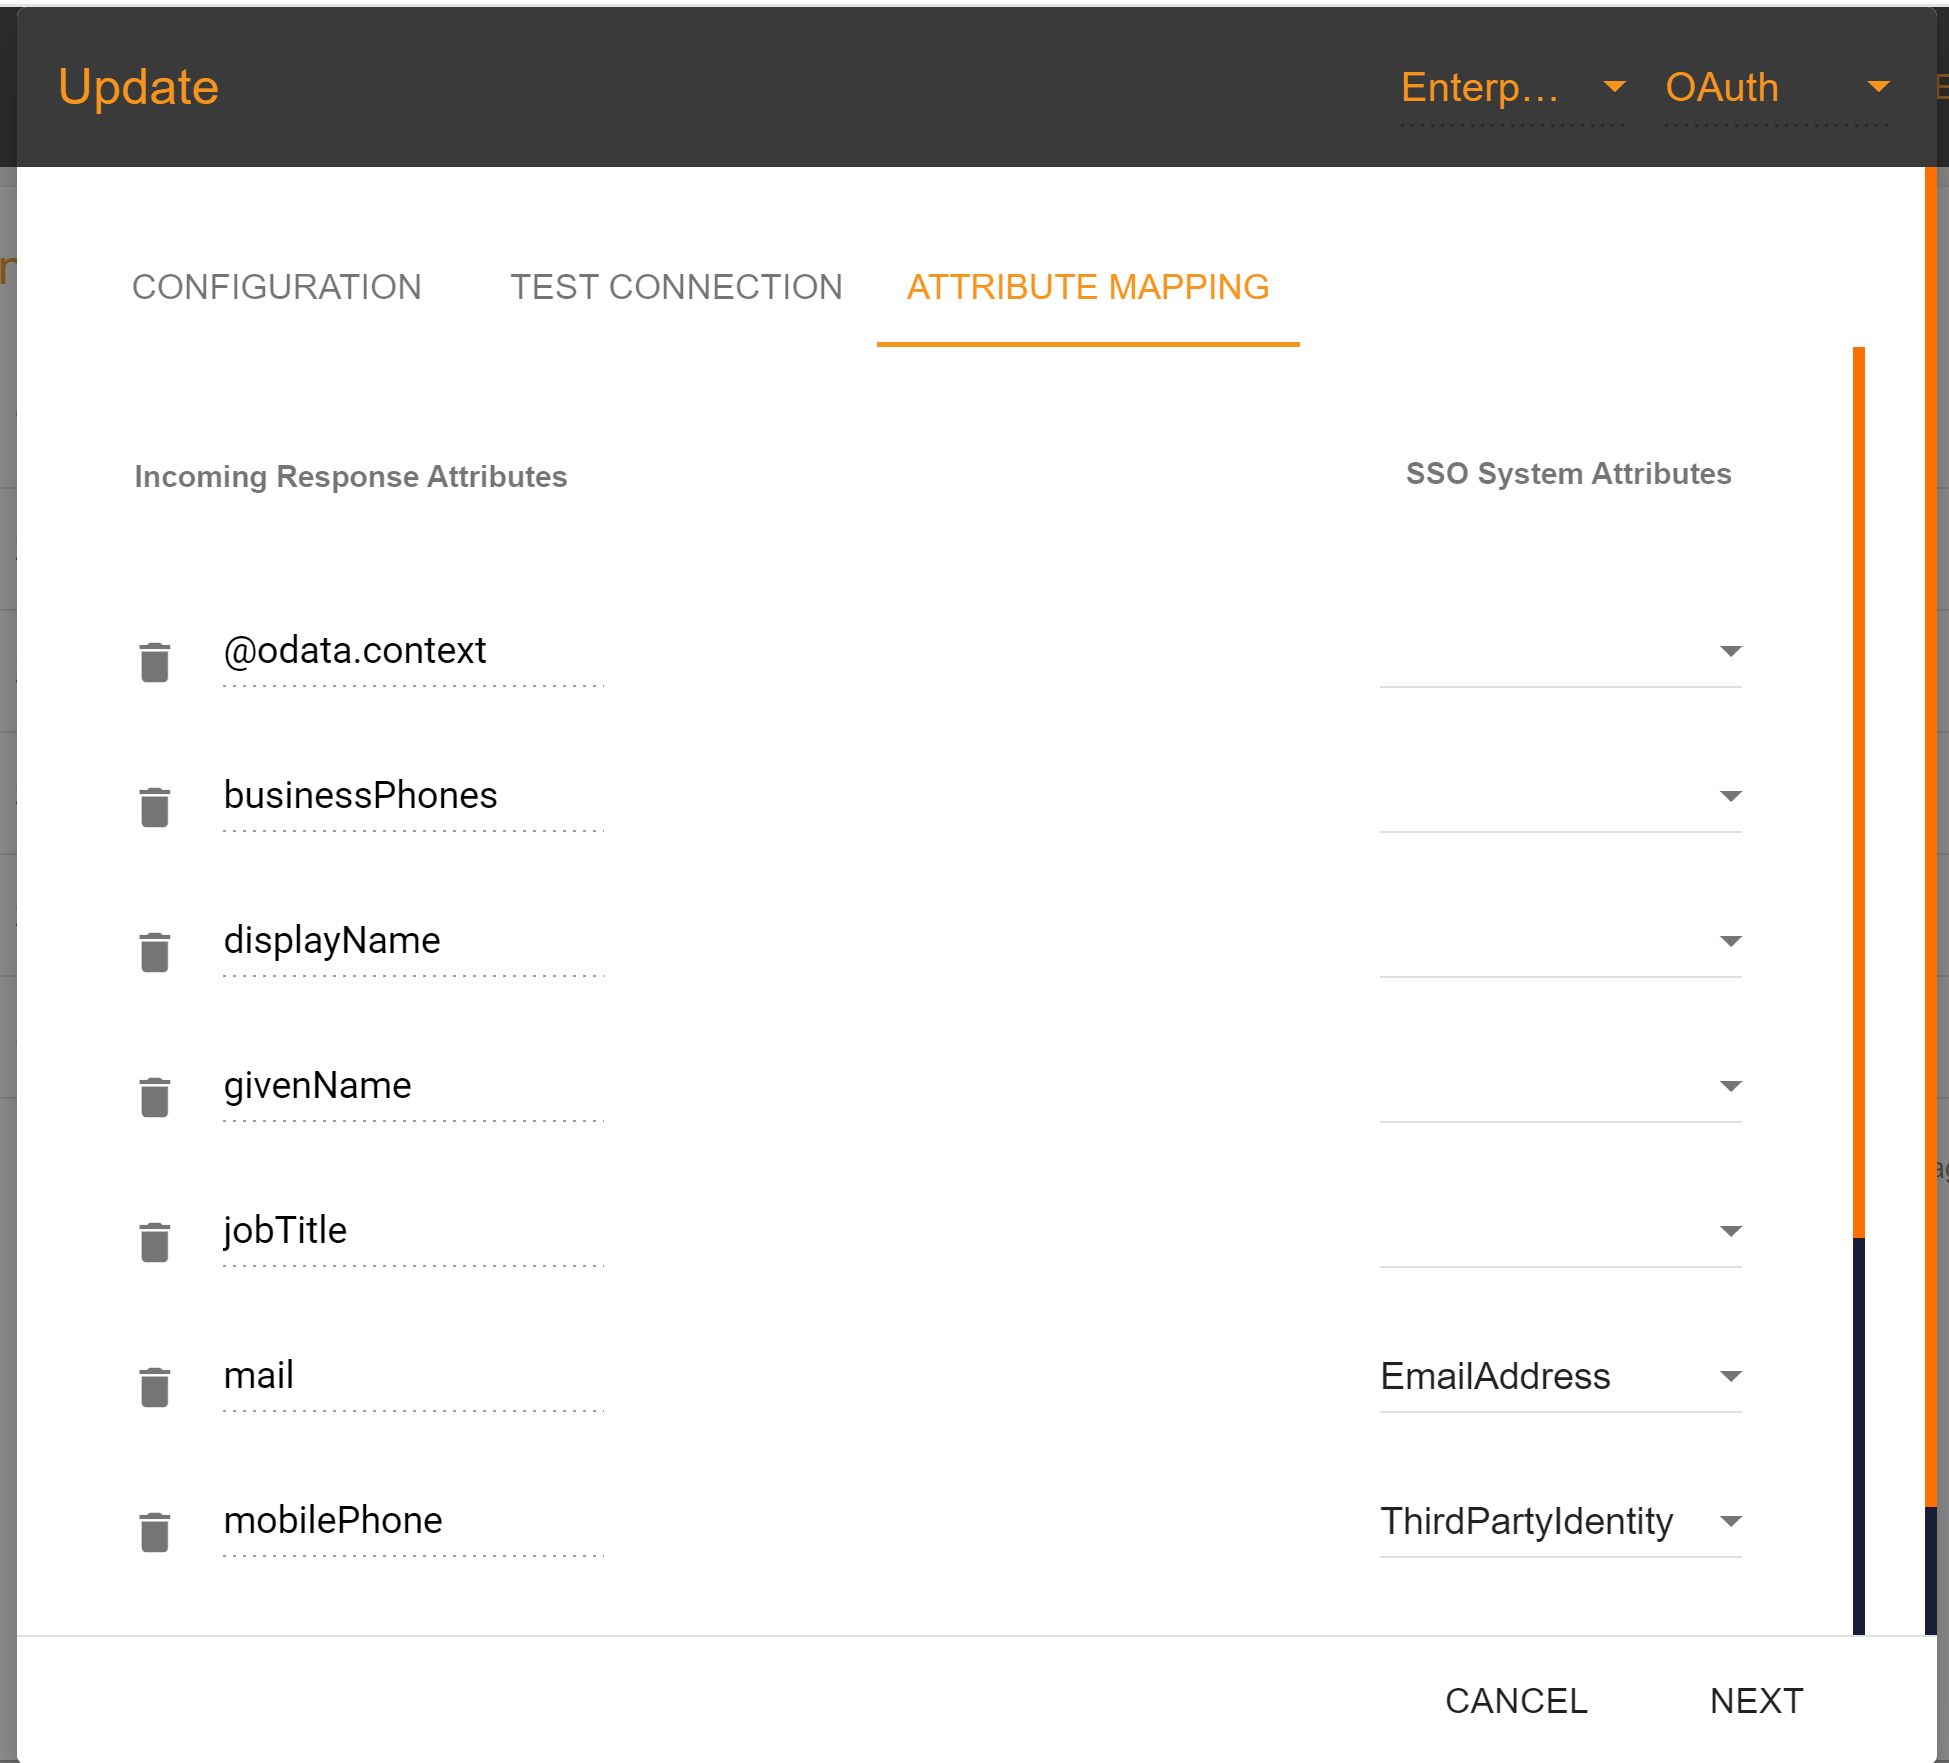
Attribute Mapping
The "Email Address" attribute is mandatory in the attribute mapping section, while other attributes are optional. After completing the attribute mapping, click the "Update" button to finalize the connection establishment process, which is now completed.
Attribute mapping correctly
To check the attribute mapping process in the SSO.ID, navigate your application configuration setting.

After configuration setting, go to Connection section and enable both OAuth Okta connection and auto provisioning. What is Auto Provisioning: Auto-provisioning in Single Sign-On Identity (SSO.ID) refers to the automatic creation and management of user accounts within applications or services based on the user's authentication through the SSO system. Note: To verify the attribute mapping process, please ensure that when Auto Provisioning is enabled, the user has not already registered in the SSO system. After enabling it, you'll see the Azure OAuth connection details in the redirect Uniform Resource Identifier (URI) of your application.

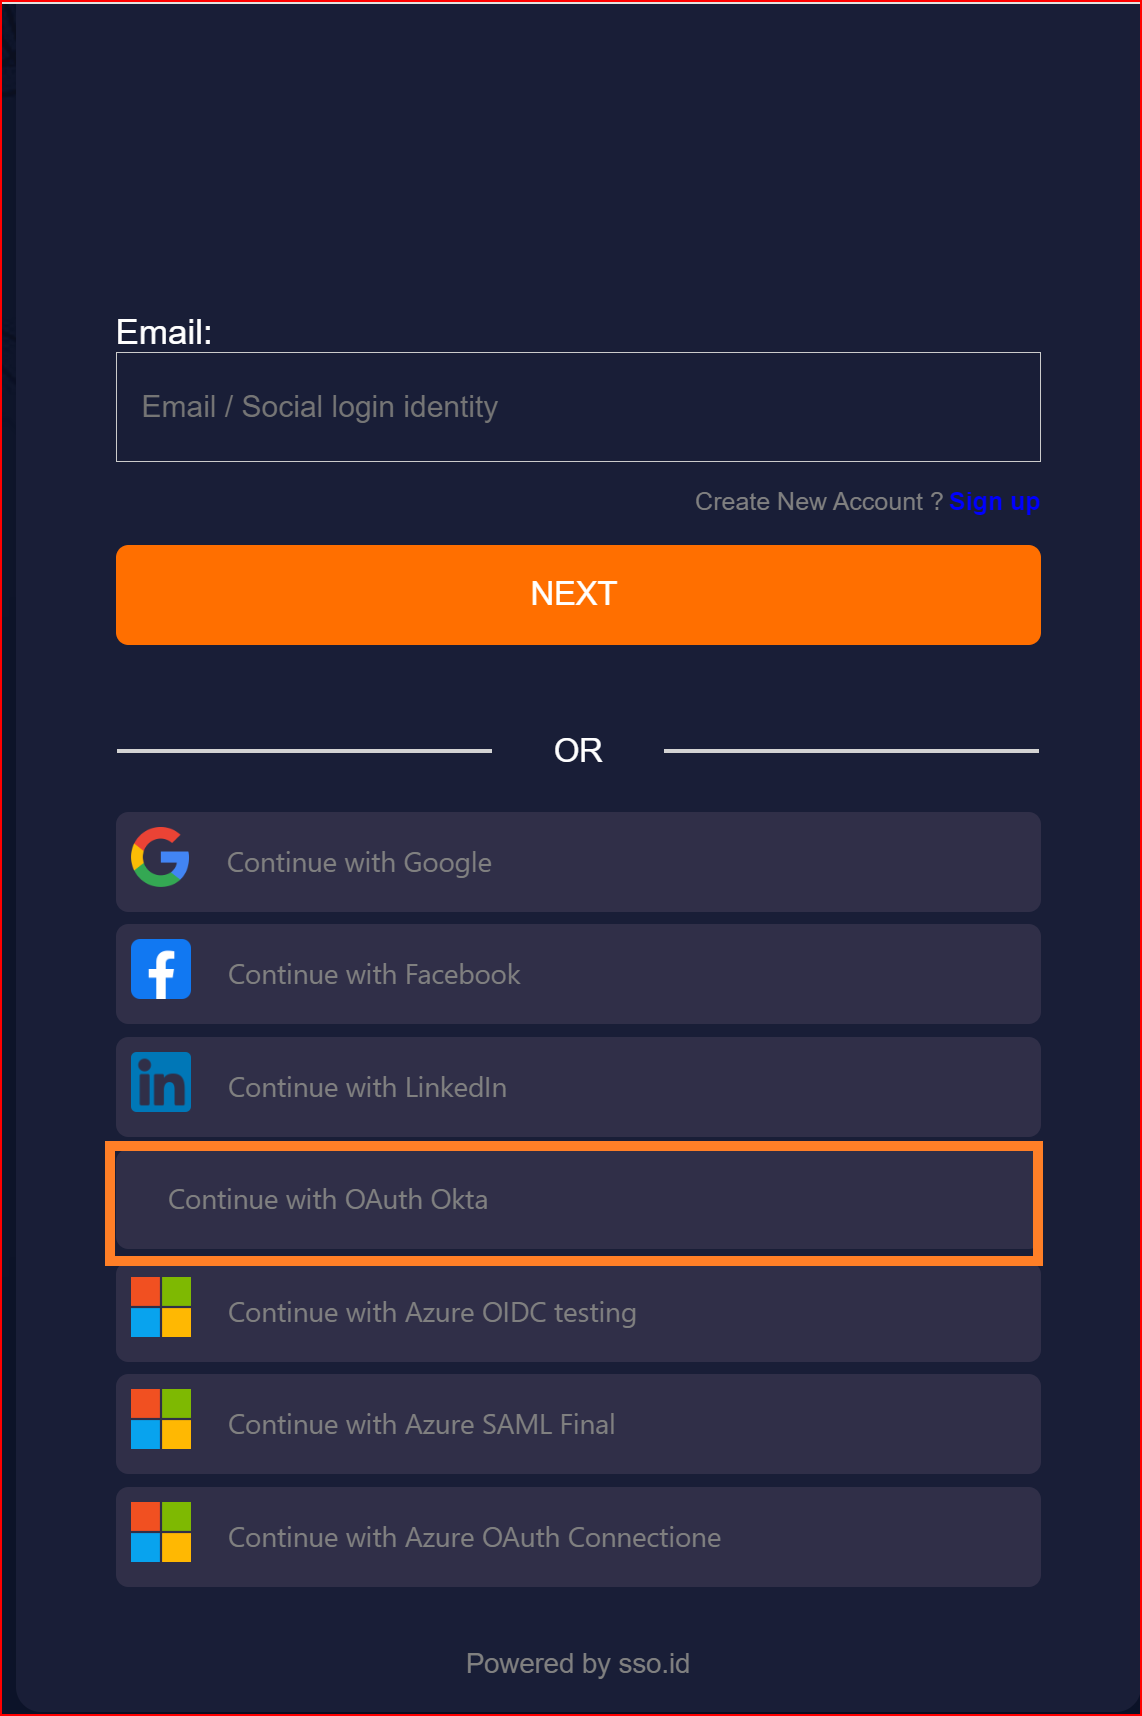
To confirm that the connection is properly set up, look for the "Sign in with SSO" button on the redirect URI of your application.
Here, you will find all the established connections that you allowed within the application. Now, you should click on the "Continue with OAuth Okta Connection" connection, which represents our newly established connection.
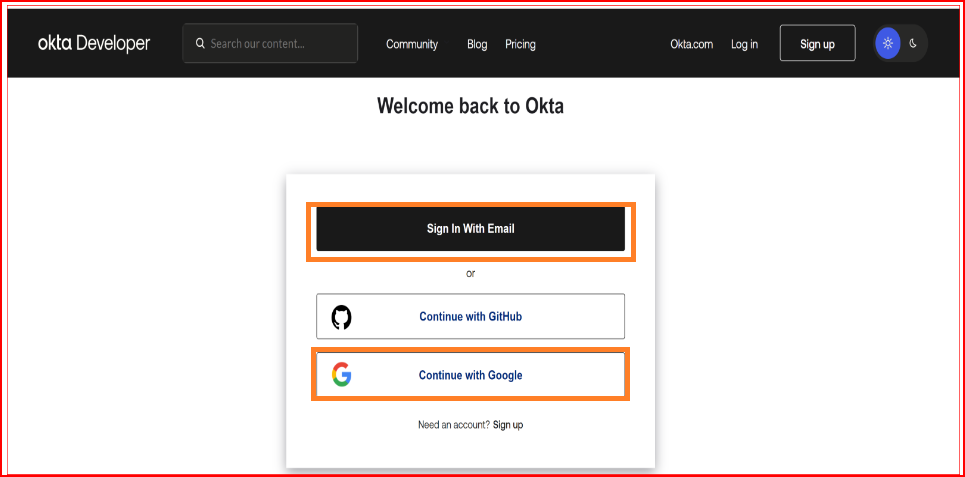
Finally, we have successfully logged into our application using the OAuth protocol with the Okta application.
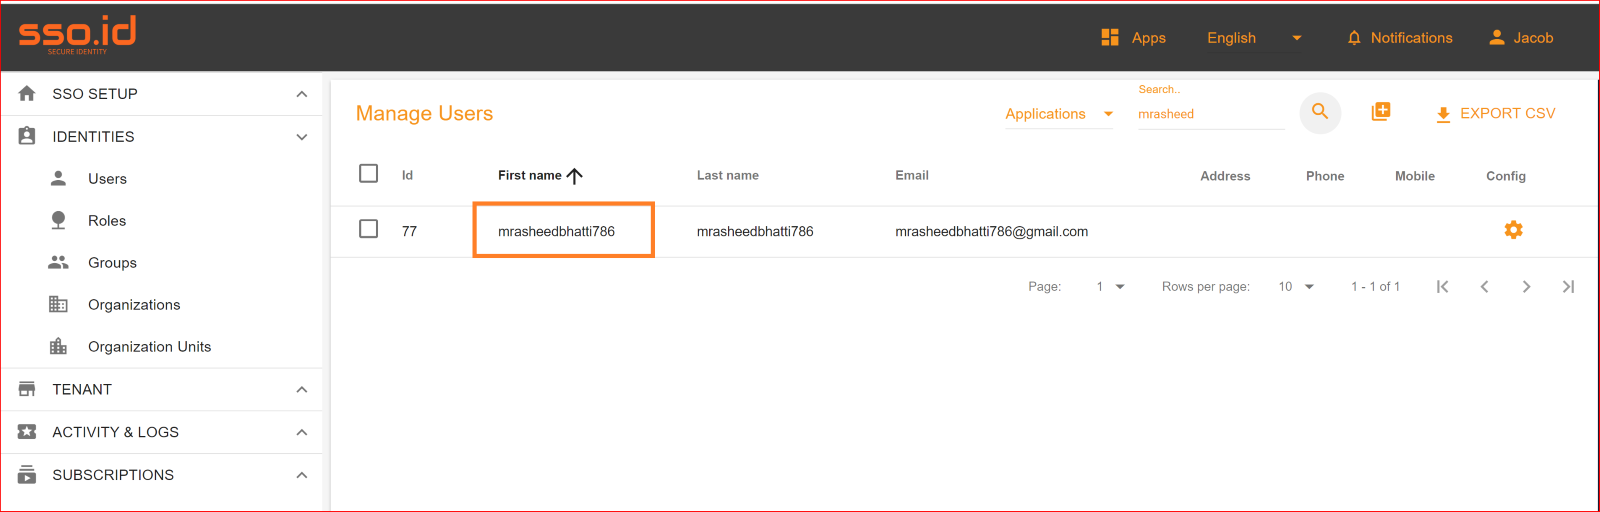
To check the auto-provisioning and attribute mapping process, you should navigate to the user management section of your SSO.ID provider's dashboard. Ensure that the user is successfully created through the Azure OAuth connection with the attributes you have specified in the attribute mapping settings.
Steps to Generate an Okta Application with OAuth
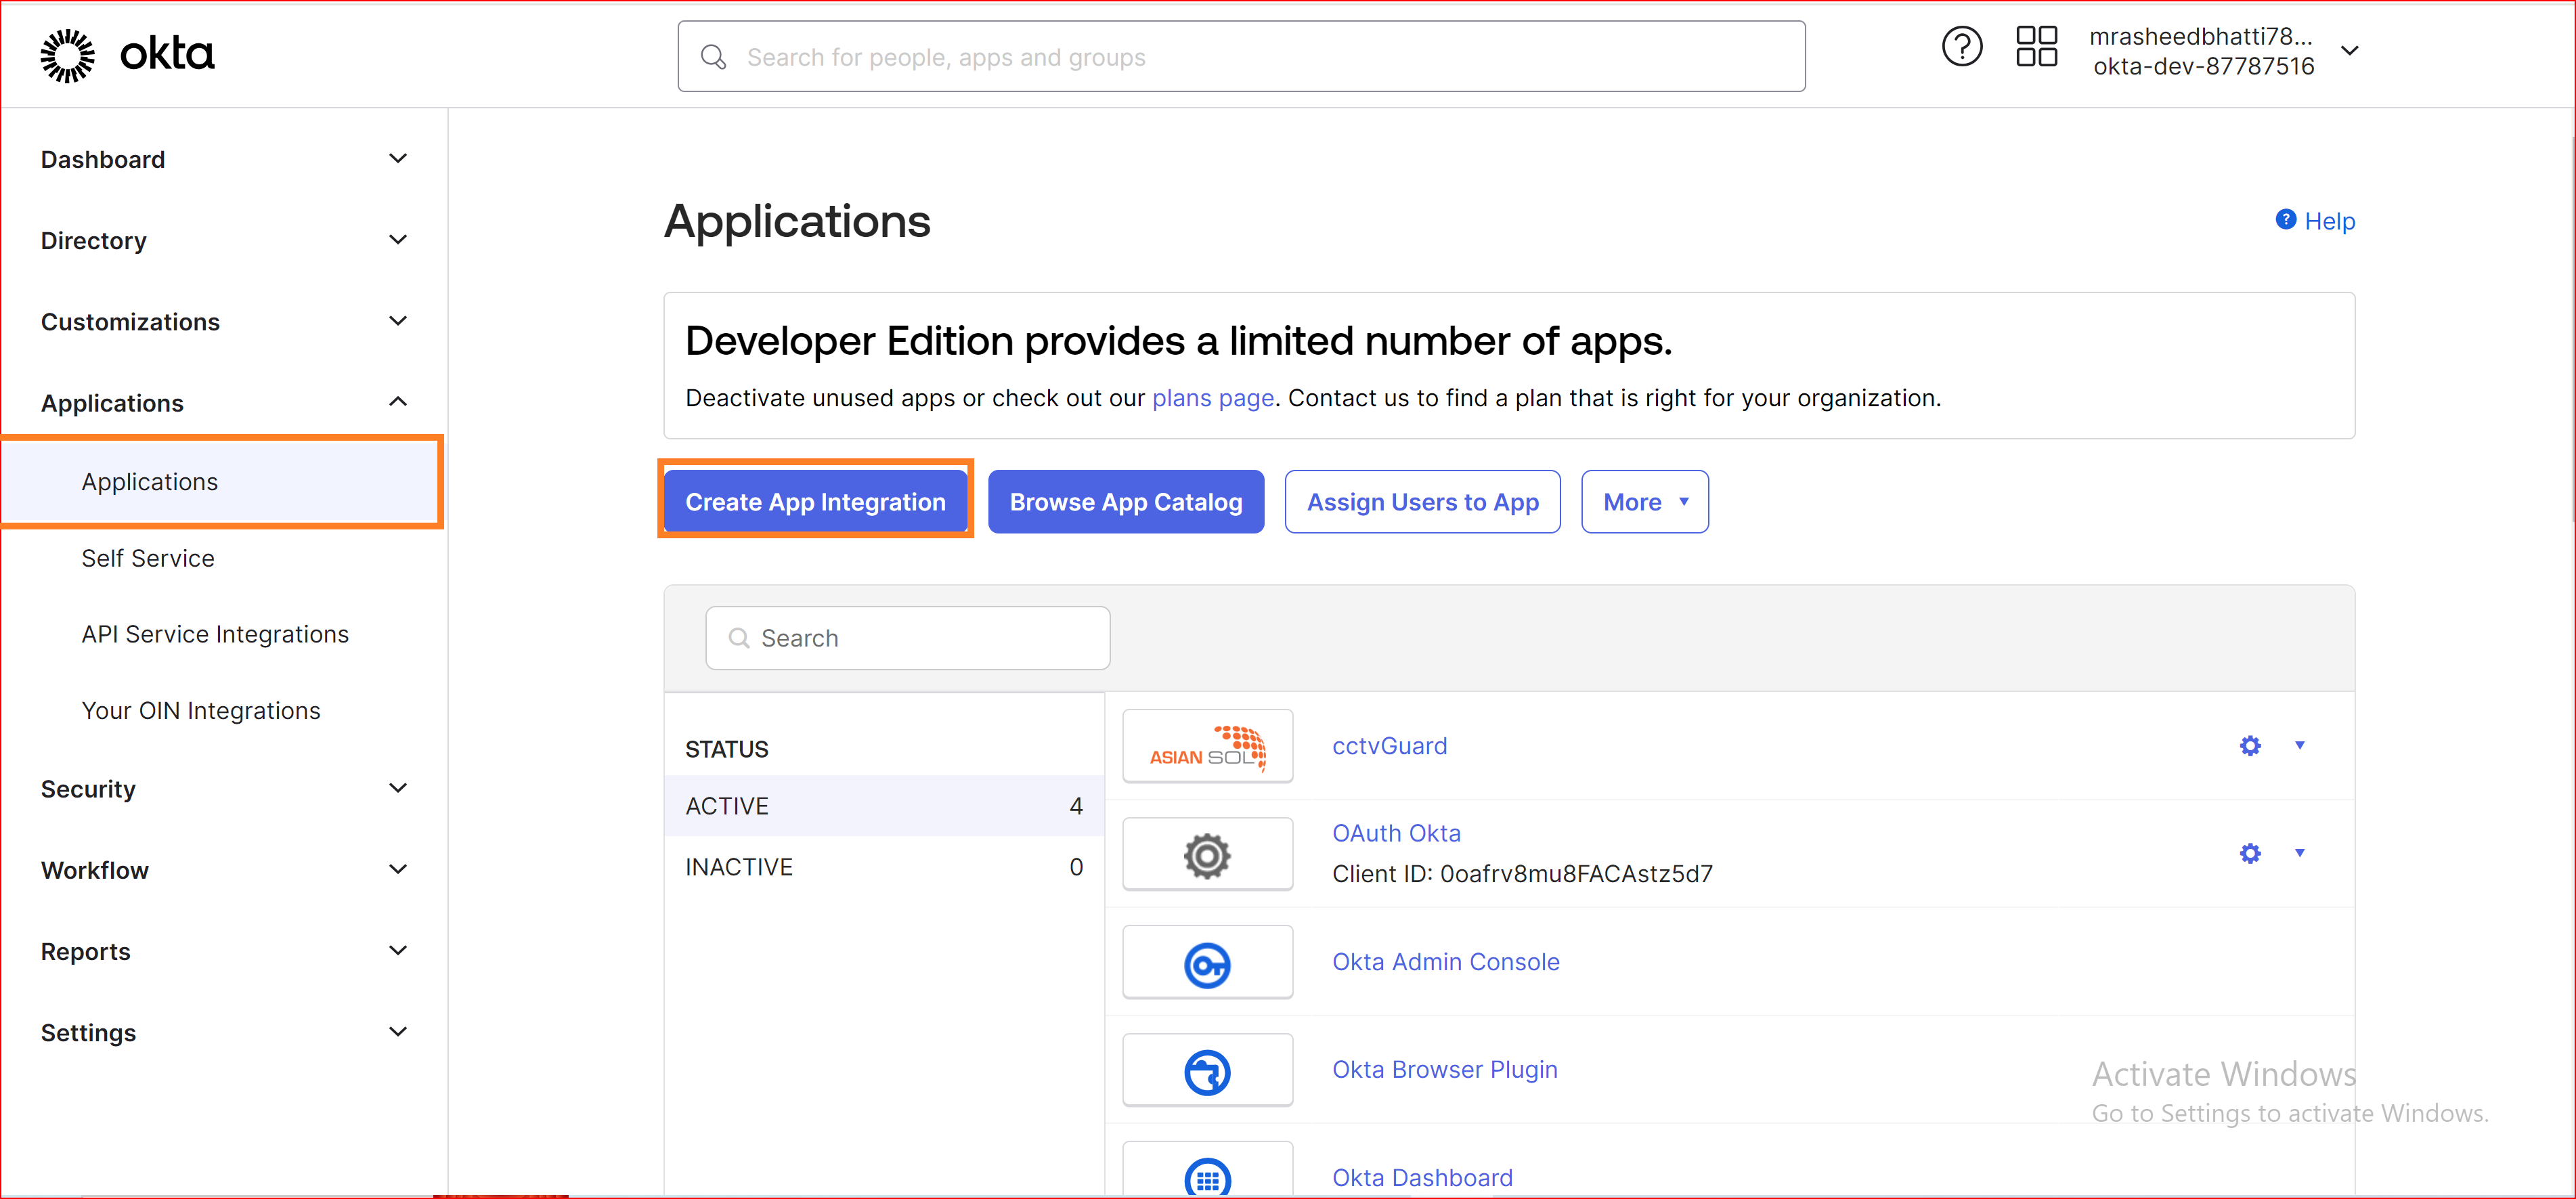
Access the Okta Developer Console
Log in to your Okta Developer account at https://developer.okta.com/login/
Create a new OAuth Application
Once logged in, navigate to the "Applications" tab. Click on "Add Application" to start the process of creating a new application.
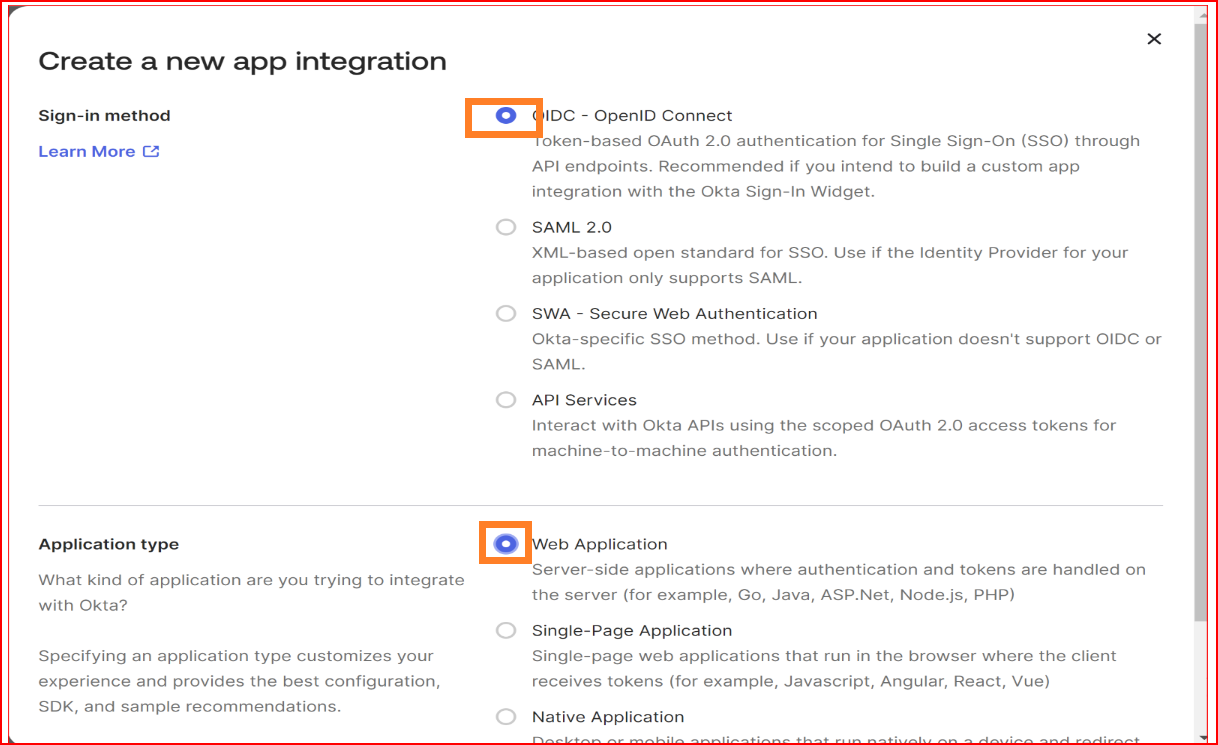
Choose Application Type
Please follow these steps to set up OAuth as the sign-in method: On the "Create a New App Integration" page, select "OIDC - Open ID Connect" as the sign-in method. Choose "Web Application" as the application type. This option makes it convenient to test scope-based access to Okta's APIs using an OAuth 2.0 bearer token. Click on the "Next" button to proceed.
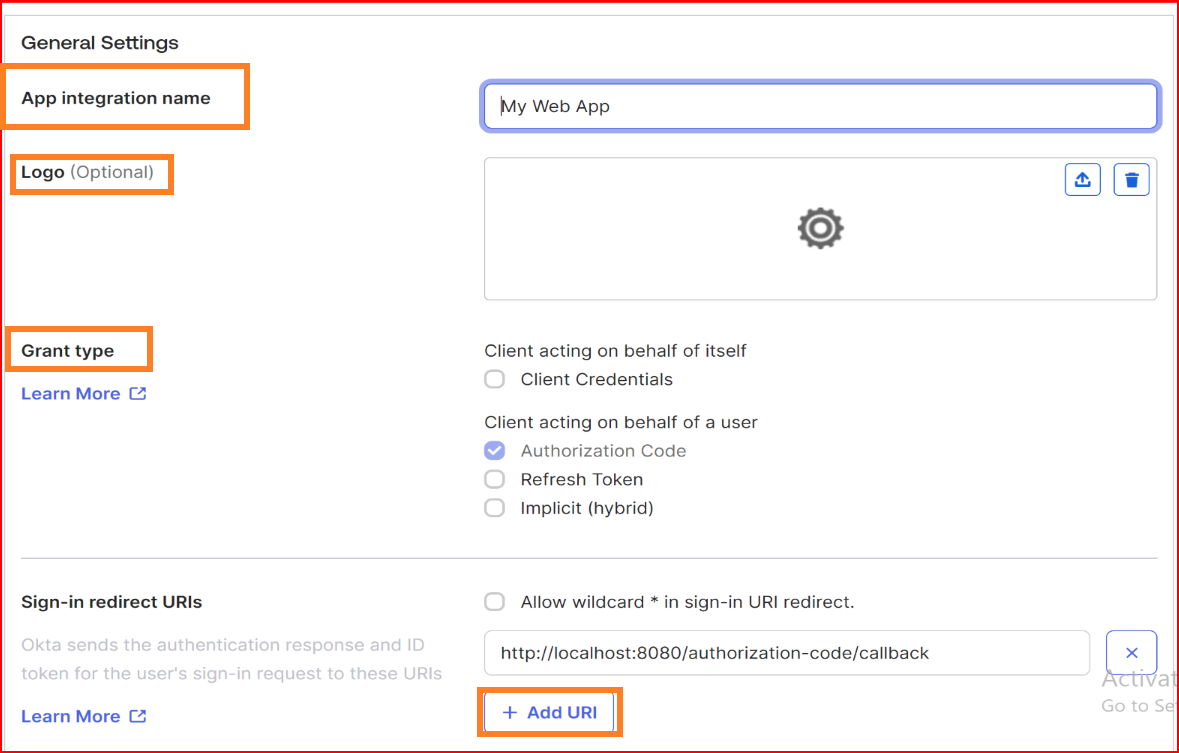
In General Settings
- App integration name Specify a name for your app integration.
- Logo Add a logo to accompany your app integration. The image file should be in either. Png, .jpg, or .gif format and should have a file size smaller than 1 MB. For optimal results, it is recommended to use a PNG image with a transparent background and landscape orientation. Ensure a minimum resolution of 420 x 120 pixels to prevent the need for upscaling the image.
- Grant type The Grant type requires an Authorization Code selected by default, and you cannot deselect the checkbox.
- Sign-in redirect URIs The sign-in redirect URI is the specific web address (URL) to which Okta sends the authentication response and ID token after processing the sign-in request. These URIs must be complete and precise, providing the full path or location where Okta forwards the authentication-related information. As a reference we provided SSO.ID complete Sign-in redirect URIs.
Assignment
In the Assignments section, choose "Limit access to selected groups" and either add a group or skip the group assignment. Click on the Assignments tab to verify that the correct users are assigned to the app. If you didn't assign users during the app integration creation, you need to add one or more users now.
Application Rate Limits
Optional. Navigate to the Application rate limits tab to modify the percentage of rate-limit capacity for this application. By default, each new application sets this percentage to 50%.
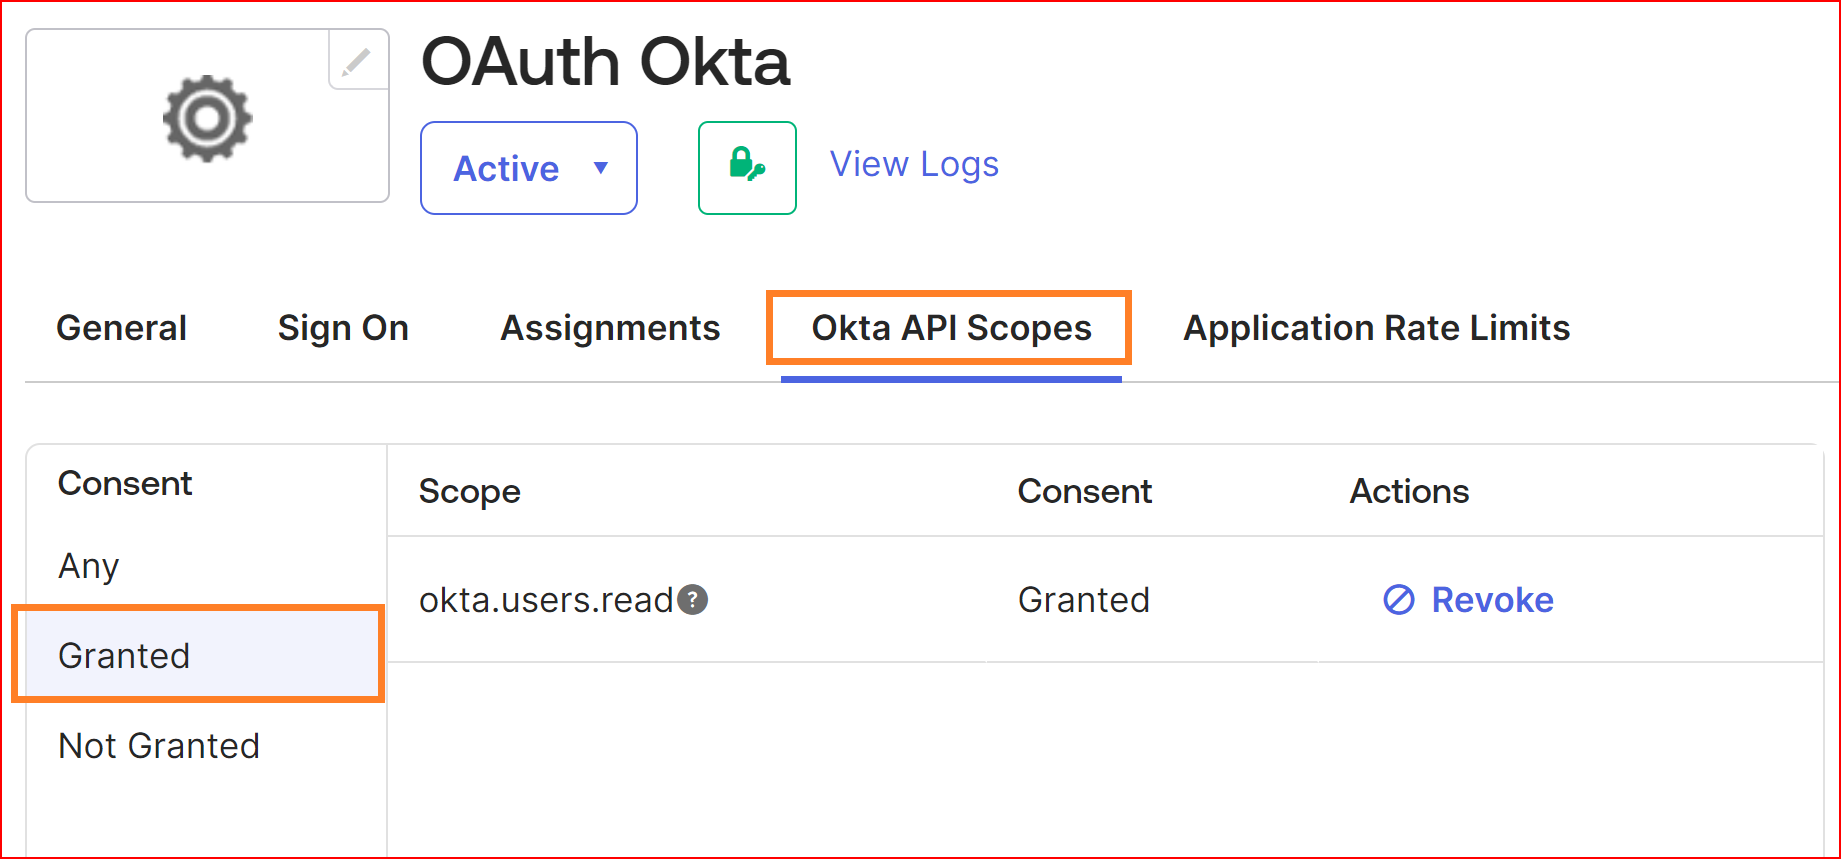
Okta API Scopes
Go to the Okta API Scopes tab and then click on "Grant" for each of the scopes you wish to include in the application's grant collection. For this example, ensure you grant access to `okta.users.read`.